Wayward Weekend 10

Happy Saturday! Sorry this is up late, when I scheduled this I thought it was the first already! Please scroll down to see what we did this week


Now it's your turn!

Wayward Weekend Guidelines:
1. We ask you follow our blog before linking up. Already following us? You could take it to another level and like us on Facebook
2. We ask that you visit and comment on others' blogs. This is the whole point =)
3. We ask that you please use this badge somewhere on your blog:


<a href="http://www.waywardgirlscrafts.com/search/label/wayward%20weekend"><img src="http://i192.photobucket.com/albums/z41/MamaBlogga/waywardweekend.png" border="0" alt="Wayward Weekend" /></a>

Wayward Weekend Features 9

Welcome welcome welcome! First off, I'd like to say we have some awesome readers! Thank you so much for supporting us!

We just started a Pinboard of our Wayward Weekend Features. You can see and follow it too! We've got all our features from the beginning of Wayward Weekend there. Check it out!

Here are our picks this week:

Jasmine's favorite: Tousled Day's Circle Skirt

Photobucket 

Brooke's favorite: Art is Beauty's Vintage Wall Art Roadside Rescue

Photobucket 

Jaime's favorite: Creatively Living's The "Bloom" Spring Pillow

Photobucket

Diana's Favorite: Pajama Crafter's Easter Wreath with Embellished Eggs

Photobucket 

Jordan's Favorite: Creatively Living's Decorating Shelves Using This and That


Photobucket

Now grab a button if you were featured!


<a href="http://www.waywardgirlscrafts.com/"><img src="https://blogger.googleusercontent.com/img/b/R29vZ2xl/AVvXsEh5C3bw30ZpheQE52iUDZ0fyIeNArGXyvazKgU64R8FCn5UkOnfXHSKFbbQcrJfNvwPp9zDZgVBwyUUloAGif8FlorKmNn-Y9ju9qq4CpH6Ot45dAwn9zMDc33QkLHVXjm5WcTGQ-BjfBs/s1600/wayward+weekend+featured.png" border="0" alt="Featured on Wayward Weekend at Wayward Girls Crafts" /></a>

Stop and smell the wisteria

Spring is here where we are. The wisteria is in full bloom in trees everywhere we go. I need a bumper sticker on my car that says, "I brake for wisteria!" I love to roll down my windows and breathe deeply when I see the vines by the road. Since there is a lot of wisteria around my school, I broke off a few branches and they are in water in my mini van. (Yes, even though the girls are grown I still have a mini van. It's paid for!)
So, today, even though it may not be spring where you are, take a minute to stop and enjoy whatever beauty is around you. I did for a few minutes, then I rushed over to help Brooke work on her house. (And so therefore, I don't have a post today.)
I was going to post about these little apple tart/pies I made for Ben's birthday. But, the pictures are on the camera at home. I will post it soon, but for today, stop and smell the wisteria (in whatever form it takes at your house.)

Hunger Games Nails

Late summer of 2010 I had just finished Harry Potter and the Deathly Hallows (in preparation for HP7 coming out that fall) and needed a new book to read. Jaime suggested the Hunger Games. I had heard of the book and thought I'd give it a shot so my mom brought it home one day and I got to reading. And 2 days later I was done (work, sleep and eating got in the way of me reading it even faster!) and dying to read the next two books. By the next week I had finished the series and was a Hunger Games fan. Friday afternoon, after I was done with class my friend and I went to see the Hunger Games. We just about jumped out of seats the entire movie we were so excited. We laughed and cried and ate a ton of food and it was all worth it. But before all that excitement we painted our nails.

We first started by painting our nails black. This is a nice background for flames of course.
Next was tricky. We used a yellow gold for this step. Ok now what you have to do is remove the polish from the brush (you know the drill, just getting the excess off using the neck of the polish bottle) then dip the tip in the polish so you have a small amount on the brush. Starting at the tip of your nail, brush lightly up. You'll want to flick it up slightly so it creates a wispy look half way up your nail. This is going to be the tip of your flames.
Now add orange starting at the tip of the nail again. This time go about 2/3 up the yellow. We still want to see the yellow.
Now add red at the tip covering up about half or less of the orange. With the orange and the red you don't need to be as careful when creating the wispy look since we're going to cover it up with sparkles.
Finally, to really make your flames burn bright, add a yellow and orange clear sparkle nail polish. Be generous at the tip of the nail and thin it out towards the tip of the flames. Go a little above the flames to make it really shine like flames. My friend also added a layer of larger gold sparkles to look like the fire was popping. It looked pretty dang good! Good luck and may the odds be ever in your favor.


PS I added an arrow to one nail using a straight pin. Simply paint on the pin some yellow gold and transfer a straight line carefully onto your nail. Then paint the tip of the pin with a small amount of yellow and apply the tip and end of the arrow. Now you're definitely ready to see Katniss and Peeta...and Gale :)

Bathroom Reveal!

I need to catch up with you. I have two unfulfilled promises that I never followed up on. You can slap my wrist!

 Promise # 1: I promised back in October that I would show you our costumes. I am disappointed to say we didn't win any contests but just as a refresher we went as X-Men. I was Storm, my hubby was Scott/Cyclops, Jasmine was Rogue, and PB was Professor Xavier.
PB looks like a little boy but that's okay it was only one night :) I should have made sure she had in her pink paci. Oh well! Her suit I showed in a tutorial in the link above and her "shirt and tie" were sewn onto a bib and the edges were tucked in her coat.

Promise #2:  I made a couple weeks before the costumes when I promised to show you our bathroom remodel. It did take us a while (3 months-ugh!) but it has been finished for a while so I need to make the grand reveal!  This project was definitely wayward! There were a ton of set backs but we finally finished around Christmas. It was nice to have our bathroom back finally!

A list of what we did:
  • Tore out the tile on the walls and replaced it with wainscoting
  • Replaced the vinyl flooring we put in right before we moved in with tile
  • Replaced the thresholds, baseboards, and quarter round
  • Touched up paint
  • Framed the mirror
  • Added accessories 


Man that list is a lot shorter than I was expecting. All of those projects are time consuming, though!

Here is a refresher as to what they looked like before we moved in:

For the past 4 years:


Under construction. The walls are ripped out. The floors are mid-tiling project and yes that is the toilet in the bath tub.

And here it is finished up!

bathroomredo 001
My accesories are from Michael's and Walmart :)
bathroomredo 002
bathroomredo 005
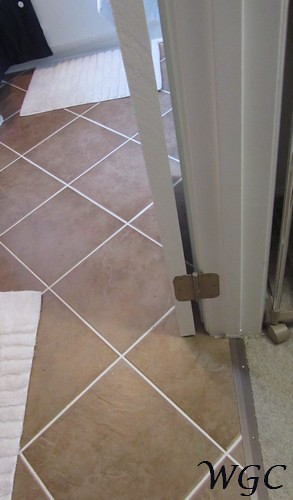
A close up of the tile and threshold

This is the only outlet in the bathroom and it used to be two plugs. My number one request since we moved in was to give me an extra outlet :)
bathroomredo 003
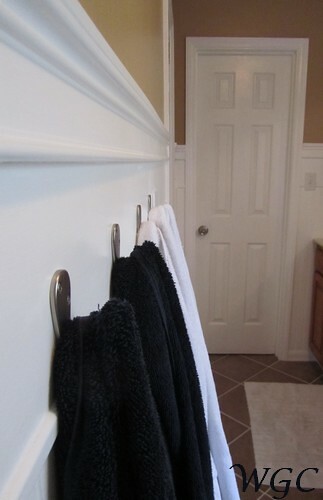
Four hooks is so much better than 1 towel rod!
It is so nice to have the bathroom back and it feels like my own spa!

Here I am making good on my promises! I hope you enjoyed!

Bow Brooch

A while ago I saw this really cute blouse on Pinterest. Pinterest tells me a while ago = 20 weeks:


Source: harrods.com via Jaime on Pinterest


I loved it! I decided that it's just a black tee with a big bow brooch. I thought, "I can make that" What can I say, I'm Wayward?

But this craft is easy. Really easy.

Materials:
36" x 6" of fabric
Matching thread

Tools: 
Scissors
Sewing Machine
Iron

Here's my fabric, recognize it?

Photobucket
First, fold your fabric length wise (hot dog) with the wrong side facing out. Then press the fold. You don't have to do it this way, but I like to because then I don't need to use pins when sewing.

Photobucket 

Sew a seam along the edge of the fabric (but don't do it in the dark like I did...or my camera makes it look like I did)

Photobucket 

Pull inside out, hem the bottoms of the tube you've just made. Iron again. Tie in a bow. Adhere a pin back to the back like this one

Photobucket

Total it took about 15 minutes from start to finish (I'm guessing, I got distracted)

Next time I think I'll make it even bigger!

PS Happy Birthday to my best friend, BLBP. She is the recipient of the lovely Blue Pigs quilt by my mom from last fall.

Easter Roundup

Did you know? We are fast approaching our first blogoversary! We've grown a lot in the last almost-year. Only a few of our followers were around for our Easter posts last year, so we'll kick off the season with a quick round up of our crafts from last Easter:


Make your Easter decorations last year after year with hollow eggs


What are you looking forward to this year for Easter?

Wayward Weekend 9

Welcome, welcome! Let's get this party started!

Here's what the Wayward Girls shared this week. We love to read your comments!


Now it's your turn!

Wayward Weekend Guidelines:
1. We ask you follow our blog before linking up. Already following us? You could take it to another level and like us on Facebook
2. We ask that you visit and comment on others' blogs. This is the whole point =)
3. We ask that you please use this badge somewhere on your blog:


<a href="http://www.waywardgirlscrafts.com/search/label/wayward%20weekend"><img src="http://i192.photobucket.com/albums/z41/MamaBlogga/waywardweekend.png" border="0" alt="Wayward Weekend" /></a>

Wayward Weekend 8 Features

Well hello there! It's time to see what the Wayward Girls loved this week!

Jaime's pick: A Mother and A Daughter's Quatrefoil Sidelights

Photobucket

Jasmine's pick: Crafting in the Rain's Train Pallet Art

Photobucket

Jordan's pick: Tousled Day's Umbrella

Photobucket 

Brooke's pick: Thrifty Crafty Girl's Under-the-Bed Storage

Photobucket

Mom/Diana's pick: The Life of CK and Nate's Pipe Pantry Shelves

Photobucket

Now grab a button if you were featured!


<a href="http://www.waywardgirlscrafts.com/"><img src="https://blogger.googleusercontent.com/img/b/R29vZ2xl/AVvXsEh5C3bw30ZpheQE52iUDZ0fyIeNArGXyvazKgU64R8FCn5UkOnfXHSKFbbQcrJfNvwPp9zDZgVBwyUUloAGif8FlorKmNn-Y9ju9qq4CpH6Ot45dAwn9zMDc33QkLHVXjm5WcTGQ-BjfBs/s1600/wayward+weekend+featured.png" border="0" alt="Featured on Wayward Weekend at Wayward Girls Crafts" /></a>

Beaded Watchbands

This craft is very popular in Idaho where my sister lives. She made these watchbands for my mother and me this Christmas. I remade them because they were a little big for our wrists, so now I know how to make them! I learned a lot trying to make them smaller. (Because I had to keep doing it over and over again.)


Here's what you need:
Beads, clasps (4) and spacers.
elastic bead string ( I used 5mm and it was too thin. I had to double it.)
A watch kit (get them in the beading section of your craft store)
Super glue.

Layout your beads. You might want to switch things around a bit, so give yourself some time to ponder it.
Cut your elastic string extra long. (I learned this lesson all too well. I tried to skimp on the elastic and ended up with everything coming loose several times. Waywardness!)


Start with a the bead that you will put between the clasps. Create a knot that will hold this bead in place while you thread. You could also use an alligator clip.

Then just thread your beads in order, down one side and up the other. If you are using spacers, mark where they will go on the opposite side when you thread it on the first side.

When you get to the last bead, untie your knot used to temporarily hold the first bead. Now tie the two ends together with  a strong knot. Seal the deal with a dot of super glue. Done!

Related Posts Plugin for WordPress, Blogger...