


Last minute gift: $1 etched glass mugs
I had the best intentions of making gifts this Christmas, but a week of stomach flu and the general busy-ness of Christmas did not work in my favor. I was planning to make fabric car organizers for one side of our family, and I even got the fabric and notions and cut out all the pieces—but I ran out of time to sew them.
So instead, as we were carrying on the family tradition by having my small children shop at the Dollar Store for gifts for one another, I spotted some holiday glassware and was inspired.

A few years ago, I made Brooke etched glass plates with a monogram design, and I knew I still had the etching kit laying around. Etching glass creates a permanent frosted effect (and should always be done on the side of a dish that doesn't contact food!).
Also a few years ago, another member of the other side of the fam gave out Santa cookie plates. I figured Santa must be thirsty and pulled out the etching kit!

I didn't have the time to cut out five full stencils from vinyl contact paper like they recommend, so I decided to trace the design freehand (is that an oxymoron?). I made an insert to fit inside these nice glass mugs and drew out a pretty "Santa," inspired a bit by Jaime's friend's script.
I used a Q-tip to apply the etching cream. A combination of a smooth stroke and dabbing on a thick layer of the cream worked best.

When you use a stencil, as long as you cover the glass really well (well enough that it's very hard to see your stencil), you'll get good, solid results. With the Q-tip, in places the etching cream layer was too thin, and would dry about before it had a chance to etch the glass, so there were some broken and spotty sections. I applied another round of etching cream and redid them—but I learned to apply it even thicker than I initially thought, until the last glass I did required no retouching.

Once you've let the etching cream sit for about 5 minutes, rinse the glass thoroughly in warm water and let it dry. Very easy! Note that the "sit" time does vary depending on what kind of stencil you're using (the rub'n'etch kind can only take 1 minute of the caustic cream) and the thickness of the glass (thin glass, such as glass ornaments, might etch away completely!).
I really wanted to add a second line, "Don't stop believin'!" However, I didn't have quite enough etching cream and the lines from the Q-tip weren't quite narrow enough to be able to write something that long on one line.
|
| L to R : A thick enough application (with "guide"), retouched (pre-rinse) and finished. |
MERRY CHRISTMAS FROM ALL THE WAYWARD GIRLS!

No comments
:
 Labels:
diy christmas presents
,
etched glass
,
gift ideas
,
gifts
,
glass
,
Holidays and Entertaining
,
Jordan
Labels:
diy christmas presents
,
etched glass
,
gift ideas
,
gifts
,
glass
,
Holidays and Entertaining
,
Jordan

Guest Post: Blissful Bucket List
So happy to have Sarah here today! What a cute craft she's sharing! Thanks for guest posting!
Hi Everyone!!! I'm Sarah, the gal behind Blissful Bucket List.
Hi Everyone!!! I'm Sarah, the gal behind Blissful Bucket List.
I am trying to contain my excitement, but I am not sure how well that will work.
I am so thrilled that Just Jaime asked me to do a guest post here at Wayward Girls Crafts.
(Love them by the way. How can you not?!)
Jaime and I have known each other for a long time.
When she did a guest post on my blog she threatened to pull out old pictures of us
However, she couldn't find them.
And lucky for her...I can't find them either. Haha!
Over at my blog, Blissful Bucket List,
I share many Pinterest Projects that I have successfully conquered (er...sometimes failed)
as I cross them off my creative 'bucket list'.
We are talking crafts, photography, recipes, fashion... a little bit of everything!
For the month of December I am doing a series called
25 Pinterest Posts/Projects Til Christmas
So, it is only natural that my post today will be centered around a Christmas idea.
My goal this Christmas has been to try out DIY Ornaments.
Last week I shared a super cute DIY Snowman Ornament
and I specifically saved this awesome Grinch one to share with y'all....

In The Making:
Supplies - green glitter, yellow, red, and black paint pens, green fluff, and Pledge Floor Care Finishing, clear plastic ornament
1. Take the plain ornament and pour the Pledge into the ornament - just enough to swirl around the inside. Swirl liquid so that the entire inside gets covered. Pour extra liquid into sink.
*Do not shake the liquid in the ornament because it will cause bubbles.
2. QUICKLY pour green glitter into ornament and shake. You want to do this fast before the Pledge dries. Continue to shake green glitter in ornament until the entire inside is coated.
3. Let ornaments dry for a day before you begin to decorate.
4. Draw Grinch face onto ornament with paint pens.
5. Use a hot glue gun to stick the green fluff into the top of the ornament.
6. Hang on tree and Enjoy!
Short and Simple crafts...thats what I do!

It was such a pleasure to be here with you and The Wayward Girls!
Hope to share with you again sometime soon!!
And Happy Holidays!
Hope to share with you again sometime soon!!
And Happy Holidays!

Scrabble Board Present
Every year we draw names in November and exchange presents on Christmas Eve. These presents are usually homemade or personalized. We call this Gift From the Heart. This year, don't tell her, I got my grandma. She loves Scrabble. I saw something similar to this online somewhere and knew I could do something like this for my Grandma this year. I spelled out all 12 grandkids names in Scrabble letters. We were a few letters short but I thought I could figure out some good ways to connect names and such. I ended up having to add the word "love" (yes, I know "av" isn't a word, this is the only way it would work!) to get everyone to fit. And...if you look closely I made another "J" and "H" tile on the blank tiles with a sharpie. I'm sure you can buy some additional Scrabble tiles online but I figured why not just try. Using Tacky Glue, I very carefully glued on the tiles, making sure they were straight and aligned. What do you think? Be nice, this took me a couple of hard hours to do!
 I also added "Grandma" to the top where the WGC logo is but forgot to take a picture!


8 comments
:
Labels:
Board Game
,
Christmas
,
gift ideas
,
gifts
,
Holidays and Entertaining
,
Jasmine
,
special gifts

White Elephant Trash to Treasure
I'm sure that sometime during this Christmas season you have been to a White Elephant party. We have been to one and are going to another one this weekend. 75% of the time you go home with something you don't want. This summer at our family reunion we did a similar gift exchange and my hubby got this lovely box:


I didn't feel like we got the total short end of the stick because I felt like I could do something with it. So it got thrown in a box when we moved and as I was going through and organizing my craft stuff I came across it again and thought it would be a great gift box.

I Mod Podged wrapping paper around the bottom half and painted the lid white. I glued the ribbon onto the sides and top. To help with lining it all up I drew lightly on the sides with pencil and I'm so happy with how it turned out.
For the huge flower from the top I can totally make that into a hairbow for PB. Bigger the bow, better the momma, right?!
Do you have any bad experiences with White Elephant? A couple weekends ago we went home with an ENEMA. I am not joking.

4 comments
:
Labels:
Brave Brooke
,
Christmas
,
gift box
,
Holidays and Entertaining
,
white elephant
Jaime Approved HOLIDAY Baking
This year I made three of my favorite things for gifts for my co workers:
Oreo truffles. About 80 of them!

A crowd favorite. I have been assigned to make these at Jasmine's wedding (in 10 days!)
Peanut Butter and Chocolate Puddle cups.

I made these for Thanksgiving last year. Weird contribution but it does not matter because they were amazing.
Three Ingredient Pumpkin Cookies, only I left out the chocolate chips.

I wanted one thing to not have chocolate. We made homemade pumpkin pie spice to go in them too!
And for my flop:

Don't these look amazing? Well I would suggest you have a real doughnut pan to make them. I was at my aunt's and using a plug in doughnut maker and it just didn't work. Then we tried to fry them. And that didn't work. So I made the pumpkin cookies instead. Next year I'll have that doughnut pan!
Now for my tips:
Make sure the treat boxes you buy are big enough! I accidentally bought tiny boxes so I have to pair the box with a plate. I ended up putting the Oreo truffles in a mini cupcake liner and then in the box.
Plan ahead! I did plan ahead but I didn't count on the doughnuts not working out and had to scramble with the pumpkin cookies at the last minute.
Make sure you don't save your baking until the last minue. Because you just may end up boxing treats until 10:30 pm.
Oreo truffles. About 80 of them!
A crowd favorite. I have been assigned to make these at Jasmine's wedding (in 10 days!)
Peanut Butter and Chocolate Puddle cups.
I made these for Thanksgiving last year. Weird contribution but it does not matter because they were amazing.
Three Ingredient Pumpkin Cookies, only I left out the chocolate chips.
I wanted one thing to not have chocolate. We made homemade pumpkin pie spice to go in them too!
And for my flop:
Don't these look amazing? Well I would suggest you have a real doughnut pan to make them. I was at my aunt's and using a plug in doughnut maker and it just didn't work. Then we tried to fry them. And that didn't work. So I made the pumpkin cookies instead. Next year I'll have that doughnut pan!
Now for my tips:
Make sure the treat boxes you buy are big enough! I accidentally bought tiny boxes so I have to pair the box with a plate. I ended up putting the Oreo truffles in a mini cupcake liner and then in the box.
 |
| Tiny boxes make me weep |
Make sure you don't save your baking until the last minue. Because you just may end up boxing treats until 10:30 pm.

4 comments
:
Labels:
baking
,
Christmas
,
Christmas Cookies
,
Dessert
,
food
,
Holidays and Entertaining
,
Just Jaime
,
neighbor gift
,
wayward
Neighbor gift: the scents of Christmas (with printable tag!)
Oranges and Christmas have gone together (in the US at least) for over a hundred years--and a lot longer if you've ever head the traditional tale about the St. Nicholas, which is also a folkloric explanation of the tradition of Christmas stockings.

These days, gift boxes of oranges and bags of clementines and tangelos are on sale at Christmastime. I confess that we probably eat more Cuties in December than . . . wait, do they sell Cuties the rest of the year?
A few years ago, I started saving the peels from our Cuties early in December. Once it gets a little closer to Christmas, I put the peels in a pot, add some cinnamon sticks and water, and put it on to simmer for hours. Our whole house smells Christmas-y.
A couple months ago, a friend showed me an idea: putting these "aromatics" in jars. They'd make great neighbor gifts! The article has several other scent ideas, but the one I whipped up took these things:
Christmas Scent Jar
There are tons of options for what to do with the mix. I'll probably do the same thing I've done in years past: the stovetop method. But you can also use an open slow cooker, a fondue pot, a candle warmer, a mug warmer and more. (Though I should say my friend tried the candle warmer method and didn't smell anything.)
Want to share these with your neighbors? Here are some free printable tags to go along with them! They're 3"x4.5" (small enough to fit on an index card). Feel free to glue them on cute paper and sign the back.


And of course, you don't have to use oranges and cinnamon. You can use pine needles or small branches, your favorite herbs, a gingerbread spice blend with slices of ginger and cinnamon sticks), or anything else that says Christmas to you. Maybe your spent vanilla beans can find one last use (after you've scraped out the seeds and made vanilla sugar, naturally).

I can't wait to get this simmering on my stove today!
(And yes, that's snow, and that's my backyard. Trade you.)
What smells like Christmas to you?

These days, gift boxes of oranges and bags of clementines and tangelos are on sale at Christmastime. I confess that we probably eat more Cuties in December than . . . wait, do they sell Cuties the rest of the year?
A few years ago, I started saving the peels from our Cuties early in December. Once it gets a little closer to Christmas, I put the peels in a pot, add some cinnamon sticks and water, and put it on to simmer for hours. Our whole house smells Christmas-y.
A couple months ago, a friend showed me an idea: putting these "aromatics" in jars. They'd make great neighbor gifts! The article has several other scent ideas, but the one I whipped up took these things:
Christmas Scent Jar
- peels of 2 large Cuties
- ~1/2 navel orange, cut into crosswise slices (and then in half, but that's optional)
- 1 cinnamon stick (scored and broken into inch pieces, which is optional)
- 5-6 whole cloves
- 1 pint jar, ring & lid
- water
I put the peels in first, then used a knife to move the peels away from the sides of the jar to slide in the orange slices (to look pretty). I added the cinnamon pieces and cloves that way, too, then filled it with water. Screw on the lid and ring, and voila!
There are tons of options for what to do with the mix. I'll probably do the same thing I've done in years past: the stovetop method. But you can also use an open slow cooker, a fondue pot, a candle warmer, a mug warmer and more. (Though I should say my friend tried the candle warmer method and didn't smell anything.)
Want to share these with your neighbors? Here are some free printable tags to go along with them! They're 3"x4.5" (small enough to fit on an index card). Feel free to glue them on cute paper and sign the back.
And of course, you don't have to use oranges and cinnamon. You can use pine needles or small branches, your favorite herbs, a gingerbread spice blend with slices of ginger and cinnamon sticks), or anything else that says Christmas to you. Maybe your spent vanilla beans can find one last use (after you've scraped out the seeds and made vanilla sugar, naturally).

I can't wait to get this simmering on my stove today!
(And yes, that's snow, and that's my backyard. Trade you.)
What smells like Christmas to you?
3 comments
:
Labels:
Christmas
,
diy christmas presents
,
gift ideas
,
gifts
,
Holidays and Entertaining
,
Jordan
,
neighbor gift
Gift Ideas: SparrowNestScript
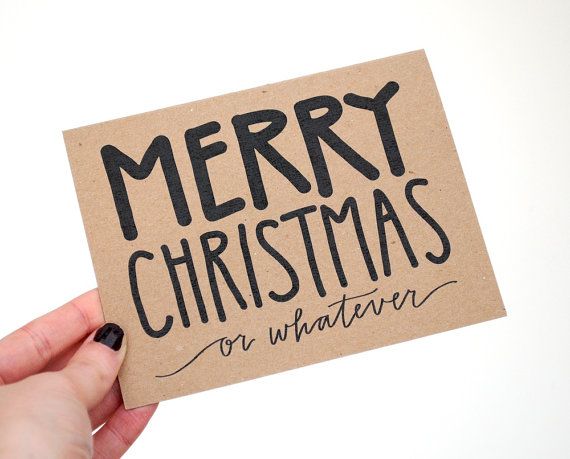
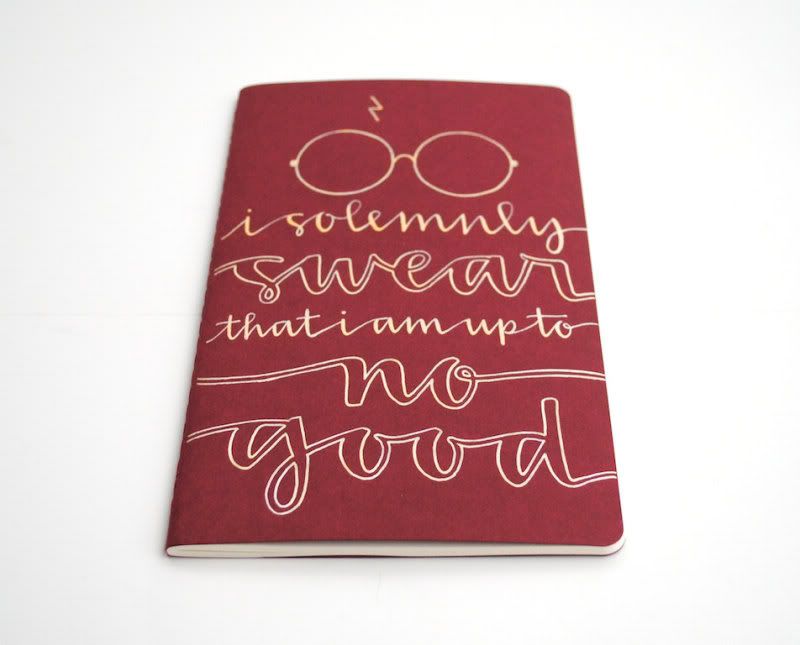
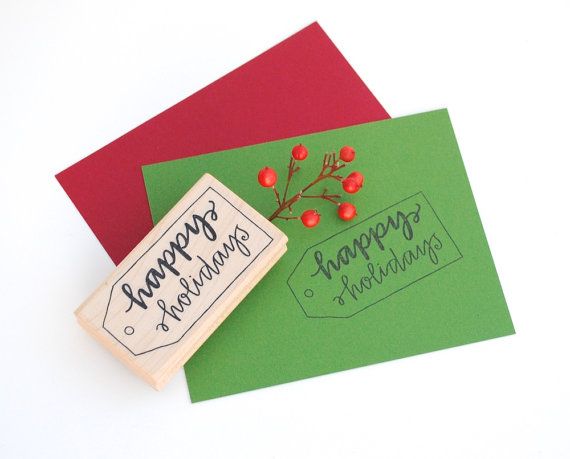
I met Emily in high school. Emily is an incredibly talented woman! We played violin together in orchestra, she is a talented pianist and an avid reader. I've always been impressed with how hard she works. Emily has beautiful penmanship. She has created an Etsy shop to sell her calligraphy wares. I'm constantly in aw of the new items in her shop and her custom work. Her shop is SparrowNestScript and is full of tons of unique items!
Here are some favorites of mine:

Here are some favorites of mine:
Please take a look at her shop on Esty or her shop Facebook page!
Festive Garland Skirt and a Winner!
On Saturday it was my best friend's Christmas party. Her invitation said there would be the prize for the most festively dressed person was a 5 course meal prepared by my best friend. I wanted to win! Last year I was an elf:
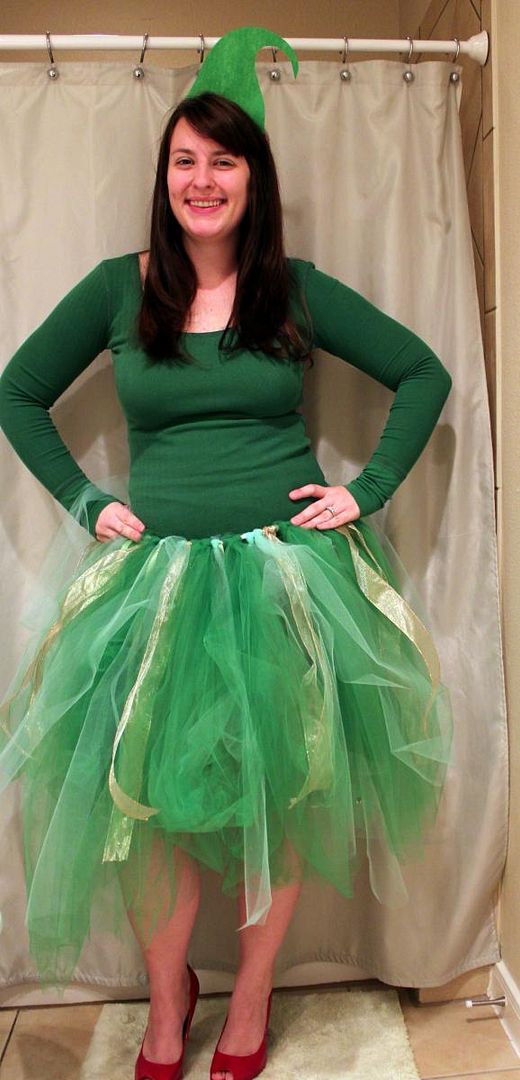
This year I got my inspiration from a candy cane:
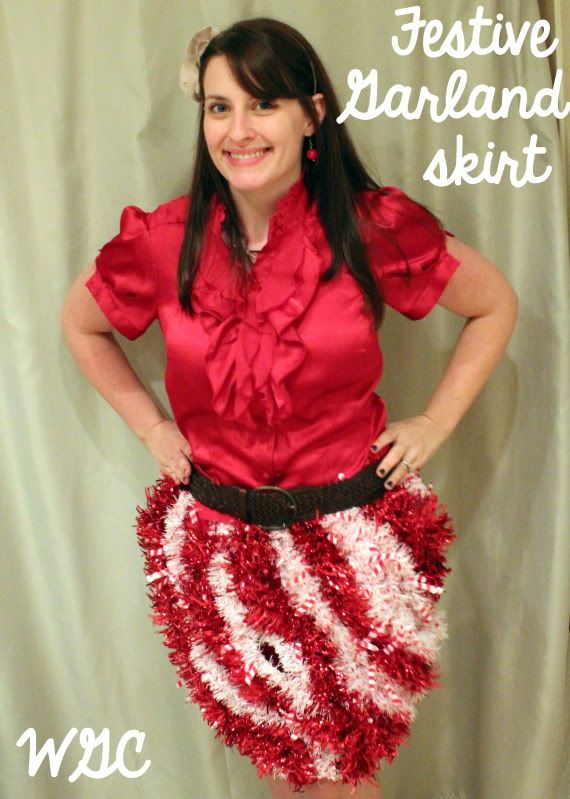
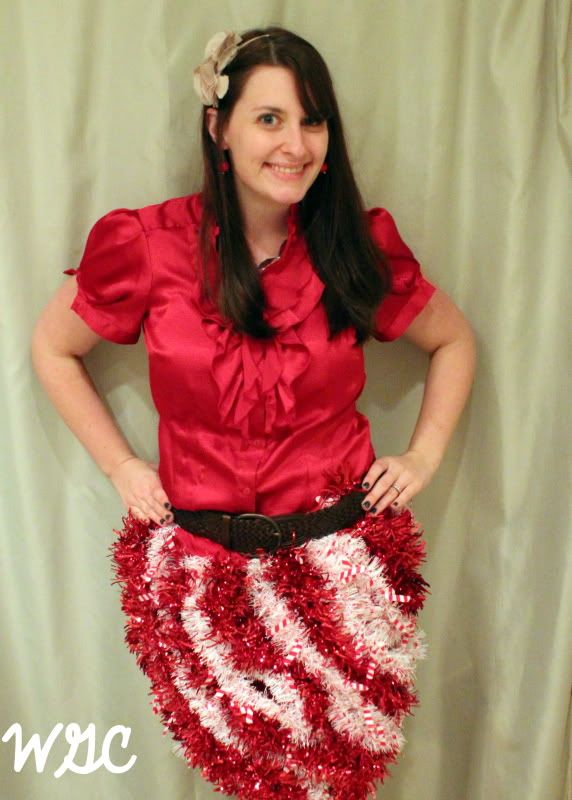
First I made my skirt from an old red t shirt. I used the pattern I made from the Super Simple Pencil Skirt. I really should have made a real waist band, but luckily a belt worked. Then I cut strands of garland from the Dollar Tree in half, doubled it again, and glued at the top. I swirled the garland a bit and glued at the bottom. It was quite eye catching (although a little unflattering!) and the best part was, I won!! Yay!
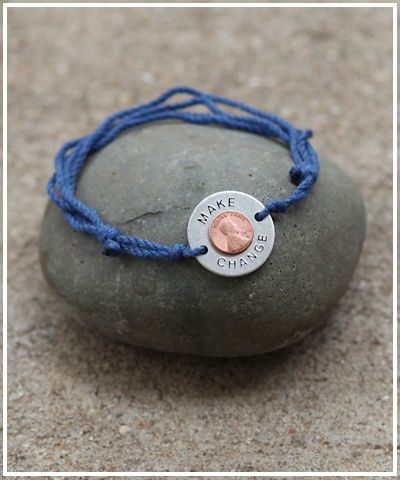
Now let's see who else won! The winner, selected by Random.org, of the Make Change Bracelet is:
Briana Richardson!
Congrats Briana! Please email me your address! jaime (at) waywardgirlscrafts (dot) com!
Thank you to everyone who entered. Make Change Today is such an excellent cause and I'm happy to team up with them for this giveaway! Don't forget about the Make Change bracelets for Christmas presents!

This year I got my inspiration from a candy cane:

First I made my skirt from an old red t shirt. I used the pattern I made from the Super Simple Pencil Skirt. I really should have made a real waist band, but luckily a belt worked. Then I cut strands of garland from the Dollar Tree in half, doubled it again, and glued at the top. I swirled the garland a bit and glued at the bottom. It was quite eye catching (although a little unflattering!) and the best part was, I won!! Yay!

Now let's see who else won! The winner, selected by Random.org, of the Make Change Bracelet is:
Briana Richardson!
Congrats Briana! Please email me your address! jaime (at) waywardgirlscrafts (dot) com!
Thank you to everyone who entered. Make Change Today is such an excellent cause and I'm happy to team up with them for this giveaway! Don't forget about the Make Change bracelets for Christmas presents!

5 comments
:
Labels:
Christmas
,
costumes
,
giveaway winner
,
Holidays and Entertaining
,
Just Jaime
,
sewing
,
simple skirt
,
skirt
,
tutorial
Gingerbread Pie with Marshmallow Meringue (and extra waywardness!)
Last year, I experimented with several "Christmas-y pie ideas"—cranberry apricot, eggnog chiffon, and today's example:

Gingerbread just says "holidays." This custard pie has molasses and brown sugar and some of the classic spices for a spot-on gingerbread taste. The recipe itself comes from Sprinkle Bakes, but I make my "experimental" pies in miniature pie plates that are 5" across, so I have to adapt everything (starting with the crusts).
 Here's the recipe for a 5" pie:
1 1/2 Tbsp butter
1 Tbsp molasses (not blackstrap)
2 Tbsp brown sugar
1/2 Tbsp flour
tiny pinch salt (or use salted butter)
1/4 tsp ginger (heaping)
1/8 tsp cinnamon (heaping)
1 egg yolk
1/8 tsp vanilla
3 Tbsp buttermilk
A pie shell
Preheat the oven to 325 degrees F. Mix the butter, molasses and brown sugar using a hand mixer. Mix in the flour, salt, and spices. Add the egg yolk and mix until thoroughly combined. Mix in the vanilla and buttermilk, then pour into the pie shell [the original recipe uses a regular, unbaked pie shell; I used a blind baked graham cracker crust].
Bake for 30-35 minutes or until set (not jiggly in the middle when moved).
I'd rate the pie itself "not bad." The texture is chewy, especially around the edges, but pretty good, though it's a little weird paired with the gingerbread flavor, which was pretty good.
The marshmallow meringue topping, however, was FANTASTIC. Here's the 5" pie version:
1 egg white
1/8 tsp vanilla
tiny dash salt
2 tsp sugar
1 1/3 oz marshmallow creme (about 1/4 cup)
Beat the egg white with vanilla and salt until foamy. Add the sugar a bit at a time, and beat until stiff peaks form, like in the first picture here:
 Add the marshmallow creme a little at a time. I recommend stopping the mixer and putting the marshmallow creme underneath the beaters. Otherwise, my mixer grabbed the chunk of marshmallow creme and flung it to the side of the bowl.
Note that once you've added the marshmallow, the stiff peaks disappear and we get into a kind of ribbon stage again. That's perfect.
You could also use straight marshmallow creme, but it's stiffer and harder to work with. See:

After spreading the meringue you can make it fancy. I usually spoon it on, making sure to seal the edges to minimize shrinking. Then I use a knife or spatula to make the peaks, tapping it on the surface and pulling it off. Brown it in a 400 degree oven.
 I cut a real-sized slice out of my mini-pie:

 YUM.
YUM.
My mixer beaters are so high in my bowl that they can't beat fewer than three egg whites (sad, I know). So I had to make the full-sized pie recipe of the meringue (double sad). With all the extra meringue, I piped these babies:
 I love meringue drops and I was already hoping to make some for this year. The marshmallow flavor was a big bonus (and some mini chocolate chips would make these perfect!).
Normally, meringue drops do NOT expand as they bake, but the marshmallow kind of changes that, so they expanded a little, and took a bit longer to bake. I gave mine about 30 minutes in a 300 degree oven. Once they look dry, you turn off the oven and leave them in there with the door shut (or slightly cracked, depending on what recipe you use).
I know what you're asking: where are the glamorous shots of the final product? Well, when you're fixing dinner and your meringue drops are resting in one oven, and you need to cook your dinner in the other oven, make sure you turn on the right oven, or you'll ruin both.
 And that's what it means to be Wayward & Crafty.
Fortunately, I still had the little bit on my pie. My then-one-year-old was fascinated by it and climbed up to the table to take a look. When she saw me coming to get her, she swiped a handful and stuffed it in her mouth.
 Yep. Raising the next generation of Wayward Girls. (And she's got good taste!)
What pies will you be making for Christmas? How do you like to use (or eat!) gingerbread?

Gingerbread pie with marshmallow meringue!
Gingerbread just says "holidays." This custard pie has molasses and brown sugar and some of the classic spices for a spot-on gingerbread taste. The recipe itself comes from Sprinkle Bakes, but I make my "experimental" pies in miniature pie plates that are 5" across, so I have to adapt everything (starting with the crusts).

1 1/2 Tbsp butter
1 Tbsp molasses (not blackstrap)
2 Tbsp brown sugar
1/2 Tbsp flour
tiny pinch salt (or use salted butter)
1/4 tsp ginger (heaping)
1/8 tsp cinnamon (heaping)
1 egg yolk
1/8 tsp vanilla
3 Tbsp buttermilk
A pie shell
Preheat the oven to 325 degrees F. Mix the butter, molasses and brown sugar using a hand mixer. Mix in the flour, salt, and spices. Add the egg yolk and mix until thoroughly combined. Mix in the vanilla and buttermilk, then pour into the pie shell [the original recipe uses a regular, unbaked pie shell; I used a blind baked graham cracker crust].
Bake for 30-35 minutes or until set (not jiggly in the middle when moved).
I'd rate the pie itself "not bad." The texture is chewy, especially around the edges, but pretty good, though it's a little weird paired with the gingerbread flavor, which was pretty good.
The marshmallow meringue topping, however, was FANTASTIC. Here's the 5" pie version:
1 egg white
1/8 tsp vanilla
tiny dash salt
2 tsp sugar
1 1/3 oz marshmallow creme (about 1/4 cup)
Beat the egg white with vanilla and salt until foamy. Add the sugar a bit at a time, and beat until stiff peaks form, like in the first picture here:

Note that once you've added the marshmallow, the stiff peaks disappear and we get into a kind of ribbon stage again. That's perfect.
You could also use straight marshmallow creme, but it's stiffer and harder to work with. See:

After spreading the meringue you can make it fancy. I usually spoon it on, making sure to seal the edges to minimize shrinking. Then I use a knife or spatula to make the peaks, tapping it on the surface and pulling it off. Brown it in a 400 degree oven.


My mixer beaters are so high in my bowl that they can't beat fewer than three egg whites (sad, I know). So I had to make the full-sized pie recipe of the meringue (double sad). With all the extra meringue, I piped these babies:

Normally, meringue drops do NOT expand as they bake, but the marshmallow kind of changes that, so they expanded a little, and took a bit longer to bake. I gave mine about 30 minutes in a 300 degree oven. Once they look dry, you turn off the oven and leave them in there with the door shut (or slightly cracked, depending on what recipe you use).
I know what you're asking: where are the glamorous shots of the final product? Well, when you're fixing dinner and your meringue drops are resting in one oven, and you need to cook your dinner in the other oven, make sure you turn on the right oven, or you'll ruin both.

Fortunately, I still had the little bit on my pie. My then-one-year-old was fascinated by it and climbed up to the table to take a look. When she saw me coming to get her, she swiped a handful and stuffed it in her mouth.

What pies will you be making for Christmas? How do you like to use (or eat!) gingerbread?
1 comment
:
Labels:
baking
,
Christmas dessert
,
Dessert
,
food
,
gingerbread
,
gingerbread pie
,
Jordan
,
meringue
,
mini pies
,
pie
Christmas in a Box
November marks 6 years of marriage for me and my hubby! In 6 years, we’ve spent a few Christmases at home. Those years are always tougher for me. I miss my family a lot, especially during the holidays. That’s where I came up with my holidays in a box idea!
This package is meant to make your loved one feel more connected to the holiday traditions you have at home.

Inside my box:
Merry Christmas!
This package is meant to make your loved one feel more connected to the holiday traditions you have at home.

Inside my box:
- Ornament from my family’s Christmas tree. We always trimmed the tree together and a major tradition was getting a new ornament every year in our stocking. As we grew, our ornament changed from Cookie Monster, to the Little Mermaid, to my preoccupation with kissing boys. The one in this box is Justin Beiber.
- Sugar cookie mix and cookie cutters. It's just not Christmas without sugar cookies and icing at our house. We have a tradition of making them...ugly. Check it out.
- Letter to Santa. We wrote letters to Santa way longer than we should have. So I thought it'd be fun to have a Mad Libs type letter to set out with the cookies. Here's an idea
- Christmas Eve pajamas. We got to open one present each year on Christmas Eve. Inevitably it would be matching pajamas. Then we take a million pictures.
- Biblical passages of Christ’s birth and quotes about Christmas. Christmas isn't complete without reading the nativity story. Great way to remember the reason we celebrate.
- Two Christmas Movies. I love Christmas movies! Elf and the Polar Express are the ones I've included. Both faves at my house.
- Christmas socks. I love festive socks, so I had to include a pair.
There you have it! How to send a little Christmas tradition anywhere!
Paper Snowflakes
Taking a break from wedding posts...that you all don't comment on. Mmhmm I noticed. When you were little did you ever cut out a snowflake and it not turn out so well? Yeah well that still happened to me when I was not so little. I decided I was going to make snowflakes and make dang pretty ones yesterday so I used the Google machine to help me out and Pinterest. I found this pin and decided to go for it. Well still didn't look as pretty as the pattern! So then I asked Mr. Google how to fold a darn snowflake correctly. Turns out I had been doing it wrong all this time.
So here's how to do it:
Start with a square piece of paper.
 Fold it in half diagonally.
 Now fold it in half diagonally again.
 Here's the tricky part that I have to do a couple times. Fold both sides into each other so the outside of the side matches the new fold. It's going to look like a triangle with tails. Make sure that the sides match and aren't overlapping. This is kind of hard to explain. Hopefully I didn't lose you!

 Now cut off the tails.
 Here's where the fun begins. Draw whatever pattern you want or follow a pattern you found.
 Then cut out the pattern. I recommend not using the tips of the scissors since this is several layers of paper and it might be too thick for the tip. I cut as high as felt comfortable on the scissors blades. This gives you more control and power to cut through the layers.
 And unfold!

Here's an example of when you fold it only in half twice on the diagonal and not doing the final two folds vs the fold explained above:
 _______________________________________________________
PS We hit 500 Followers!!! We couldn't be more excited! Help share the word of our waywardness and help us reach more of our wayward crafters out there. Thank you all so much!
So here's how to do it:
Start with a square piece of paper.


Here's an example of when you fold it only in half twice on the diagonal and not doing the final two folds vs the fold explained above:

PS We hit 500 Followers!!! We couldn't be more excited! Help share the word of our waywardness and help us reach more of our wayward crafters out there. Thank you all so much!
Subscribe to:
Posts
(
Atom
)