Showing posts with label Just Jaime. Show all posts

Orzo: One Pan Chicken and Orzo Skillet

Mom chose orzo, which was a great choice to me since I never use it.

One Pan Chicken and Orzo Skillet Dinner. Ingredient: Orzo, chosen by Mom.

Probably my least favorite thing I made. The orzo ended up being mushy because I put too much water in--I didn't have the broccoli it called for which needed to be cooked in that water as well. The favor wasn't outstanding either.


I should have made rice pilaf, since I love it. 

Wonton Wrappers: Homemade Recipe, Asian Wonton Salad Toppers and Dessert Wontons

Wonton Wrappers Recipe
Special Ingredient: Wonton Wrappers, chosen by Jasmine

So, I actually was an overachiever with this one by a lot! First, I made my own wonton wrappers. This was NOT by choice. I simply could not find them in my grocery store. As I was making them the recipe stated they needed to be rolled out very thinly. I was not looking forward to this prospect, but Jasmine had the bright idea of using a pasta machine. Brilliant!


With my wonton dough I made two recipes. Since the salad topper recipe wouldn't use much of the dough, I decided to also make dessert wontons. Here they are side by side. I used the the linguine side of my pasta machine to cut the salad topper wontons perfectly. The dessert ones are a little wonky.  


Salad topper wontons. 


Dessert wontons finished! They were delicious. The biggest problem was they were SO hot and I wanted to eat them so badly, I may have burned myself several times. But it was worth it! 


And the salad toppers;


Great crunch and fun addition to a salad. In the future, I'll probably just buy them though. 

Agave: Creamy Avocado Citrus Salad Dressing

Creamy Avocado Citrus Salad dressing--Special Ingredient: Agave, chosen by Brooke

The original recipe calls for honey, but I substituted agave instead. It was a yummy, zippy and thick dressing. I probably wouldn't make it again just for myself (since my husband has a bit of an aversion to avocado after food poisoning) but I enjoyed it.


Tomatillos: Roasted Salsa Verde and Salsa Verde Chicken Quinoa (or rice)

Salsa Verde Chicken Quinoa
Roasted Salsa Verde
Special Ingredient: Tomatillos, chosen by Me!

I chose tomatillos for my special ingredient. I have made several things with tomatillos but wanted to stretch myself and branch out. I found a recipe for Salsa Verde Chicken with Quinoa. I don't love quinoa and so I just used rice. The recipe calls for homemade roasted salsa verde, which was pretty fun to make. Then you just bake it all together. The original recipe didn't call for cheese on top, but I thought it needed it.


I also served it with blue corn chips, fresh grape tomatoes and a sprinkle of cilantro. It was a good, easy dinner. However, I think I like my other tomatillo recipes better. (Our Best Bites' chili verde pork--only in their cookbook but AMAZING).


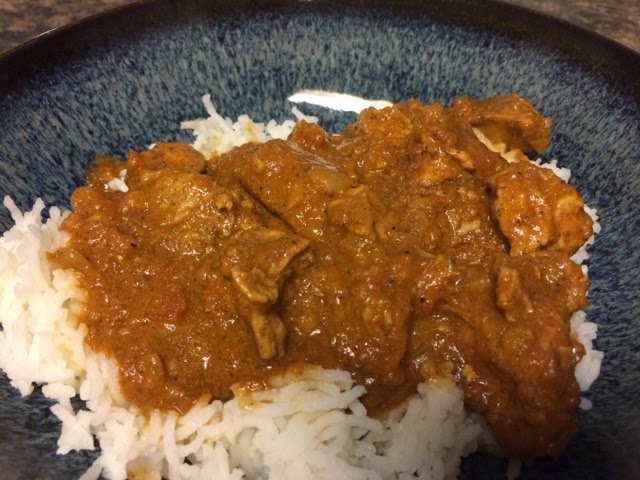
Indian Food: Best Butter Chicken

Best Butter Chicken  Special Type of Food: Indian, chosen by Jordan

My husband loves Indian food. I suspect that was a strong factor in his choosing to go to India on an MBA school trip a few years ago. He has made some amazing Indian food at home so it's a little intimidating for me. I found this recipe for Butter Chicken aka Tikka Masala. It turned out delicious. This was one of the best things I made and opened me up to making more Indian food.


When I told my husband I made the recipe for the challenge he said, "Oh. I thought you made it for me because you know I love Indian food," HA! Well since then I've made a lot more.

Simple Watercolor Painting for Beginners

I've been interested in watercolor for a few years. This year I finally got into it and feel comfortable in the very beginning stages. I wanted to make a handmade gifts for my nephew and nieces and thought a watercolor painting of an LDS temple would be something special. This method also worked for paintings I did of a bird, book, and sweater.


Prerequiste: know how to mix watercolor paints and how to apply the paint (basically, dab your brush before each time you touch the paper). 

First step, find color pages of the temple online. It seems like this would be easy, but I had some criteria: it needed to be simple and I wanted to have several temples, including a small temple design. That was the hardest to find. See our LDS Pinterest board for the coloring sheets I used


The next step was to trace the temple on a piece of white paper using a pencil. I used a straight edge (ok a board book) to keep my lines straight, which made it take longer but it made it look better. I traced the temple from my laptop screen, like a lightbox. If you wanted, you could just print out the coloring page and skip this step. 


Next, color all over the back of the tracing with a pencil. I shared this picture on Instagram and some of you guessed what I was doing! The pencil coloring will be used as a transfer method.


Take your watercolor paper and tape it to the back of the tracing (so the coloring is touching the paper) to keep it steady. Trace the picture again. As you trace, the coloring will transfer lightly to the watercolor paper. Make sure both papers are secure so it transfers well. 


After the drawing is transferred, paint it! Yep, you just paint in the lines. With watercolor you want to do several coats, called washes, to increase in depth of color. With temples, I wanted them to be gray but not dark gray so this didn't take long. I did more washes with the bird painting to get vibrant colors. Allow the paper to dry in between washes. 


A brown paper grocery bag is a great backdrop for a first timer. It can also be used as watercolor paper. I use it to dab my brush before each stroke (very important!)

Once you're satisfied with the colors and the painting is dry, trace the pencil in fine-tipped marker or pen. You can't erased what you've painted over, and I think a pen outline gives it a nice, finished look. 


Finally, sign your piece of art! The whole process can be finished in about an hour or two, depending on how many washes you do. It was really fun to make these paintings. After the temples were completed, I grew more confident and made some gift tags and painted a few books to represent Kindle books. They were a lot of fun.


A bird for my brother-in-law


This is a great project for a beginner!


Neighbor Gift: Cinnamon Popcorn and a Movie

This year I have neighbors! Ok, I've had neighbors in the past, but I've never felt super friendly with them. Now that we own our home, I figured we needed to get friendlier with the people around us. I decided to make cinnamon kettle corn and give this DVD


It's a short movie about the nativity of Christ. The perfect gift for Christmas, in my opinion. You can order your own here: Joy to the World DVD

Cinnamon Kettle Corn recipe adapted from Something Swanky
  • 1/4 cup vegetable oil
  • 1/4 cup white sugar
  • 1 teaspoon cinnamon 
  • 1/2 cup unpopped popcorn kernels
Heat the vegetable oil in a large pot over medium heat, covered.

Put in two kernels. When they pop, the oil is ready

Once hot, stir in the sugar, cinnamon and popcorn.  I use a spoon to help really coat the kernels.

Cover, and shake the pot constantly to keep the sugar from burning.

Once the popping has slowed to once every 2 to 3 seconds, remove the pot from the heat and continue to shake for a few minutes until the popping has stopped. Pour into a large bowl, and allow to cool, stirring occasionally to break up large clumps.


This year I tried making kettle corn in my Stir Crazy popper. AND IT WORKS and doesn't ruin my Stir Crazy! It's so fast and easy. Never going back to stove top. 

Cinnamon Kettle Corn recipe for Stir Crazy:

  • 1/4 cup vegetable oil
  • 1/4 cup white sugar
  • 1 teaspoon cinnamon 
  • 1/2 cup unpopped popcorn kernels
Put all ingredients in the Stir Crazy. Place the lid on top and turn it on. Once the popping has slowed to once every 2 to 3 seconds, turn off Stir Crazy and flip over (so the bowl lid is right side up) and take the heat element off**. Allow the popcorn to cool and enjoy.

**Don't leave the heat element on top while it cools, like I did. It melted the side of the bowl/lid a little. 

St. Nicholas Day: A Family Tradition

One of my favorite Christmas traditions growing up was St. Nicholas Day. Although we are members of The Church of Jesus Christ of Latter-day Saints sometimes known as "Mormons" my mom instituted we celebrate St. Nicholas Day on December 6th. St. Nicholas Day is commonly celebrated in European countries. It is thought that Santa Claus bringing gifts is based off St. Nicholas Day. Read more here.

 We set our shoes out on the fireplace hearth on the 5th of December. In the morning they would be filled with a small surprise, like hair things, candy or a small toy. It was a simple tradition but one we looked forward to. As a teenager, I liked to set out my most daring shoe for St. Nicholas. When we went to college, St. Nicholas still found us, via US Mail! His handwriting was strangely similar to my mom's ;)

I plan on carrying on this tradition with my family as well. Just another magical way to make December memorable!


In my husband's basketball sneaker: The Beach Boys's Sounds of Summer.(affiliate link)

In my bootie : Welch's Fruit Snacks, (affiliate link) because I love fruit snacks

In my daughter's boot: We Belong Together by Joyce Wan. (affiliate link) I LOVED this book when we got it from the library and I'm so happy we own it now! It's got really cute illustrations and I think it's perfect for a parent-child relationship or for siblings.

Wrapped and Done by December One RESULTS!


If you'll remember, it was my goal to be done with all my Christmas preparations by December first. This included my Christmas cards, gifts and decorations. Here's how I faired


Cards: Done! My sister-in-law took our pictures, I got that great Groupon and then addressed and sent them on Friday the 28th.

Decorations: Done! I like what I did this year, but miss most of my ornaments. A one year-old baby and breakable ornaments just don't mix. It's nice to have enough room for everything. Here's my nativity:


Gifts: All my gifts to my extended family and in-laws have been shipped! I left my husband and daughter's gift shopping until last week because I wanted to make people who lived far away a priority as to get their gifts shipped. This was good and bad. Good because that got done, bad because I didn't factor in that I'd be ordering gifts online and would need to allow for time to wrap those gifts. So I have 2 gifts coming that I haven't yet received which need to be wrapped. I still feel like I was successful because I won't be stressing about the gifts and I actually enjoy wrapping gifts.

So I think I did really well!! How did you you?

Advent Calendars!

I love a good advent calendar and now's the time to make them! There are so many fun and beautiful ideas out there. We have shared a few of ours in the past.


Musical Advent Calendar Garland is so easy you can make it in an afternoon AND the commitment is pretty low. Can you sing a song a day? Then you can do it!


Jordan's Felt Advent Calendar reminds me of the advent calendar we had growing up. Oh the fights we had over whose day it was to hang up the ornament.


Countdown to Christmas is almost an advent, so it should be included =)


Are you counting down the days yet?

Hashtag alert and Progress Report: Wrapped and Done by Dec 1

Hey everyone, how is your holiday prep going? It's still my goal to be Wrapped and Done by December 1! We've been posting some on Instagram but we want to see what YOU are working on for your holiday prep! Please post using the hashtag #HolidayPrepYall so we can see what you're up to! Plus we will feature you on Instagram!


 Now, here's some of what I've been doing:

Ordering my Christmas cards! I just bought this Groupon to Staples, 100 cards for $19--that's the best deal I've seen ANYWHERE by FAR! But it's EVEN BETTER, knocked down to $8 for 100 because it's been shared with enough friends. There's also a deal for 50 cards Get the deal too before Sunday! Here's one I liked:

(Thanks Brooke, for sending me the link!)


Painting--making my own gift tags!


Wrapping


Bing-ing (Searching using Bing to earn rewards. I've earned $25 for Christmas presents so far. Read more here)


Ibotta-ing (Rebate app, I've earned $18.25 so far )


Shopkicking (App to scan products in store, I've earned $15 to Target so far)


Ordering: presents from Amazon using my Bing Rewards! Win!


(no picture because I can't ruin the surprise!)

Getting our pictures taken, here's my favorite face I made:


Things that still need to be done: Christmas cards addressed, holiday baking, holiday decorating (I refuse to do it until after Thanksgiving, but the day after is just fine), ordering, wrapping and sending more gifts.

So let's see YOUR photos!! Use the hashtag #HolidayPrepYall and we will re-gram it on Instagram!

Helping with Days For Girls Inc

Have you heard of Days for Girls? It's a nonprofit with a really great mission:

Days for Girls International is a grassroots 501(c)3 non-profit creating a more dignified, humane and sustainable world for girls through advocacy, reproductive health awareness, education and sustainable feminine hygiene - because no girl should go without. Women and girls discover their potential and self-value, are equal participants and agents of social change and are given opportunities to thrive, grow and contribute to their community's betterment while ensuring quality sustainable feminine hygiene.

Yearly, my church has a large meeting for our women's organization, the Relief Society. This year we have a service project for Days for Girls. We put together reusable feminine hygiene kits for women around the world. In preparation for the day, I cut out 40 panty liners out of flannel (a sheet actually!). Here's what it looked like after I traced the pattern


and here are 40 cut liners (two pieces of flannel thick) ready to be sewed. I'm not the best seamstress, so I only volunteered for the cutting.


This last Saturday we got together to finish and assemble the kits. 


Kits ready to assemble


This is what I worked on: adding snaps to the shields.


Some young women sewing liners. 

All in all, we assembled kits for 210 young women throughout the world. This changes lives!! I encourage you to look into Days for Girls, Inc and see what you can do to help!

Leftovers to Lunch! 10 Great Ideas to Take Your Dinner Leftovers to a New Level!


My favorite lunch is leftovers. I just love how easy it is and I'm not wasting a thing! Sometimes leftovers need a little sprucing to make a good lunch. Here are some ideas!

1. Throw it in an omelet. Good for meat and veggies.

2. Eat it on bread! I had some paprika chicken sauce but no cooked noodles. I just ate it on a slice of bread instead for an easy lunch.


3. Burrito time! Wrap up everything in a tortilla and call it good.

4. Soup. Oh how I love soup for lunch! You can use meat, vegetables, beans and pasta in soup and they taste amazing. I love to experiment with soup and throw different vegetables in. I don't recommend eggplant though.

5. Sandwich, the old stand-by. Take it up a notch by turning it into a grilled cheese! Don't forget to add vegetables like asparagus, onions, and peppers you cooked up last night. A lettuce wrap is a way to use your leftovers as a sandwich without eating a ton of carbs.

6. Eat it cold. I'm looking at you, pizza. And I will also eat spaghetti cold too, on occasion.

7. Bake it. Leftover spaghetti? Why not bake it? Recipe here

8.  Why not make a pizza? French bread pizza is so fun and easy, lunch comes together in minutes when you have left over meat and vegetables. Or a pizza bagel!

9.  Eat it over rice. I ran out of tortillas the last time I made chili verde pork. I couldn't let it go to waste so I ate it over rice. Delish! Or use your leftover to top a baked potato.

10.  4. Toss with lettuce to make a salad. One of my favorites, good for meat, veggies and even rice like I did with my left over fish tacos and rice:


Do you have any ideas on how to liven up your leftovers? Share them!


Related Posts Plugin for WordPress, Blogger...