Showing posts with label fall. Show all posts

Fall Leaves Monogram

Happy Fall, Y'all! I wrote this post as a guest post two years ago but never shared it on our blog. So to get in the spirit of the season, here is my  Fall Leaves Monogram. I started by grabbing some fall patterned paper scraps from my scrapbook stash.

Photobucket

Using my Silhouette, I cut out a bunch of leaves from these scraps. Then I cut out my monogram also using my Silhouette. If you don't have a Silhouette, you could get some leaves like these and then hand cut your monogram. For this craft, you want a simple monogram because it ends up being really busy--straight lines are best!

Photobucket

I covered the "W" in adhesive and then stuck my first layer of leaves on.

Photobucket

Then I added more glue and filled in the holes.

Photobucket

I let the leaves staggered the leaves to create more visual interest and then trimmed down the sides.

Photobucket

Then I used some 3-D pop adhesives to give it a little dimension and backed it on a coordinating piece of cardstock.

Photobucket

Last, I popped it in a frame and called it good. Here's the finished product!

Photobucket

Here it is with my fall table scape:

Photobucket

(kinda weird to see this--I've moved two times since I wrote this post!)


Pumpkin recipe roundup!

Last night after we finished trick-or-treating, my 5-year-old looked up at me and asked, "What's fun in the next year [month]?"

What's NOT fun? Fall is in full swing, the leaves are falling all around, and pumpkin recipes are helping us all get ready for Thanksgiving!


What are your favorite pumpkin recipes? 
Share links!

Fall Initial for the Front Door

Recently I was Skyping one of my best friends and she was showing me her new house. As she walked in her front door I saw we both had A's on our front door (we happen to share the same last name). So basically what I'm trying to say is all the cool kids are doing it. Her A was painted turquoise and on a super cute burlap wreath.

Here is how I made mine:

I used 2MM Jute cording, a 12" A I got on sale for a great price, and two 2 stems of fall flowers.


 Tips for wrapping:
1: I started out by gluing the jute close to the bottom with hot glue
2: I wrapped it around one time and then I put glue (this is hard to see in the picture) on the bottom edge so you can't see any white. If I could do this again I probably would have painted the letter before hand.
3: I continued to wrap and put glue along the edge as I went.
4: I wrapped up the bottom of the A, cut and glued down the jute, and wrapped the jute around the cross of the A.
 For the flowers I wanted to be able to change them out so I glued them close together on a piece of stiff dark stiff felt. I glued the leaves onto the side.
 I glued a piece of jute on the back of the felt and tied it into the A. 


Isn't it cute?!

After I put up my fall decor I added the A to my wreath but I can change it out at any time. I think when it hangs alone I need to add a beefier bow at the top.

Have you tried adding jute to anything this fall?

Fall Decor

For the past three year I have shared with you guys my fall mantle (both can be seen here) and I feel like each year it gets better. This year I decided to add a bit more of that lovely fall feel to my autumn decorations with some burlap.

I've had this burlap for quite some time. They sell burlap in many different shades. I'm not sure what you're supposed to do with burlap but it's very stinky so when I got it home I washed it delicately in a bucket with some soap and then rinsed it. A good amount of dye came out (but I don't feel like it changed the color of the fabric) and so did the majority of the smell.


I added the burlap in two places. I used some vases and cut pieces about 4" wide x the circumference. I glued them on the back and wrapped some twine around about 10 times. I made a bow and glued it onto the side.


I also added the burlap as a table runner on both surfaces. I love the texture and richness the burlap adds.

How are you decorating for fall? 

Happy Fall, Y'all!

We moved 5 weeks ago and doubled our house size and I have since (of course) changed how I want every single room decorated. I'm changing color schemes and decor from our last house. Please forgive me as I will post mostly about house projects. I will need your opinions/advice on tons of things, so thanks in advance!!

In the south the chill has only started to creep in within the last few weeks. After it did of course I got the itch to have deep oranges, yellows, and reds adorn all level surfaces in my home. I bought extra pumpkins to autumn-ify our kitchen with a centerpiece and broke out the decorations I bought last year.


Since moving my husband has been working on a special project for me. It turned out beautiful and I am so lucky to have such a handy guy. I will post the tutorial for this next week. It is the awesome backdrop to my mantle.

 Last Friday I determined I was going to need a ton more stuff for my mantle so I went over to Michael's. This is a great time to get stuff because all of their Fall/Halloween stuff is 70% off and it isn't too picked through yet. I have three simple tips for decorating your mantle:

1. Invest in items that can be used in any season. Two examples are the green crazy tall thing that adds height and the large glass hurricanes.
2. Get one or two more things than you think you need.
3. Use varying heights, textures, and color to add visual interest.


There are mini pumpkins inside the hurricanes.

I also got this super cute table from my amazing friend who recently moved away. I think I am going to do something like this to it. I'm so grateful she gave it to me because it fits perfect in this space.
More of the decorations were on the table but little hands got to throwing the glass things on the floor and so they were put up higher :)


Happy Fall, Y'all!!

Fall Decor Round Up

Are you in full fall mode yet? If not, we've got some great fall decor ideas to help you get that way!

Brooke made this beautiful fall wreath and has tons of great tips for making wreaths.


Jordan has a great harvest printable. We love this quote!


Mom made these table runners for fall. The second one looks great on Jaime's tablescape!


Jasmine made these fun Mod Podge Halloween vases. So cute!


Jaime made this fall leaves canvas. Can you believe it was only $1?!


 Now are we ready to decorate?! Get to it!

Apple braid: healthy makeover!

Last fall, I made a tasty apple braid. This fall, I decided to see if I could give the original recipe a healthy makeover.

It was an all-day endeavor, and there were tears shed. Literally. Actual tears.


The healthy makeover!

For the filling:
  • 3 medium Granny Smith apples, peeled, cored and cut into slices.
  • 3 Tablespoons Xylitol
  • 1 1/2 tsp cinnamon
  • 2 tsp lemon juice

For the 100% whole wheat bread, from Heavenly Homemakers--This makes two loaves, so either half the recipe or make one loaf of bread in addition to the apple braid.

  • 6 cups (give or take) whole wheat flour, divided
  • 1 ¾ cups warm water, divided
  • 1/3 cup honey
  • 1 package active dry yeast (2 1/4 teaspoon)
  • 1 teaspoon sea salt
  • 3 Tablespoons melted butter

For the drizzle:
  • 1 tbsp Agave Nectar
  • tiny dash imitation vanilla
Yep, there's no actual sugar in this recipe!

Begin the bread first, following Heavenly Homemakers' recipe through the first rise. In the last 15 minutes of the first rise, make the filling by combining the filling ingredients in a bowl. 

After the first rise is finished, preheat the oven to 350. Roll out half this amount of dough and cut the outer thirds in ribbons (being careful to keep them even because you don't want to end up with too many ribbons on either side).


Remember that whole wheat dough is that it generally doesn't have as much stretch as white bread dough, so the ribbons might need to be extra long to fit over the filling.

Lay the filling down the middle of the bread and overlap the ribbons to form the braid, pinching the dough in place. Since my dough was less elastic than the last time I made it, I actually just pinched them together in the middle. I tried to give this a chance for a second rise . . . didn't happen. It also didn't happen for the other loaf of bread I made from this dough. I'm VERY frustrated, after grinding my own freaking wheat, using yeast I just opened last month, spending four hours making the dough and six MORE hours trying to get it to rise the second time. . . .

Ahem. Anyway.

Bake the apple braid at 350 F for about 25 minutes or until golden brown.

Combine the drizzle ingredients, warm slightly and drizzle over the cooling braid. Cut into 10 slices.

So, how did the healthy makeover go?
As you can see, the analysis by CalorieCount.com shows there's almost no difference between the before and after in raw nutrition data. Calories, fat, saturated fat, cholesterol, sodium--it's all very close. However, the reduced sugars and especially the whole grains earned the after version a nutrition grade of B+, as opposed to C+, making this a dessert you don't have to feel too guilty about.


And most importantly, how did it taste?

I HAVE NO IDEA. 

Again, I'm super frustrated about this. I brought this to my friend's house, and my friends had pieces (and seemed to like them), but I was too full to eat any. So I brought it home and put it in the kitchen.

The same room as a bunch of bananas a neighbor gave us that afternoon.

The bananas were infested with fruit flies which took over my apple braid which I seriously spent six and a half hours making.

Wayward rage.

Ahem. Anyway.

So, if you try this, let me know how it tastes! I don't think I have six and a half hours to go through all this grief again any time soon.


Pumpkin Carving Ideas

The Wayward girls have a strong tradition of carving pumpkins. After lining the dining room table with newspaper, we'd all get to work gutting and carving! We've shared some of our pumpkin designs and thought we'd give you a few ideas since it's that time again!

Jasmine, Brooke and her husband carved these bad boys as an homage to Harry Potter.

 
A dementor and patronus, the three brothers, and a witch.  

Jaime and her husband are also HP fans. Here's what her husband carved. 
Photobucket
Voldy!

Jordan's son (5 at the time) designed and husband cut this cutie!


Brooke's little girl could be found playing around:


Have fun carving!

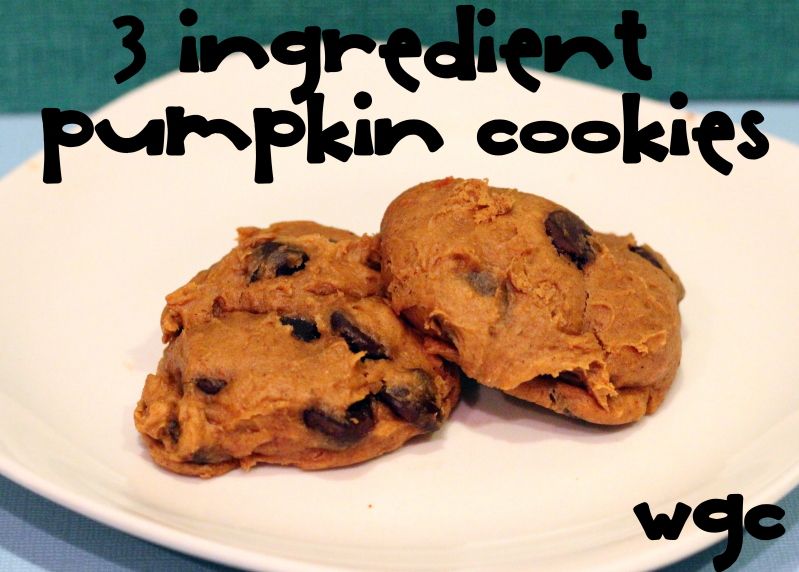
3 Ingredient Pumpkin Cookies

Fall baking means one thing to me: PUMPKIN! I've been meaning to make some pumpkin cookies and friends coming over for lunch in between General Conference Sessions was a great excuse. I found the idea of making pumpkin cookies with only 3 ingredients all over and I knew I had to make them myself.

Photobucket

3 Ingredient Pumpkin Cookies

Photobucket

Ingredients:
1 15 oz can of pumpkin puree (not pumpkin pie filling)
1 cake mix (I'd recommend Spice Cake)
1 bag (2 cups) of chocolate chips (I'd recommend dark chocolate chips)

Optional: Pumpkin pie spice. Really you only need this if you use a regular cake mix, rather than spice cake.

Directions:

1. Preheat oven to 350. Mix together pumpkin and cake mix using a mixer.

Photobucket 

2. Stir in chocolate chips

Photobucket

3. Glob 2 tablespoon sized cookies on a greased cookie sheet.

Photobucket

4. Cook at 350 for 12-15 minutes, or until a toothpick comes out clean.

Photobucket


5. ENJOY!

Photobucket


What excuse can you find to make these babies?
Related Posts Plugin for WordPress, Blogger...