Showing posts with label Baby & Kids. Show all posts

Calli-Cardi! Sweater with a caterpillar

Last year I made sweaters for everyone in my family (except me...). My four-year-old's lovey is a multicolored caterpillar we call Cally. I wanted to incorporate it into her sweater to make it personal and unique for her: a Calli-Cardi!


I looked for a cardigan with an off-center opening to maximize the room for the caterpillar on the front. As with my six-year-old's sweater, I knew I didn't want to buy five colors of yarn to only use a little of most of them so I dyed the caterpillar colors:
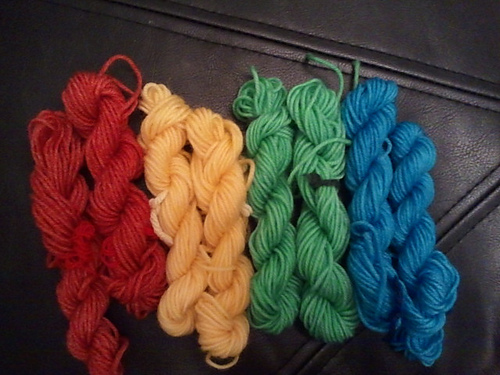
Each hank was about 14 yards; the eight of them together weighed about 36g.To dye them, I used food safe colors in Mason jars on the microwave (but that's another post!).

Red: one packet of cherry Kool-aid
Yellow: about five drops of yellow McCormick's food coloring (and white vinegar)
Green: about five drops of green McCormick's food coloring (and white vinegar)
Blue: one packet of mixed berry blue Kool-aid.

Originally I planned to work the caterpillar design as part of the sweater itself using the intarsia method of colorwork, but I realized that would be a big challenge, especially with two different weights (thicknesses) of yarn. So I made the cardigan normally and then knit hexagons to appliqué the caterpillar on.
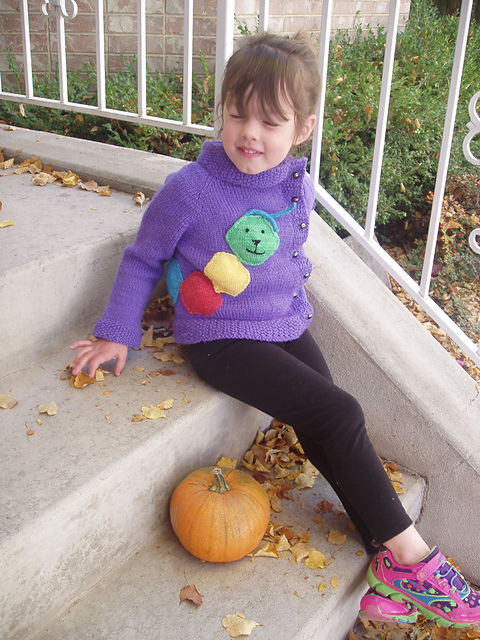

I left an extra long tail on the end of each hexagon and used the tails to sew the caterpillar onto the sweater. I used backstitch in black yarn to make the caterpillar's face and short i-cords to make his antennae.

As you can see, she loves it!

For pattern notes, modifications and in-progress photos, see this project on Ravelry!
Cardigan Pattern: Peach Blossom Child Jacket by Jennifer Little
Cardigan Yarn: Cleckheaton Country Kids 8-ply (superwash wool in DK/8-ply weight) in purple
Caterpillar Pattern: Merit badge by Amanda Ochocki
Caterpillar Yarn: Knit Go Craft Super Soft Cashmere Wool in white (cream), hand dyed (claims to be DK weight but knit up more like fingering weight)

Teddy Bear Picnic 1st Birthday Party

A few weeks ago we celebrated KZ's first birthday. Her nickname is "Bear Bear" so we decided to have a teddy bear picnic. It was one of the last warm weekends (even though it was mid-October) before fall has fully set in. It was the perfect day! We had the picnic in our backyard with some of our family members and everyone had fun!

The best part of this party was I only had to purchase a few things! The decorations were all the teddy bears, mason jars, and baskets we could round up in the house. I did purchase the tablecloths (from Party City) but the flowers were leftover from events we attended earlier in the week.


I served sandwiches on kaiser rolls, pickles, chips, teddy bear crackers, and red and green apples. We also served lemonade.

 I had big plans for a beautiful cake but I opted for a simple cake. In addition to the chocolate frosting I used 4 vanilla wafer cookies, and half a pink Starburst. 


For the favors I ordered flavored honey on Amazon, and had gummy bears, and Bit of Honey candy.  The papers said "Thank you for BEE-ING sweet and coming to my party"


Those are some happy people having fun!!

This was one of my favorite parties that I have attended. Mostly because it was the most simple and I got to have fun enjoying the party without the stress!

Halloween 2014 Costumes: Frozen!!

Someone asked me a couple weeks ago what we were going to be. I said "What do you think?" We went for the obvious choice. This is the first year that PB is old enough to pick her own costume and duh she chose Elsa. We do like to pick unexpected costumes, though so without further ado!

I have to admit that "Elsa's" costume was purchased (thank goodness) but the other outfits were DIY.
 Since I didn't have anything to make for her outfit we did kick it up a notch with the hair, makeup, and accessories. So PB always begs to put on my makeup. Well I did for her costume and she hated it! For her make up I penciled in her eyebrows, put bright pink, purple, and blue on her lids, put on a bit of mascara, blush, and lip gloss.
 For her hair I knew I wanted pieces that were swept back and then a side braid. I gave her the choice of which hair style of Elsa's she wanted and this is the one she picked. I started by putting mousse in her hair and pinned back with a slight twist, three section on one side and one on the other to look swept back. I gathered her hair to one side and braided it. I put bobby pins in to secure the style. Then her daddy got to work using a whole can of white hairspray on her hair. She loved the results!!

Do you notice her shoes? Well we have two pairs of the same shoes in a 7 and 7.5. She is wearing the left of both pairs which we didn't discover until we got home!
Isn't this the best? When we were at the dollar store they already had out their Christmas stuff and PB wanted a pack of snowflakes. I was thinking of a cute belt with them but she wanted it to come out of her hand. I tied a ribbon on her wrist and one on her ring finger and tied threads onto them which were tied to the snowflake to keep it upright. To stabilize it on her hand I glued it onto a tan piece of paper.


Can you guess what she is? (Other than extremely cute, of course!) She is a rock troll/Love Expert! I made her little shirt out of an old one of mine and splattered it with white paint. I made her necklace out of Sculpey. I used two different shades of green ribbons for her head band. 


It doesn't get cuter than her!

For the King of Arendelle, I used his regular black suit and popped the collar and pinned it shut all the way up. I made the accessories from Sculpey, red fabric, cording, fringe, fun foam, and a big of cardboard.

For the Queen of Aredelle, I made the dress (not well so I won't go into a tutorial...) with black and purple fabric along with some decorative trim. I used Sculpey for my broach and fun foam for my crown. 


What is the funniest part of all? PB instead wants to be Anna for actual trick'r'treating. Good thing we have one of those dresses too!!

Two things to find in the pictures: Where's Waldo's arm and the pumpkins from last week's post!

Sweater of many (custom!) colors

I've been way too quiet here on the blog lately, but not for lack of crafting! I've got a lot of things I keep meaning to share, but I'm so happy with this one, I had to make the time to blog.


Cast on: Sept 21
Finished: Oct 8
Pattern: Jolie Fleur from DROPS design.
Yarn: Knit Picks Wool of the Andes Sport in Rouge and White

That's right: the only two colors of yarn I purchased for this were the dark pink of the body and the white. The other colors were dyed on the white using McCormick food coloring and Kool Aid!

  • Light pink (it's in there): McCormick Neon Pink
  • Yellow: McCormick Yellow
  • Green: McCormick Green
  • Blue: Ice Blue Raspberry Lemonade Kool Aid
  • Purple: McCormick Neon Purple and McCormick Neon Blue, 2:1.

Dyeing yarn with these is not only easy (and awesome!) but completely food safe, so you can use your regular pots and pans, and it's okay to use them for food afterwards. (I actually used Mason jars in the microwave...) Kool Aid contains enough citric acid to "set" the food dyes on animal fibers (wool, alpaca, silk) and nylon. Food coloring requires additional acid, and I used vinegar. The only other thing you have to do is heat it enough and the yarn soaks the dye right up--but this is probably a post for another day!

I ran out of all the colors I'd dyed as well as the white and had to order and dye more. Fortunately, I'd kept careful notes of the dye formulas I'd used. Unfortunately, I lost those notes. But I was able to remember it pretty well!

I absolutely love how this turned out. But the best part is how much my daughter loves it. She came up to me while I was finishing it and spontaneously told me, "Thank you for working so hard on my sweater." And that makes it even more worth it.

Lots more information on the project and especially progress photos: Project on Ravelry

Legging Embellishments with DIY knee patches

I decided to tackle a few of the things in my "to mend" pile this week. On top was a cute pair of hot pink leggings with little holes in the knees. I debated cutting them off at the knee or putting on patches which won out in the end.

I found some brown and white polka dot fabric that looked so cute with the pink.


What I used:
Scrap fabric and paper
iron
Heat n Bond sewable adhesive

I first cut the shape I wanted out of the scrap paper to use as a pattern. I cut a piece of fabric and heat n bond slightly bigger than the pattern and ironed on the adhesive to the fabric. I then cut the shape out of the fabric. Ta da! Patches!

I ironed the patches onto the leggings. The heat slightly discolored the fabric but it went back to normal once it cooled. This was the tricky part. You can get heat n bond that is a little more heavy duty and may stay a little better but I used lite and it needed to be stitched around. 

I used my seam ripper on seam on the inside of each leg about an inch above to an inch below the patch on either leg. With the other side of the pants pulled away I used a zig zag stitch and sewed around each patch twice. I then sewed up the open seams and voila!


How cute did these turn out?! Too bad they are in the size in between both my girls right now!!

Easy Pacifier Clip

Hi my name is Brave Brooke and I hate searching for pacifiers. The other day I went and bought a bunch because I detest looking for them and yet I was still searching for the 7 we own. Months ago I made KZ a pacifier clip that is sadly sitting somewhere along our route home from our long road trip so it was time to make another one and a couple to spare.

This is one of the first sewing projects I've done in quite a few weeks. It was so rewarding to finish and it was so simple. This is a great project to use scraps for

All you need is:
  • A piece of fabric that is 10"x 4" (one of the ones I made was more like 10" x 3.75" and it still worked out just fine)
  • A clip (this is the kind that I ordered)
  • Ribbon (about 4")
  • Velcro/a snap
  • Optional: button pacifier (MAM or NUK) adapter

First fold the short ends down 1/4" and press.

Next fold it in half lengthwise and in half again (see picture) and press.

Before sewing the fabric closed unfold and sew any embellishments and the fastener (Velcro or snap) for the clip on. For a button pacifier you will need the adapter for the top and the clip for the bottom. The first one of these I made I put Velcro on either end. For this one I used a piece of ribbon on the adapter side. This tutorial can be used for any type of pacifier. 

Refold the fabric and sew around all sides. As you come around the end opposite of the clip side sew in the ribbon folded in half with the ends inserted into the top. 

Make sure any embellishments are secure. For the bow I back stitched before I sewed it closed and then once it was sewed up I tied it and with coordinating thread hand stitched it through the knot to make sure it wouldn't come untied. 


Notice the clip on the left has a snap. 


These are the best pictures I could get of her using her pacifier clip. She is on the go with no time for pictures!


What embellishments would you put on a pacifier clip?

Frozen Party: Food, Favors, and Outfit

This is the last installment of the three part series about PB's Frozen: Melted 3rd birthday party. See posts about the decorations and games.  Let's get down to the good stuff- the food!

We had turkey and cheese sliders. With the quote "We finish each others...sandwiches!" (idea from here) We also had fruit and veggies, pigs in a blanket, and "reindeer chow" (muddy buddy chex mix).  We had marshmallows (snowballs) and powdered doughnuts.


 The punch was blue Koolaide, sherbet, and lemon-line soda. We put some of the "ice" around the bottom. This was my grandma's idea :)

So the cupcakes were super simple but looked awesome. I used a white cake that I put food coloring in to make purple, blue, and left some white to go along with the color theme. I used store bought frosting and them I added the ice. (For a tutorial go here. It was simple, had a great effect, and was tasty!)


Favors: I was thinking about quotes from the movie that talked about food and I remembered how much Elsa and Anna love chocolate. I made Oreo truffles and put them in baggies and cut off the top of the bag. I tied them with teal ribbons.


Outfit: There is a noticeable lack of 3 year old in these pictures. My angel has told me repeatedly that is is "dis-gussing" and she refuses to wear it. I got a text from my amazing sister-in-law this week with a picture of an awesome costume she made her 4 year old who also refuses to wear it. It must be genetic.

I made her a towel poncho for the pool that has an Elsa dress on it. I bought a bath towel at Walmart along with light blue and teal sparkly tulle. I used teal felt I had on hand.

To make the poncho part of the towel I folded the towel in half and measured my cutie. I measured the width of her shoulders and the length to just under her arm pits. I cut a hole in the towel width wise centered on the crease of the towel. I cut it two inches shorter than her shoulder measurement. I cut a three inch slit to accommodate her head. Around the opening I folded it down 1/4 of an inch and sewed to finish off the edge.  On either side of the towel I sewed about a 5 inch long section on either edge to leave arm holes. It was about 5 inches from the top of the fold.


I pieced together the dress and used the measurement of the length to her chest for where to put the gathered section on the front. The light blue was very light to I had to layer it a few times to see the color. I zig-zagged around the felt and the completely tacked down sections (sleeves). The cape on the back is only sewed on the top and the two bottom corners. The dress on the front is sewn the same way except there is gathered fabric above the felt.


Phew! It was quite the party! I was thinking of writing up some tips about how not to go insane (like I did) while throwing a birthday party. Have a great 4th of July!
Related Posts Plugin for WordPress, Blogger...