Ok so have you ever sewn something then when you finished you see a big heaping mess of thread on the underside where you started? Well this is because the bobbin hadn't been threaded all the way correctly. In order to do so first you're going to need to put it in the machine the correct way leaving it with a couple of inches of extra. This is important. Not all machines are alike so I don't really know how yours needs to be threaded!
Next with the needle threaded, turn the knobby thing until the needle goes all the way down into the machine.
Now pull it back up . You should see that the top thread has gone down into the bottom part of the feeder. Now pull the top thread's thread until the bobbin thread comes up.
Using a seam ripper or whatever's small enough to fit under the foot, pull one side of the bobbin thread.
And pull that thread to the side. Now you won't start a sewing project with a ball of thread around your bobbin!
Showing posts with label sewing tips. Show all posts
Threading a Bobbin Right
Posted by
Jasmine
at
7:00 AM
1 comment
:
Labels:
bobbin
,
Jasmine
,
sewing
,
sewing machine
,
sewing tips
,
threads
Custom-fit ruched swim coverup
My girls weren't the only ones who got new swim duds!
I sewed this ruched swim coverup myself from very lightweight jersey knit. And here's how I did it!
First, you need very accurate measurements--and a lot of them.
Once I had my measurements, I subtracted a square for the back. (You can measure from side seam to side seam for an exact measurement--I wouldn't just divide all the numbers by two because the side seam will be farther forward on the bust than the waist.) You probably want to bring in the sides a bit at the small of the back:
For the front of the bodice, take your other measurements, subtract the square, and divide that answer by two. If your fabric is really stretchy like mine was, you'll need to subtract another inch or two here to create negative ease. "Ease" is the difference between the fabric measurements and your measurements. Normally you want at least a couple inches so you can put on the clothing and move in it.
In a knit fabric, you can use negative ease to have a very fitted garment. Or, in this case, one that stays up. I definitely need more negative ease in mine!
Once you have all your measurements ready, using the length measurements and your halved and adjusted front bodice measurements, make the pattern (I believe this is similar/identical to making a sloper, a personal generic pattern). I use a piece of newspaper to make my pattern, laying out the adjusted widths spaced according to the lengths. Connect the measurements with curves.
Then you use this half pattern on a fold, which will make the bodice top:
Then sew the back and front together.
For the skirt, draw a straight line on the angle from the waist to hip measurement. Extend this line to reach the desired skirt length.
And just for fun, I got some cool pictures of the finished product on a breezy day before heading to the pool at our RV campground outside of Bryce Canyon!
I sewed this ruched swim coverup myself from very lightweight jersey knit. And here's how I did it!
First, you need very accurate measurements--and a lot of them.
- High bust
- Bust
- Under bust
- Waist
- Hip
- Lengths: high bust to bust, bust to under bust, under bust to waist, waist to hip, and waist (or hip) to desired skirt length, top of back of bodice (a bit below underarm height) to hip
Once I had my measurements, I subtracted a square for the back. (You can measure from side seam to side seam for an exact measurement--I wouldn't just divide all the numbers by two because the side seam will be farther forward on the bust than the waist.) You probably want to bring in the sides a bit at the small of the back:
You could sew the whole bodice as a tube, but that makes it hard to add the ruching, and generally in a sleeveless top, the back is lower than the front, so keep that in mind!
For the front of the bodice, take your other measurements, subtract the square, and divide that answer by two. If your fabric is really stretchy like mine was, you'll need to subtract another inch or two here to create negative ease. "Ease" is the difference between the fabric measurements and your measurements. Normally you want at least a couple inches so you can put on the clothing and move in it.
In a knit fabric, you can use negative ease to have a very fitted garment. Or, in this case, one that stays up. I definitely need more negative ease in mine!
Once you have all your measurements ready, using the length measurements and your halved and adjusted front bodice measurements, make the pattern (I believe this is similar/identical to making a sloper, a personal generic pattern). I use a piece of newspaper to make my pattern, laying out the adjusted widths spaced according to the lengths. Connect the measurements with curves.
Then you use this half pattern on a fold, which will make the bodice top:
Cut one piece like this. Then, to create the ruching, take your regular pattern and draw horizontal lines across it. I did mine about 1.25" apart.
Cut the pattern along these horizontal lines, and space the pieces evenly to double the overall length of your bodice. You'll have to redraw the curves here.
Cut one long piece like this. Sew two lines of long basting stitches along each edge (mine also required two sets of basting stitches down the front of the bodice). Pull the threads to gather the fabric to match the regular-length bodice. Stabilizing stitches for the ruching are your friend.Then sew the back and front together.
For the skirt, draw a straight line on the angle from the waist to hip measurement. Extend this line to reach the desired skirt length.
My research favored a six-gore skirt, and the bodice is only the front half of your dress, so you'll want to divide that original skirt trapezoid into three even gores to get your final measurements or pattern pieces.
The full pattern will look like this:
Cut six gores and sew them together, then sew them to the bodice!
Here's a closeup of my bodice. You'll probably be able to see the lines of stabilizing stitches:
And just for fun, I got some cool pictures of the finished product on a breezy day before heading to the pool at our RV campground outside of Bryce Canyon!
Happy summer!
Posted by
Jordan McCollum
at
7:00 AM
2 comments
:
Labels:
beach
,
cover up
,
Holidays and Entertaining
,
Jordan
,
sewing
,
sewing tips
,
summer
,
tutorial

Tailoring Made Easy!
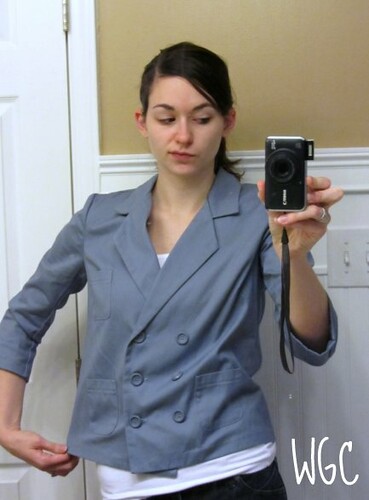
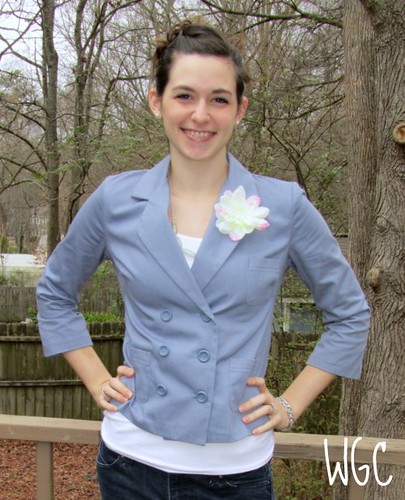
I had this cute jacket hanging in my closet that I had never worn. I got it a couple summers ago on a trip with my mom and Jasmine and it was a great deal. I paid less than $5 for it! The only problem was that it didn't fit. A great deal isn't a deal if you can't use the thing you bought. Today I decided to change that and I did it all during nap time :)
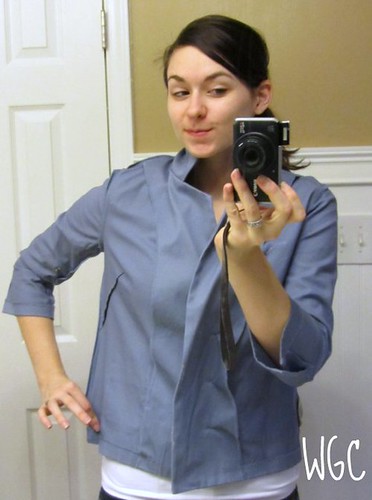
The problem was that it did not fit in the torso. The arms fit great but the rest was boxy and too wide. I decided to make the outer shape more feminine and take in the darts-yup I'm not endowed, I'll admit it.
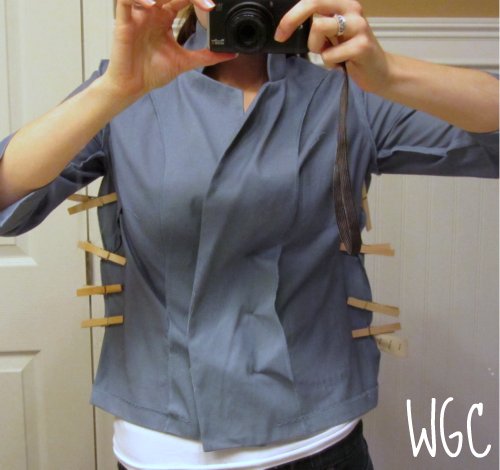
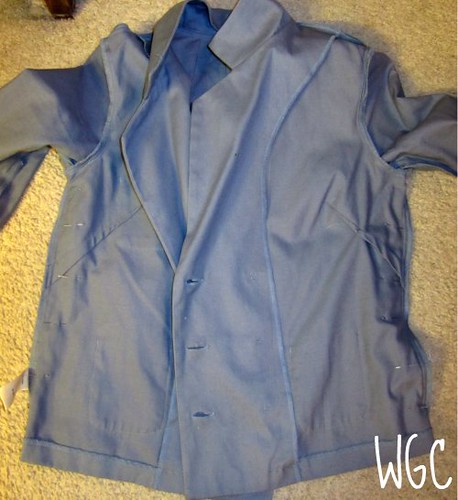
Marking for tailoring an article of clothing while you're wearing it with straight pins is pretty hard. Instead I got the idea to do it with clothes pins! I turned the jacket inside out and buttoned it. I then pinched the excess fabric making sure that it was about even on each side and put on the clothes pin.


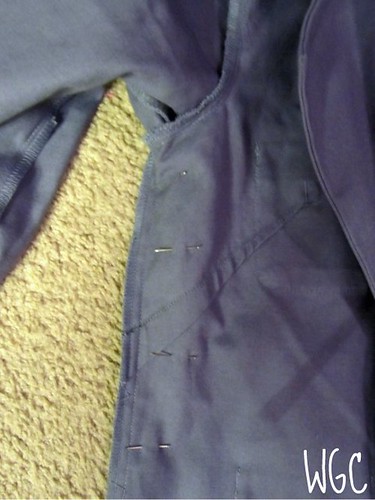
I then took the jacket off and pinned where the clothes pins were with straight pins.
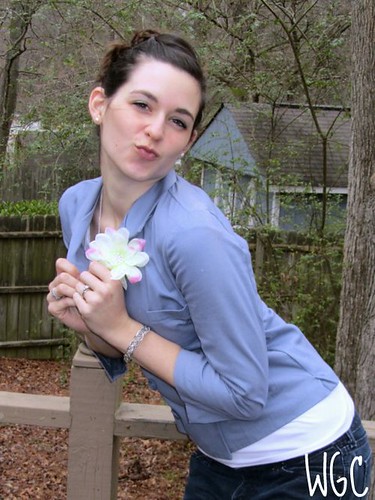
This part is important: I didn't want to change the sleeves or bottom edge so I tapered the top and bottom of the edge. I made sure that under the bust area the seam went in so that it would be fitted. I then altered the darts (for a tutorial on darts go here) by starting at the smaller original edge and making the angle greater. I turned it right side out and made sure it fit and pinned a flower to my lapel. (Note: I also put on makeup and fixed my hair so I wasn't such a hot mess)


I hope this inspires you to tailor your own clothes to you because none of us are the same shape! I heard a really cool quote the other day on a commercial for foundation. I don't remember exactly what they said but it was basically we each are a melting pot of our ancestors and our face is the combination of their faces looking back at you in the mirror. We each have a unique heritage and thus are different. Having clothes that fit make you feel more confidant so do it!
The problem was that it did not fit in the torso. The arms fit great but the rest was boxy and too wide. I decided to make the outer shape more feminine and take in the darts-yup I'm not endowed, I'll admit it.
Marking for tailoring an article of clothing while you're wearing it with straight pins is pretty hard. Instead I got the idea to do it with clothes pins! I turned the jacket inside out and buttoned it. I then pinched the excess fabric making sure that it was about even on each side and put on the clothes pin.


I then took the jacket off and pinned where the clothes pins were with straight pins.
This part is important: I didn't want to change the sleeves or bottom edge so I tapered the top and bottom of the edge. I made sure that under the bust area the seam went in so that it would be fitted. I then altered the darts (for a tutorial on darts go here) by starting at the smaller original edge and making the angle greater. I turned it right side out and made sure it fit and pinned a flower to my lapel. (Note: I also put on makeup and fixed my hair so I wasn't such a hot mess)


I hope this inspires you to tailor your own clothes to you because none of us are the same shape! I heard a really cool quote the other day on a commercial for foundation. I don't remember exactly what they said but it was basically we each are a melting pot of our ancestors and our face is the combination of their faces looking back at you in the mirror. We each have a unique heritage and thus are different. Having clothes that fit make you feel more confidant so do it!
Posted by
Brave Brooke
at
11:30 AM
5 comments
:
Labels:
Brave Brooke
,
sewing
,
sewing tips
,
tailoring
,
tutorial
Baby Presents- Wearable Blanket
I'm making my baby most of her presents for Christmas this year. Tonight while we visited with Santa at a party he asked her what she wanted while she had a death grip on his beard. I said something like "bath toys??" After we got home I actually started one of her gifts (I'm way late I know).
I love this blog. She has amazing tutorials like every day of the week. I saw this one and combined with awesome deals on Black Friday at Joann on fleece I decided I would go for it. I had this tutorial and many of her other tutorials, pinned for a while on my Pinterest.
I feel like I really stretched myself (again- like the swing cover) on this project. I did two things I had never done before. They were both really easy once I read instructions how to do it. The first was a zipper- I told you I was a novice sewer. The other was a snap. The tutorial she gives includes OTHER tutorials on things I wanted to learn how to do.
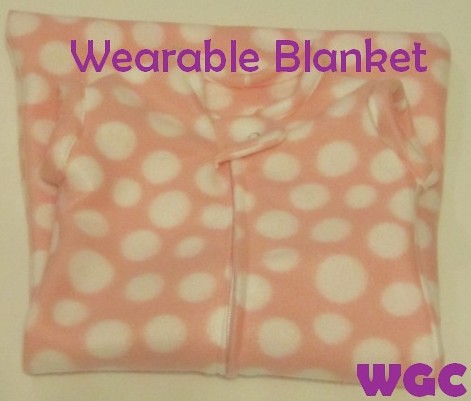
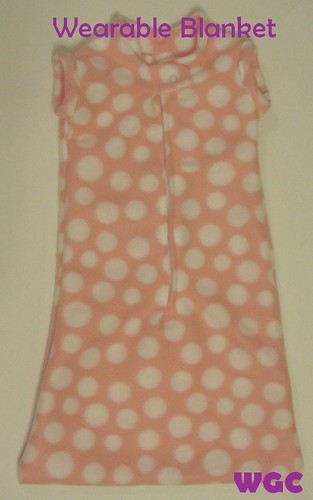
So here is the Wearable Blanket I made:
A couple variations I did:
I love this blog. She has amazing tutorials like every day of the week. I saw this one and combined with awesome deals on Black Friday at Joann on fleece I decided I would go for it. I had this tutorial and many of her other tutorials, pinned for a while on my Pinterest.
I feel like I really stretched myself (again- like the swing cover) on this project. I did two things I had never done before. They were both really easy once I read instructions how to do it. The first was a zipper- I told you I was a novice sewer. The other was a snap. The tutorial she gives includes OTHER tutorials on things I wanted to learn how to do.
So here is the Wearable Blanket I made:
- I used a 14" zipper instead of a 22". It only goes 2/3 of the way down the front but I don't think that will be a problem at all.
- For my pattern I actually had a sleeveless sleep blanket that is too big to pattern it after instead of making my own.
- I didn't round the bottom edges. I just didn't I think it was partially laziness.
![]() |
| Do you see my zipper and snap? Pretty snazzy, huh? |
For the zipper I used her tutorial included within the tutorial. For the snap I followed the directions on the back of the package. All I needed was a hammer and a spool of thread. I lined up the top and bottom pieces, centered the spool, and hammered away.
I want to hear about what you are making for others for Christmas this year!
Posted by
Brave Brooke
at
7:00 AM
3 comments
:
Labels:
baby
,
Baby & Kids
,
baby girl tutorials
,
Brave Brooke
,
sewing
,
sewing tips
,
tutorial
,
wearable blanket
How to sew a blind hem
Happy Halloween! I think this is the first year we've carved pumpkins (or at least the first time in a while). We let the kids choose the features, and my five year old drew the face on. Naturally, the adults (read: my husband) did the cutting.
And as always, I felt ridiculously compelled to sew our costumes. So I altered one of my dresses and sewed a whole new one for my older daughter. (You can see the full family on my blog.)
I had every intention of sewing one for my younger daughter, too, but I realized . . . I like being DONE with sewing more than actually doing it! Plus, I found a beautiful dress she hadn't worn yet. (My son's costume was purchased; it was actually a pirate costume, but it worked perfectly.)
Because it's not enough for me to sew something that's already beyond my skill level, I decided to tackle a new skill while sewing my daughter's dress: sewing a blind hem. I really, REALLY hate pressing narrow hems, so I thought I'd give a blind hem a shot. (You still have to press it, but it was a little better.) I was pretty pleased with the result.
A blind hem is a bit less noticeable way to hem a dress. (It's also especially good for hemming pants . . . but I don't even want to think about how you'd have to fold and twist them to do that!) Here's how it looks:
This is how the blind hem stitch looks on my machine (this is for woven/non stretch fabrics; stretch fabrics have smaller zigzags between the big zigzag peaks).
The peaks of the zigzags are the only parts of the hem stitching that goes through the top layer of fabric to be visible from the outside. It's all in the folding before you sew--which is a bit tricky to explain, but this is how I figured out to do it, loosely based on instruction from the family seamstress maven, Jasmine, (in July) and . The instructions are much easier to demonstrate in a video:
Here's a diagram to show where to sew:
You just want to catch the edge of the fold of the front fabric with the point of the zigzags. I practiced on scrap fabric to try to get the stitch width right so I could aim the fold for the midline of my sewing foot and catch the zigzags.
The pattern is Simplicity 4647, view A, size 3 (with the overlay skirt from view B, size 6). I didn't sew the sash on quite right. I think I could still fix it, though--either take out the stitching line and sew it down further forward, or tack it down. The fabric was the $1.99 costume satin (but it feels nice), with a glittery tulle net for the overlay. Oh, and her crown? $4! (I was excited for the good deal.)
Have you ever sewn a blind hem? What are your best tips?
And as always, I felt ridiculously compelled to sew our costumes. So I altered one of my dresses and sewed a whole new one for my older daughter. (You can see the full family on my blog.)
I had every intention of sewing one for my younger daughter, too, but I realized . . . I like being DONE with sewing more than actually doing it! Plus, I found a beautiful dress she hadn't worn yet. (My son's costume was purchased; it was actually a pirate costume, but it worked perfectly.)
Because it's not enough for me to sew something that's already beyond my skill level, I decided to tackle a new skill while sewing my daughter's dress: sewing a blind hem. I really, REALLY hate pressing narrow hems, so I thought I'd give a blind hem a shot. (You still have to press it, but it was a little better.) I was pretty pleased with the result.
A blind hem is a bit less noticeable way to hem a dress. (It's also especially good for hemming pants . . . but I don't even want to think about how you'd have to fold and twist them to do that!) Here's how it looks:
This is how the blind hem stitch looks on my machine (this is for woven/non stretch fabrics; stretch fabrics have smaller zigzags between the big zigzag peaks).
The peaks of the zigzags are the only parts of the hem stitching that goes through the top layer of fabric to be visible from the outside. It's all in the folding before you sew--which is a bit tricky to explain, but this is how I figured out to do it, loosely based on instruction from the family seamstress maven, Jasmine, (in July) and . The instructions are much easier to demonstrate in a video:
Here's a diagram to show where to sew:
You just want to catch the edge of the fold of the front fabric with the point of the zigzags. I practiced on scrap fabric to try to get the stitch width right so I could aim the fold for the midline of my sewing foot and catch the zigzags.
The pattern is Simplicity 4647, view A, size 3 (with the overlay skirt from view B, size 6). I didn't sew the sash on quite right. I think I could still fix it, though--either take out the stitching line and sew it down further forward, or tack it down. The fabric was the $1.99 costume satin (but it feels nice), with a glittery tulle net for the overlay. Oh, and her crown? $4! (I was excited for the good deal.)
Have you ever sewn a blind hem? What are your best tips?
Posted by
Jordan McCollum
at
8:00 AM
4 comments
:
Labels:
blind hem
,
costumes
,
halloween
,
hem
,
Holidays and Entertaining
,
Jordan
,
pumpkin
,
pumpkins
,
sewing
,
sewing tips
,
tutorial
Flat Buttons
Buttons can be a little tricky and I know you all wanted me to show off my Paint skills again. Two hole flat buttons (buttons without a shank) are fairly easy to sew but you have to give it some room because there isn't a shank or the space under the button to sew. To make room for a fake shank (no I didn't rhyme that much on purpose) all you need is a toothpick. Take your button and place a toothpick between the two holes. You will want to double your thread by tying both ends in a knot just to save time and add strength. Start to sew from the back of the garment. Sew through the holes 3 or 4 times. Once you have sewn that, remove the toothpick. Now come from the back of the fabric and go through to the front but do not go through the button hole again. With your thread, wrap around the backside of the button 3 or 4 times. This is the make shift shank. This allows you to have room for the fabric to go under the button once you buttoned the garment. Now sew to the back and tie the thread off. Your knots will all be in the back. And ta da now you have sewn a flat button!


Posted by
Jasmine
at
9:34 PM
6 comments
:
Labels:
buttons
,
Jasmine
,
sewing
,
sewing tips
,
tutorial
Shirt Redo- Buttons and Resizing
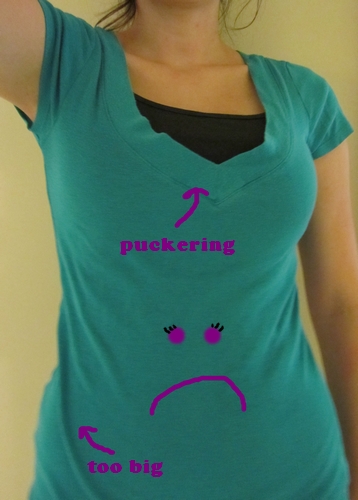
I have this shirt. We had a love/hate relationship. It was a tad bit too big but it was so versatile at the same time. The v-neck was a little too wide an pooched out. I saw this tutorial (obviously I'm inspired by the things I see on the internet since my crafts recently have all sparked from ideas on the web-yes I love pinterest) and thought I could apply it to my sad shirt. See here it is being sad:
What you will need:
Buttons
Shirt you want to redo
Scrap of fabric (not pictured) (1.5" x length of the shirt)
General Sewing Supplies
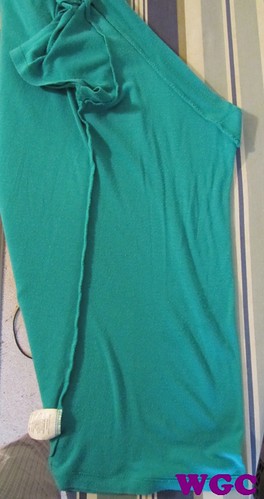
Step 1: Turn shirt inside out and find the center of the front. My shirt was a v-neck so I just folded it in half at that line. Cut the shirt length wise.
Step 2: Line the scrap of fabric up on the backside of the left edge and fold 1.5". Overlap the right side and pin in place.
Step 3: Sew the edge of the left piece the length of the shirt. I also sewed the far side. (See last picture)
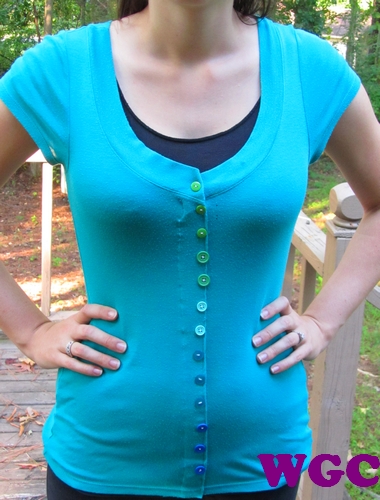
Step 4: Sew on buttons. I arranged my assorted buttons, measured the length of the shirt, and divided the length by the number of buttons. My buttons were 1 1/8" apart. I sewed on the first button and measured from the middle of that button 1 1/8" and marked with a fabric pencil. Well, I tried but the pencil wouldn't work so I just tried to juggle the tape measure in one hand while I started the needle in the right spot.
Step 5: Have a now happy shirt!
So here is my tutorial for resizing and adding buttons:
What you will need:
Buttons
Shirt you want to redo
Scrap of fabric (not pictured) (1.5" x length of the shirt)
General Sewing Supplies
Step 1: Turn shirt inside out and find the center of the front. My shirt was a v-neck so I just folded it in half at that line. Cut the shirt length wise.
Step 2: Line the scrap of fabric up on the backside of the left edge and fold 1.5". Overlap the right side and pin in place.
Step 3: Sew the edge of the left piece the length of the shirt. I also sewed the far side. (See last picture)
Step 4: Sew on buttons. I arranged my assorted buttons, measured the length of the shirt, and divided the length by the number of buttons. My buttons were 1 1/8" apart. I sewed on the first button and measured from the middle of that button 1 1/8" and marked with a fabric pencil. Well, I tried but the pencil wouldn't work so I just tried to juggle the tape measure in one hand while I started the needle in the right spot.
Step 5: Have a now happy shirt!
Got any good tshirt redos?
Posted by
Brave Brooke
at
9:00 AM
20 comments
:
Labels:
Brave Brooke
,
buttons
,
Resize t-shirt
,
sewing tips
,
T-shirts
Jasmine's Tools of Trade
One of the best tools I had at school was the sewing machines they had on campus in the sewing lab. We had very nice machines. I have spent lots and lots of valuable time on those machines. I wanted to go in there one day and just see what all it could do but I never got around to trying and I don't think we were exactly encouraged to play on Bernina sewing machines. I definitely was sad to leave the machines behind but it landed on my list of my tools of trade.
Bernina Activa 220
Another tool of trade that I love would be glue. It doesn't really matter what kind it is whether it be a glue gun, glue stick, rubber cement, whatever, I probably like to use it. Tape's nice too but I just like glue better (for most projects.)
My favorite tool would be my hands. Obviously, I do everything with them. I don't like to do shortcuts the first go around when I try to make things on my own. You can create worlds of whatever with just your hands.
Bernina Activa 220
Another tool of trade that I love would be glue. It doesn't really matter what kind it is whether it be a glue gun, glue stick, rubber cement, whatever, I probably like to use it. Tape's nice too but I just like glue better (for most projects.)
My favorite tool would be my hands. Obviously, I do everything with them. I don't like to do shortcuts the first go around when I try to make things on my own. You can create worlds of whatever with just your hands.

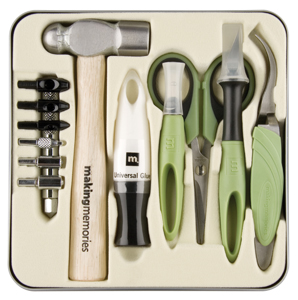
Brooke's Tools of the Trade!
As I was making some cards the other day I realized I almost always use some of my basic tools every time I do a craft. Once I started thinking about it I wanted to do a blog post about how I love use these.
It is a Singer 5040 C which they don't make any more but this is about the same machine.
The first one has to be my eyelet setter. I have one that comes in a kit with a few tools. Jaime prefers her setter because it is not so LOUD :)
My second item also has to do with paper crafting. It is a corner rounder. I love the detail this adds to cards, bookmarks, and scrapbooking pages.
Here are the cards with an example of both of these.
Of course I also think this goes without saying but my sewing machine is very much a necessity! I recently inherited a sewing machine from someone who hadn't used it in a long time and no longer was going to use it. I cleaned it up and lubed it up and it works fantastic! It was great timing because mine was starting to wear and have a few problems. This is the machine I have:
It is a Singer 5040 C which they don't make any more but this is about the same machine.
What is your favorite tool of the trade?
Click the product pictures to be taken to Scrapbook.com's superstore where you can purchase them! (disclosure: we're an affiliate of Scrapbook.com; we'd receive a few cents if you bought something from SB.com from the product links in these posts)
Posted by
Brave Brooke
at
2:37 PM
7 comments
:
Labels:
Brave Brooke
,
cards
,
Corner Rounder
,
Eyelet Setter
,
sewing
,
sewing tips
,
tools
,
tools of the trade
,
tutorial
Reducing Bulk
Sewing instructions usually say trim. Well what the heck does that mean? It can mean a few things. The purpose of "trimming" is to reduce bulk at the seams.The instructions typically don't tell you how to reduce bulk, they just stick with trim. Here's how to tell how to reduce bulk:
Curves:
Reducing bulk at curved seams can be done with notching or clipping.
On an outer curve, we notch. This is cutting triangles along the edge. To check whether or not it worked, pull the fabric and straighten it.When you straighten the curve, it should make a straight line without bumps. If it bunches when you straighten it and looks wavy, you need to notch more. Cut close to the seam line but DO NOT cut the seam (that weakens the seam.)
Now for inside curves you use clipping. This is cutting slits into the fabric. You don't take out any fabric, just one single cut will do. When you straighten the curve to check if it worked, there should be any pulling in the fabric and it should straighten nicely. Add more clips if there's pulling or stress on the fabric.
Corners:
Reducing bulk at corners can be done with trimming and clipping.
At an outside corner is really easy to reduce bulk. To trim, just cut the tip off close to the seam. Easy beezy, done.
Clipping at an inside corner is super tricky....just kidding. You make one clip into the fabric where the corner is. Boom, done.
When you straighten these, the trimmed edge should meet and the clipped edge should straighten. Trimming when straightened should look like clipping when not straightened and clipping when straightened should look like trimming when not straightened.
Layers:
Grading is cutting multiple layers shorter and shorter one layer at a time. This is for when multiple pieces of fabric meet. Leave the facing the longest, so just don't cut that one. Cut the layer next to the facing a little bit shorter than the facing. Continue cutting each layer shorter and shorter. How much you cut off depends on how many layers there are. If there are three layers, you leave the facing the same, the 2nd layer should be around half of the length of the facing and the 3rd layer should be very short and close the seam. To check, run your finger along the layers, it should feel smooth and flows nicely.
Curves:
Reducing bulk at curved seams can be done with notching or clipping.
On an outer curve, we notch. This is cutting triangles along the edge. To check whether or not it worked, pull the fabric and straighten it.When you straighten the curve, it should make a straight line without bumps. If it bunches when you straighten it and looks wavy, you need to notch more. Cut close to the seam line but DO NOT cut the seam (that weakens the seam.)
Now for inside curves you use clipping. This is cutting slits into the fabric. You don't take out any fabric, just one single cut will do. When you straighten the curve to check if it worked, there should be any pulling in the fabric and it should straighten nicely. Add more clips if there's pulling or stress on the fabric.
Corners:
Reducing bulk at corners can be done with trimming and clipping.
At an outside corner is really easy to reduce bulk. To trim, just cut the tip off close to the seam. Easy beezy, done.
Clipping at an inside corner is super tricky....just kidding. You make one clip into the fabric where the corner is. Boom, done.
When you straighten these, the trimmed edge should meet and the clipped edge should straighten. Trimming when straightened should look like clipping when not straightened and clipping when straightened should look like trimming when not straightened.
Layers:
Grading is cutting multiple layers shorter and shorter one layer at a time. This is for when multiple pieces of fabric meet. Leave the facing the longest, so just don't cut that one. Cut the layer next to the facing a little bit shorter than the facing. Continue cutting each layer shorter and shorter. How much you cut off depends on how many layers there are. If there are three layers, you leave the facing the same, the 2nd layer should be around half of the length of the facing and the 3rd layer should be very short and close the seam. To check, run your finger along the layers, it should feel smooth and flows nicely.
Don't be jealous of my Paint skills ;) Hope my artistic abilities helped!
And happy anniversary to Jordan and her husband!
Darts
Darts add shaping to the bust or back of a piece of clothing. Making darts is a lot easier than I thought it would be. I would recommend practicing before you put it on your actual garment. Practicing on a scrap before sewing your garment for most things is a pretty good idea I've found.
With darts, remember to always go from the widest point to the narrowest point (even in back darts.) Transfer ALL marks from the pattern, especially for the dart, with chalk or sewing transfer paper. You should have something that looks like a triangle.
Bust Darts:
Your stitch length should be at the basic 2.5. We're starting from the widest part of the triangle. Back stitch 3-4 stitches after starting. Sew until you are about 1/2 inches away from the point of the dart. Reduce your stitch length to 1. Sew all the way to the end of the point. Do not back stitch. Simply cut the threads long and tie a knot. Trim all threads after you're done. Do not serge the dart.
Back Darts:
With back darts, you start in the middle. It's the same concept, start at the widest point and move toward the point of the dart. It is the same steps as the bust dart after that.
Pressing the dart:
First press the sewn area so there is a crisp crease on the fold of the now sewn dart. This won't show on the outside but it will make the dart lay flat. For a dart on the bust, press the dart down. For darts on the back, press toward the center.
With darts, remember to always go from the widest point to the narrowest point (even in back darts.) Transfer ALL marks from the pattern, especially for the dart, with chalk or sewing transfer paper. You should have something that looks like a triangle.
There should also be a few circles along the outer lines of the triangle.These are important. Fold your dart in half then pin your dart matching the circles on both sides. The circles and the lines should match evenly. Now you're ready to sew!
Your stitch length should be at the basic 2.5. We're starting from the widest part of the triangle. Back stitch 3-4 stitches after starting. Sew until you are about 1/2 inches away from the point of the dart. Reduce your stitch length to 1. Sew all the way to the end of the point. Do not back stitch. Simply cut the threads long and tie a knot. Trim all threads after you're done. Do not serge the dart.
Back Darts:
With back darts, you start in the middle. It's the same concept, start at the widest point and move toward the point of the dart. It is the same steps as the bust dart after that.
Pressing the dart:
First press the sewn area so there is a crisp crease on the fold of the now sewn dart. This won't show on the outside but it will make the dart lay flat. For a dart on the bust, press the dart down. For darts on the back, press toward the center.
Subscribe to:
Posts
(
Atom
)