Showing posts with label sweater. Show all posts

Vivien lace baby cardigan

Vivien, my youngest niece's name, means alive or lively. I thought that was perfect for this sweater I designed for her that features leaf lace motifs (leaves are alive!).

My adorable niece wearing her cardigan!

I fell in love with the lace yoke of this Prinsessa Estellen nuttu cardigan, which was inspired by one worn by Princess Estelle of Sweden. (You knew there were other royal families of Europe, right? Princess Estelle is second in line for the crown after her mom, Crown Princess Victoria!)

I would have just used that pattern, but there were two problems: it was only available in the 0-3 months size, and . . . it was in Finnish.

Strangely enough, our (the Wayward Girls') dad is fluent in Finnish (he was a missionary there in the 1970s), but I didn't figure he'd have knitting terminology on the tip of his tongue. However, because of Dad's Finnish connection, I remembered that another friend, writer and knitter Annette Lyon, also speaks Finnish. In fact, she learned to knit in grade school in Finland (while her father was in charge of the missionaries there).

The lace pattern had a chart, which makes it almost universal, but I wanted to make sure I'd read it right, and Annette was kind enough to check my translation. With a whole bunch of math and some trial-and-error, I knit up a six month cardigan with the lace patterned yoke.


I wanted to make it even more unique, so instead of a seed stitch border as on the cuffs, button band and neckband, I used a provisional cast on and designed an original leaf lace border. It's a bit bigger than the sweater, though, so the leaf pattern is more obscured, and it looks more like a ruffle, which is also cute!

I'm planning to write up the pattern to share--anybody interested? I'll get around to it much quicker that way!

View the project on Ravelry

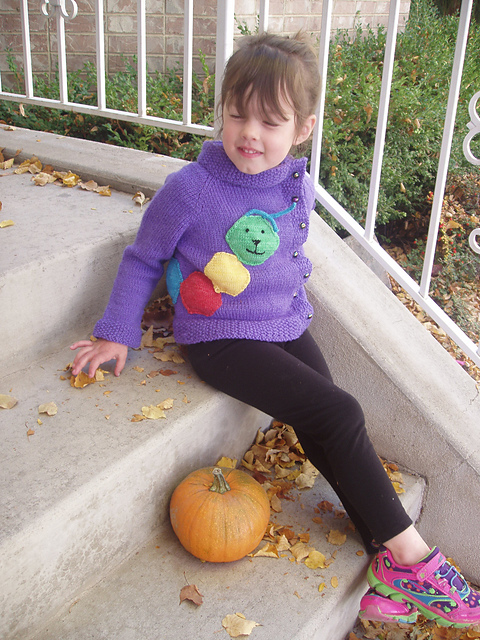
Calli-Cardi! Sweater with a caterpillar

Last year I made sweaters for everyone in my family (except me...). My four-year-old's lovey is a multicolored caterpillar we call Cally. I wanted to incorporate it into her sweater to make it personal and unique for her: a Calli-Cardi!


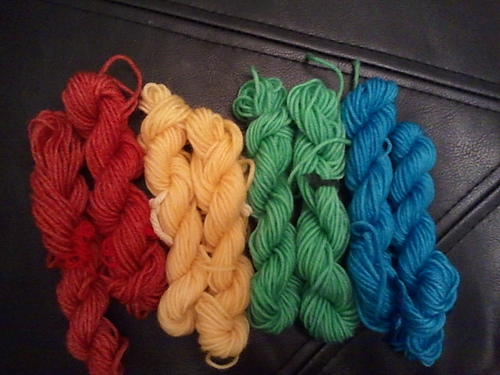
I looked for a cardigan with an off-center opening to maximize the room for the caterpillar on the front. As with my six-year-old's sweater, I knew I didn't want to buy five colors of yarn to only use a little of most of them so I dyed the caterpillar colors:

Each hank was about 14 yards; the eight of them together weighed about 36g.To dye them, I used food safe colors in Mason jars on the microwave (but that's another post!).

Red: one packet of cherry Kool-aid
Yellow: about five drops of yellow McCormick's food coloring (and white vinegar)
Green: about five drops of green McCormick's food coloring (and white vinegar)
Blue: one packet of mixed berry blue Kool-aid.

Originally I planned to work the caterpillar design as part of the sweater itself using the intarsia method of colorwork, but I realized that would be a big challenge, especially with two different weights (thicknesses) of yarn. So I made the cardigan normally and then knit hexagons to appliqué the caterpillar on.


I left an extra long tail on the end of each hexagon and used the tails to sew the caterpillar onto the sweater. I used backstitch in black yarn to make the caterpillar's face and short i-cords to make his antennae.

As you can see, she loves it!

For pattern notes, modifications and in-progress photos, see this project on Ravelry!
Cardigan Pattern: Peach Blossom Child Jacket by Jennifer Little
Cardigan Yarn: Cleckheaton Country Kids 8-ply (superwash wool in DK/8-ply weight) in purple
Caterpillar Pattern: Merit badge by Amanda Ochocki
Caterpillar Yarn: Knit Go Craft Super Soft Cashmere Wool in white (cream), hand dyed (claims to be DK weight but knit up more like fingering weight)

Another sweater!

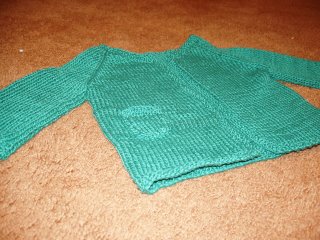
Since I was on a finishing kick, I decided to finish a sweater I've been working on for my son for a long time. Fortunately, I made it a couple sizes to big for him when I started, anticipating spending too long to finish. Two and a half years, in case you're wondering—and yes, it fits him! I went ahead and made the button bands pretty wide just in case, and it seems to fit him pretty well.

In addition to recently finishing my husband's sweater, I wanted to get this done because the weather is still cool in the morning, but my son doesn't have a lightweight jacket to wear in the mornings and take off in the afternoons. So two weeks ago, I finally finished!


The buttons look a little off-center here. I wonder if you have to make buttonholes off-center for them to look centered.

The pattern: Hallows Cardigan by Melissa Metzbower. I knit the actual pieces of the sweater probably two years ago, but as I recall, it was pretty easy! One thing I found interesting about the pattern was that there's no armhole shaping, they're just square. However, the fit seems fine.

The yarn: Joann Sensations Kashmira I have to confess, I picked this yarn because the yarn name is similar to a Led Zeppelin song ("Kashmir") It wasn't anything remarkable to work with, but nothing to complain about.

My project on Ravelry: http://www.ravelry.com/projects/MamaBlogga/hallows-cardigan

The recipient: He loves it! The week after I gave it to him, his class watched a segment from the TV show Arthur where they talked about knitting (it was supposed to be about perspective & point-of-view). He became the class sensation and asked me to teach him to knit. Apparently the fact that it took me 2.5 years to finish this didn't set in.

The seven-year sweetheart sweater

In the knitting world, there is a legend whispered among women over the clicking of the needles, a legend that tells of the tragic end that has befallen many a knitter. The legend has a name, murmured in fear or shouted in rage. That name is

the boyfriend curse.

For whenever you knit a sweater for a boyfriend, inevitably the relationship ends before the sweater is done.

Fortunately, I waited until we were married a few years to start a project for my husband. Of course, were that curse to befall me, I would have gotten a nice long reprieve from the curse, because my (first?) sweater for my husband took a mere seven years to complete.


The Sweater Saga

I began this sweater after Christmas 2006. I was hoping to get it done in time for his birthday at the end of January. I finished the front and the sleeves and was working on the back when his birthday came, so I surprised him with the pieces and told him my plan.

Next, I was hoping to have it done for Valentine's day. But in the intervening weeks, when I reached the armholes of the sweater back, I discovered that I'd knit 2/3s of this large piece in the wrong size. AGH. I had to take out all of that knitting—and then I needed to take some quiet time away from this sweater.

Sometime in the next few years, I pulled out the yarn and needles again and knit back to the armholes—in the right size this time, but then I put it down because I needed to find the pattern again to work the armhole shaping. A couple years later, I finally finished that piece and blocked the pieces.

Then seaming. Ugh. I hate sewing the pieces together, but I took advantage of some TV time to get this done.

Six months later, I was ready for the final step: knitting the neckband. After six long years, it was finally done! And then my husband tried it on—and the neckband looked terrible. It was like bacon neck, but standing up. It was ridiculous.

No way could I let a sweater I'd worked so hard on end up looking like that. So finally, last month, I pulled out, ripped out the neckband knitting and started over, making the neckband much tighter.

The finished product!


The pattern: Leo by Kristi Porter, from Knitty Fall 2004. I picked this pattern because it was suitably low-key. Since this was originally a surprise, I wanted to play it safe with the design. I'd fished for hints about what he liked, and I was pretty sure cables and most other design elements are out, and this is now my go-to sweater for guys who want an understated, classic look. Or guys who balk at the idea of (gasp) a stripe.

The yarn: Knit Picks Swish Worsted in Jade. I'd originally purchased this for me, but decided to use it for my husband's sweater because I'd love to see him in it!

Now we just have to wait for the weather to get cold again.

Daisy cardigan with patch pocket pattern

This weekend, we'll be hosting our own Wayward Weekend Link Party! Be sure to come ready to share your favorite crafts and comment on others'!

I started knitting . . . oh my goodness, it was 15 years ago! But I didn't start trying to really improve my skills until the last few years.

When my oldest (who'll be 6 in a few weeks) was a baby, I made my first sweater using the Daisy pattern from the summer 2003 issue of Knitty (a free online knitting magazine!). It's a raglan-sleeve cardigan in stockinette stitch, with seed stitch ribbing. I made it using Sonata, a yarn Elann.com has now discontinued. It's a double-knit weight mercerized cotton, so it's shiny and strong, with well-defined stitches. And I love the color!


And here's my son modeling it, in washed-out-ghost mode:

This took me almost exactly six days, which I think is pretty quick for any project. I was pretty pleased--and that was enough to convince me that baby sweaters are the BEST for quick projects!

Now, for the confession. This craft was, of course, a little wayward: I added the patch pocket to cover up a particularly ugly failed graft between two balls of yarn. I think the result is really cute though, so if you want to replicate it, here's what you have to do:

Patch pocket pattern (standard abbreviations used—hover over the first mention of a term for an explanation)
CO 8 sts.
Row 1: Knit.
Row 2: p1, m1, p to last st, m1, p1.
Work 8 more rows in stockinette stitch, knitting the right side, purling the wrong side.

Seed stitch edging:
Row 11: * k1, p1, rep from * to end.
Row 12: * p1, k1, rep from * to end.
Row 13: as Row 11.
BO all sts.

Sew onto sweater, seed stitch edge on top.

What's your favorite way to hide a mistake?

Originally blogged at MamaBlogga

How to block (and wash!) wool sweaters

Speaking of sweaters: Last call for Ruth Hill 74, the winner of the Ivy Sweater! You have until October 30 to get your mailing address to waywardgirlscrafts at gmail.com. If I haven't heard from you by then, next week we'll announce a new winner.

When you knit a sweater, usually (but not always) you knit each piece separately: the back, the front (or each side of the front, if it's a cardigan), and both sleeves. Then you "block" the pieces, forming them into the shapes they'll take permanently, before sewing the pieces together and adding a collar/neckband/button band.

Blocking the pieces of a sweater I'm knitting for my husband.
 
With an animal fiber like wool, there's a lot of spring in the yarn (I'll skip the full technical explanation). This means that the sweater pieces can roll or smush together before blocking. Sorry for getting technical there. Blocking "teaches" the pieces how to lay right so they'll fit together better when sewing.

When you wash a wool sweater, you need to do the same thing. Let's say, for example, that you have curly hair. You can "teach" your hair to lay flat with a flat iron, but the next time your hair gets wet, it will "forget." You have to straighten it all over again, or it'll just spring right back up into its natural state. (Which is beautiful, by the way. Stop straightening it.)

So you can follow the same process you would for blocking a sweater to wash it. Note that it will take longer to dry because a put-together sweater is twice as thick as the individual pieces, so it would be better to use a lay-flat drying rack made of mesh to help with air circulation.

To block (or wash) a wool sweater--or insert "sweater pieces" whenever I say that--first you have to wet the sweater. Use cold water--hot water can cause shrinkage or felting--and a gentle cleaner like Woolite. I like to fill my washing machine to low, add the detergent, then stop the machine and stick the sweater pieces in the drum. (DON'T let them agitate--that's the other step to felting wool, and you'll ruin your sweater.) You can let them soak up the water on their own, or you can speed this along by squeezing them under the water.

Once the sweater is soaking wet, take it out of the water and lightly squeeze (DON'T wring) excess water out. (Why put so much in if you're just going to take some out? You want to get the fibers uniformly wet.) Be very gentle during this part--wet wool is fragile. For extremely delicate pieces, I use a clean kitchen colander to lift them so I don't put any strain on the fibers.

You can also squeeze out the excess water by placing the sweater on a towel and rolling the towel up with the sweater on the inside. The fibers are protected here, so you can squeeze or even stand on the towel to get that water out.

Once the pieces are damp, you shape them. You want features like cables and ribbing to stretch out a bit, while flat sections may have a tendency to curl. When you're blocking, you'll want to pin the pieces into that shape for the drying process, but that may not be necessary when you're just washing them. If you're using pins, use rust proof pins. Most knitters prefer stainless steel T-pins.

Obviously not a sweater. This cashmere shawl I knit used a LOT of pins for every little detail.
Lace needs "aggressive" blocking to bring out the details. Don't  pull your sweaters this far!

For blocking, I usually use a towel over cardboard or my carpet (though I'm hoping to get one of those alphabet foam floor puzzles to use--they're fantastic!). I've also used a mattress for something I knew would dry very quickly.

Since you can stretch the sweater into the right shape here, you can also stretch it to fit you better here. If it's too short, you can lengthen it. If it's too narrow or tight, you can stretch it. You can do this to certain parts or the whole thing. But again, wool is delicate, so don't stretch it too much. (You could also try hanging a wet sweater upside down to lengthen it, but I wouldn't, because I think it would stretch the fibers unevenly.) If you're adjusting the size, you might want to use pins on a solid surface to hold it in shape.

I discovered a new trick when I was blocking my husband's sweater: I took a sweater that already fits him and used it to determine the best size for the pieces. (I was blocking them several inches too big before that!) Since patterns include finished sizes (and if you're lucky, piece sizes), you can also use a ruler to make it the right size. As you can see in the top photo, I also tried to line up the sleeves with the armscyes so they'd sew in better.

The pieces dry in that shape, and then you're ready to wear (or sew together) your sweater!

There are other ways to block wool, of course, but if you want to wash it, you'll probably want to stick to something that gets it all the way wet, right?

Note: blocking works best on natural fibers, especially animal fibers. It still helps with acrylic fibers, but the results usually aren't quite as dramatic, and resizing isn't recommended.

Like pie? Come check out the results in Battle: Chess pie vs buttermilk pie on my PieQuest! 

Related Posts Plugin for WordPress, Blogger...