Showing posts with label knitting. Show all posts

Fast, easy, fantastic: quick thank you gifts for teachers!

We often give gifts to our kids' teachers at the end of the school year. A couple years ago, I hit on a gift idea that became a favorite: a "spa kit." (This may have been inspired by a birthday gift from Mom.) After a long, stressful school year, teachers need to relax! What better way than a spa kit?

I made the spa kit easy on myself: I hit up the dollar store and put together a basket or gift bag of things like exfoliating scrubbies, eye masks, bubble bath, bath pillows, lotion and scented candles. This year, I made the spa kits even more special with the addition of handmade "spa cloths."


The handmade gifts add an extra touch, and they're super quick to make: it took under three hours to make the first set of five hearts. I already had the yarn from another project, so it was no extra cost. Plus, there are tons of cool crochet or knitting patterns online for free (Ravelry lists over 4500 patterns, but you might need to be logged in to see them)!


The spa cloths came especially in handy with my two-year-old accidentally spilled her water bottle all over us and one of the gift bags. They got their very first use right away!

Want to make your child's teacher gift even more special? Have them write a thank you note, mentioning their favorite activities or memories of the school year!

My spa cloth projects on Ravelry

Patterns
Sweet Somethings (heart) by Julie of Simply Notable
Leafy Washcloth by Megan Goodacre of Tricksy Knitter (with mods from Ravelry user Penserosa--decreases at edge)
(Also to come: Starfish Cloth by Dione Read of Sew Funky)

Yarns
Hearts
Peaches & Cream in Hot Blue
Lion Brand Microspun in Red


Leaves
Knit Picks Shine Sport in Green Apple (held double for the larger leaf)

(Starfish will be done in Knit Picks Shine Worsted in Snapdragon)

Dying to dye (yarn)

One night, my husband came home and found the kitchen in disarray. "What's all this?" he asked.

"I'M DYYYYYYYEING," I wailed.

And I was. Dyeing with an E, that is! It's really easy to dye yarn made from animal fibers (wool, alpaca, cashmere, even silk) and nylon, and you can use common ingredients you probably already have in your kitchen!

My first dyeing experiments were for a colorwork sweater for my oldest daughter. First, I wanted to make sure we liked the colors, so I did little samples of 20" of yarn. I was trying to do about 1% of what I'd use for the final dye concentration, so I filled up my containers with 100 mL of water, added the dyes (food coloring and Kool-aid), and then used a dropper to get 1 mL of the dye stock. I mixed that 1% dye stock with more water.

Here's a secret of dyeing: it doesn't matter how much water you use. I measured the water to get the concentration right for a tiny test, but when you do the actual dyeing, as long as you have enough water to cover your yarn and let it circulate, the only proportion you really need to worry about is the amount of dye to the amount of yarn (by weight).

To prepare the yarn, you need to wind it in hanks (long loops) and tie figure-eight ties through the loops in three to four places to prevent tangling. Then soak it in clean water. (You'll need vinegar later, so you can add it to the soak water instead of the dye bath, but I usually don't.)
Then you can prepare the dye stocks. Tools of the trade: tons of measuring cups to get my 1% solutions, microwave safe containers and a kitchen scale.

The colors in my rainbow here are McCormick's neon pink food coloring, McCormick's yellow food coloring, McCormick's green food coloring, Ice Blue Raspberry Kool-aid, and a mix of McCormick's neon purple (2 parts) and neon blue (1 part).

In the foreground, I'm soaking the yarn samples to be dyed.


Now it's time to dye! You need heat and acid to set this dye on protein fibers. With food coloring, you have to add some vinegar; a tablespoon in the dye stock is plenty (this doesn't have to be measured either! No wonder I love this!). The Kool-aid doesn't need vinegar because it already has citric acid. The heat is simple too: microwave! (Stovetop and oven work just as well too--but don't boil the yarn; it felts.)

Above, my tests are ready to microwave: I put 1mL of the dye stock into a baggie, added more water, and put in my wet yarn. I did more of the blue because I had a few samples of other things I was thinking about dyeing.


I nuked them for 2 minutes, let them sit for 10 and nuked them for 2 minutes. I repeated this until the dye bath "exhausted," meaning the water was clear (or milky in the case of the Kool-aid, but the dye was absorbed by the yarn). Here they are after microwaving:

Baggies may not be the best choice for this... But notice how the yarn is colorful and the water, not so much.

My daughter and I picked the colors for her sweater from the samples and then I stuck the yarn to be dyed in the full dye baths:

And, below, after microwaving. Check out the water--it's clear, except in the purple. Blue dyes often take longer to exhaust, so I recommend leaving the yarn in overnight after heating:

This jar of yellow did something interesting. Maybe I didn't have enough acid in it, but while it was in a cool-down phase between microwave bouts, I was worried about how much dye was left in the water. I added more vinegar and turned around to put away my big ol' jug. By the time I looked back, the water was perfectly clear and the yarn a vibrant yellow!

Allow the yarn to cool--you can speed this up by taking it out of the dye bath, but DO NOT PUT COLD WATER ON HOT YARN. This will cause the yarn to felt.

Once it's cool, you'll want to rinse the yarn with clean water. Be sure the rinse water runs clear. If it doesn't, either your dye isn't set, and you need more acid and/or heat, or you've used more dye than the yarn can actually absorb, so the excess is washing off. The yarn will usually fade more dramatically if the problem is that the dye isn't set.

And now it's time to dry! Above, the yarn is hanging out in my salad spinner, which is really handy for drying small amount of yarn. Below, it's hanging on a chair with a fan to dry the rest of the way.

Since this was for colorwork, I made myself some posterboard bobbins and wound up the yarn. The darker pink and the white are purchased--Knit Picks Wool of the Andes Sport in Rouge and White--and the white is the base for the other colors.
And in the finished product:

Vivien lace baby cardigan

Vivien, my youngest niece's name, means alive or lively. I thought that was perfect for this sweater I designed for her that features leaf lace motifs (leaves are alive!).

My adorable niece wearing her cardigan!

I fell in love with the lace yoke of this Prinsessa Estellen nuttu cardigan, which was inspired by one worn by Princess Estelle of Sweden. (You knew there were other royal families of Europe, right? Princess Estelle is second in line for the crown after her mom, Crown Princess Victoria!)

I would have just used that pattern, but there were two problems: it was only available in the 0-3 months size, and . . . it was in Finnish.

Strangely enough, our (the Wayward Girls') dad is fluent in Finnish (he was a missionary there in the 1970s), but I didn't figure he'd have knitting terminology on the tip of his tongue. However, because of Dad's Finnish connection, I remembered that another friend, writer and knitter Annette Lyon, also speaks Finnish. In fact, she learned to knit in grade school in Finland (while her father was in charge of the missionaries there).

The lace pattern had a chart, which makes it almost universal, but I wanted to make sure I'd read it right, and Annette was kind enough to check my translation. With a whole bunch of math and some trial-and-error, I knit up a six month cardigan with the lace patterned yoke.


I wanted to make it even more unique, so instead of a seed stitch border as on the cuffs, button band and neckband, I used a provisional cast on and designed an original leaf lace border. It's a bit bigger than the sweater, though, so the leaf pattern is more obscured, and it looks more like a ruffle, which is also cute!

I'm planning to write up the pattern to share--anybody interested? I'll get around to it much quicker that way!

View the project on Ravelry

Calli-Cardi! Sweater with a caterpillar

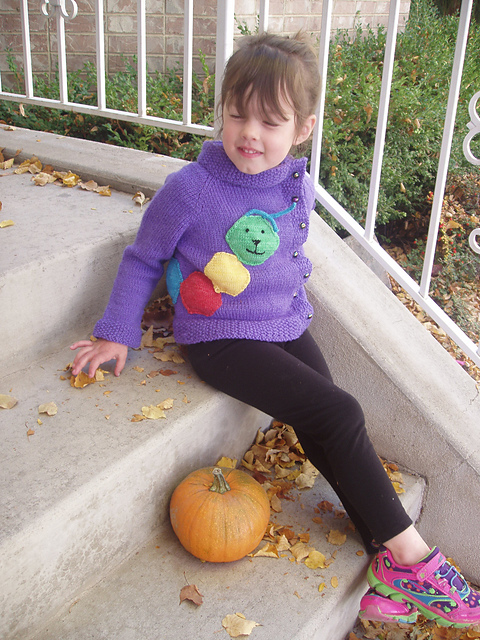
Last year I made sweaters for everyone in my family (except me...). My four-year-old's lovey is a multicolored caterpillar we call Cally. I wanted to incorporate it into her sweater to make it personal and unique for her: a Calli-Cardi!


I looked for a cardigan with an off-center opening to maximize the room for the caterpillar on the front. As with my six-year-old's sweater, I knew I didn't want to buy five colors of yarn to only use a little of most of them so I dyed the caterpillar colors:

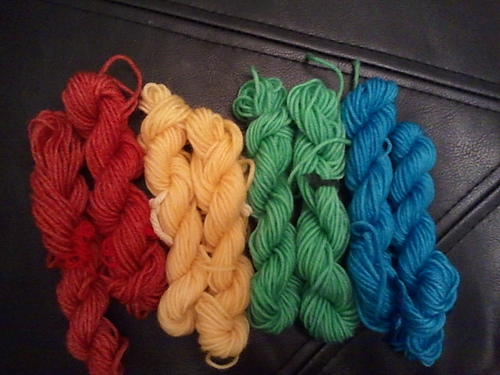
Each hank was about 14 yards; the eight of them together weighed about 36g.To dye them, I used food safe colors in Mason jars on the microwave (but that's another post!).

Red: one packet of cherry Kool-aid
Yellow: about five drops of yellow McCormick's food coloring (and white vinegar)
Green: about five drops of green McCormick's food coloring (and white vinegar)
Blue: one packet of mixed berry blue Kool-aid.

Originally I planned to work the caterpillar design as part of the sweater itself using the intarsia method of colorwork, but I realized that would be a big challenge, especially with two different weights (thicknesses) of yarn. So I made the cardigan normally and then knit hexagons to appliqué the caterpillar on.


I left an extra long tail on the end of each hexagon and used the tails to sew the caterpillar onto the sweater. I used backstitch in black yarn to make the caterpillar's face and short i-cords to make his antennae.

As you can see, she loves it!

For pattern notes, modifications and in-progress photos, see this project on Ravelry!
Cardigan Pattern: Peach Blossom Child Jacket by Jennifer Little
Cardigan Yarn: Cleckheaton Country Kids 8-ply (superwash wool in DK/8-ply weight) in purple
Caterpillar Pattern: Merit badge by Amanda Ochocki
Caterpillar Yarn: Knit Go Craft Super Soft Cashmere Wool in white (cream), hand dyed (claims to be DK weight but knit up more like fingering weight)

Sweater of many (custom!) colors

I've been way too quiet here on the blog lately, but not for lack of crafting! I've got a lot of things I keep meaning to share, but I'm so happy with this one, I had to make the time to blog.


Cast on: Sept 21
Finished: Oct 8
Pattern: Jolie Fleur from DROPS design.
Yarn: Knit Picks Wool of the Andes Sport in Rouge and White

That's right: the only two colors of yarn I purchased for this were the dark pink of the body and the white. The other colors were dyed on the white using McCormick food coloring and Kool Aid!

  • Light pink (it's in there): McCormick Neon Pink
  • Yellow: McCormick Yellow
  • Green: McCormick Green
  • Blue: Ice Blue Raspberry Lemonade Kool Aid
  • Purple: McCormick Neon Purple and McCormick Neon Blue, 2:1.

Dyeing yarn with these is not only easy (and awesome!) but completely food safe, so you can use your regular pots and pans, and it's okay to use them for food afterwards. (I actually used Mason jars in the microwave...) Kool Aid contains enough citric acid to "set" the food dyes on animal fibers (wool, alpaca, silk) and nylon. Food coloring requires additional acid, and I used vinegar. The only other thing you have to do is heat it enough and the yarn soaks the dye right up--but this is probably a post for another day!

I ran out of all the colors I'd dyed as well as the white and had to order and dye more. Fortunately, I'd kept careful notes of the dye formulas I'd used. Unfortunately, I lost those notes. But I was able to remember it pretty well!

I absolutely love how this turned out. But the best part is how much my daughter loves it. She came up to me while I was finishing it and spontaneously told me, "Thank you for working so hard on my sweater." And that makes it even more worth it.

Lots more information on the project and especially progress photos: Project on Ravelry

Have knitting, will travel

I do most of my knitting on lazy Sunday afternoons, and sometimes while my husband is driving—but really, knitting can be a very portable craft! I remember one woman who'd bring her knitting to the gym and work while she walked!

Adapting your knitting to the road: use the right tools
You might not be planning on walking and knitting at the same time, but seriously: carrying your knitting is an essential part to taking it with you! You might want a bag with handles, if that's all you're planning to carry (or you'll put your wallet inside your knitting bag—make sure it has pockets!), or you might want another container that fits inside your purse or other bag. Either way, water-resistant material is handy for keeping your knitting clean.

On my trip, I put my knitting in a plastic grocery bag to keep it clean and grabbed a canvas market bag that was a gift from my sister-in-law, but the needles kept poking through the plastic bag, market bag, and my backpack!

Fortunately, they make tons of bags especially for knitting! Most of these include a good system for keeping the yarn safe while freely feeding yarn to your flying fingers.

This one has accessory pockets and a needle pouch. It holds up to 8 skeins of yarn and has a hole in the lid to feed the working yarn through—with a slit to be able to remove the yarn!This one has a stand, a large pocket for knitting books, and lots of storage space for yarn, needles and accessories. While it's a travel bag, it may become the only storage you use (if you're not a yarn hoarder).This one keeps your yarn very clean and portable, and fits into a larger bag. However, once you're working, you can't remove the yarn from the container unless you cut it.

Whether you're working on double point needles or single, the more you move your knitting, the likelier you are to lose a stitch or two hundred. To prevent this, consider using point protectors:


They slip on to the tips of your needles and (hopefully) keep your yarn from slipping off while you're not knitting. I also hear rubberbands can work well (but obviously that will depend on your yarn and your stitch size).

Keep it simple
I happened to bring fairly easy projects to work on, so I was also able to read while knitting. Two hobbies at once!

However, keeping it simple has another benefit: for me, I only had one page, front and back, to keep track of for each project with my pattern. I didn't have to keep a cable needle handy. I had stitch markers already in place on the projects—really, all I did was grab the project and some extra yarn if I had it, and go. I didn't even bring scissors!

You don't have to go that minimal, but the less you bring with you, the less you have to manage, and the less you stand to lose. Plus, constantly shuffling through all the loose pages of your pattern is a pain!

For more complicated pieces like lace, you might consider getting a pattern holder like this one (or its smaller counterpart):


It folds to keep your pattern clean and portable, and can lay flat or stand up to display your pattern. It also has magnets to not only keep your pattern in place, but a magnetic bar to help you remember what line you're on!


Knitting that isn't well suited to travel
Knitting with extensive colorwork may not be well suited to travel. It's highly likely that your bobbins and skeins will get tangled—but if you're always very careful about managing them, this may not be a problem for you!

I went on a trip last month and I brought two WIPs with me. One of them was done with finer yarn (fingering weight, I think) on US #2 or #3 double point needles. This often lead to stitches slipping off, so this might not be good for travel unless you take the precautions above.

What's your best tip for knitting while traveling?

Another sweater!

Since I was on a finishing kick, I decided to finish a sweater I've been working on for my son for a long time. Fortunately, I made it a couple sizes to big for him when I started, anticipating spending too long to finish. Two and a half years, in case you're wondering—and yes, it fits him! I went ahead and made the button bands pretty wide just in case, and it seems to fit him pretty well.

In addition to recently finishing my husband's sweater, I wanted to get this done because the weather is still cool in the morning, but my son doesn't have a lightweight jacket to wear in the mornings and take off in the afternoons. So two weeks ago, I finally finished!


The buttons look a little off-center here. I wonder if you have to make buttonholes off-center for them to look centered.

The pattern: Hallows Cardigan by Melissa Metzbower. I knit the actual pieces of the sweater probably two years ago, but as I recall, it was pretty easy! One thing I found interesting about the pattern was that there's no armhole shaping, they're just square. However, the fit seems fine.

The yarn: Joann Sensations Kashmira I have to confess, I picked this yarn because the yarn name is similar to a Led Zeppelin song ("Kashmir") It wasn't anything remarkable to work with, but nothing to complain about.

My project on Ravelry: http://www.ravelry.com/projects/MamaBlogga/hallows-cardigan

The recipient: He loves it! The week after I gave it to him, his class watched a segment from the TV show Arthur where they talked about knitting (it was supposed to be about perspective & point-of-view). He became the class sensation and asked me to teach him to knit. Apparently the fact that it took me 2.5 years to finish this didn't set in.

The seven-year sweetheart sweater

In the knitting world, there is a legend whispered among women over the clicking of the needles, a legend that tells of the tragic end that has befallen many a knitter. The legend has a name, murmured in fear or shouted in rage. That name is

the boyfriend curse.

For whenever you knit a sweater for a boyfriend, inevitably the relationship ends before the sweater is done.

Fortunately, I waited until we were married a few years to start a project for my husband. Of course, were that curse to befall me, I would have gotten a nice long reprieve from the curse, because my (first?) sweater for my husband took a mere seven years to complete.


The Sweater Saga

I began this sweater after Christmas 2006. I was hoping to get it done in time for his birthday at the end of January. I finished the front and the sleeves and was working on the back when his birthday came, so I surprised him with the pieces and told him my plan.

Next, I was hoping to have it done for Valentine's day. But in the intervening weeks, when I reached the armholes of the sweater back, I discovered that I'd knit 2/3s of this large piece in the wrong size. AGH. I had to take out all of that knitting—and then I needed to take some quiet time away from this sweater.

Sometime in the next few years, I pulled out the yarn and needles again and knit back to the armholes—in the right size this time, but then I put it down because I needed to find the pattern again to work the armhole shaping. A couple years later, I finally finished that piece and blocked the pieces.

Then seaming. Ugh. I hate sewing the pieces together, but I took advantage of some TV time to get this done.

Six months later, I was ready for the final step: knitting the neckband. After six long years, it was finally done! And then my husband tried it on—and the neckband looked terrible. It was like bacon neck, but standing up. It was ridiculous.

No way could I let a sweater I'd worked so hard on end up looking like that. So finally, last month, I pulled out, ripped out the neckband knitting and started over, making the neckband much tighter.

The finished product!


The pattern: Leo by Kristi Porter, from Knitty Fall 2004. I picked this pattern because it was suitably low-key. Since this was originally a surprise, I wanted to play it safe with the design. I'd fished for hints about what he liked, and I was pretty sure cables and most other design elements are out, and this is now my go-to sweater for guys who want an understated, classic look. Or guys who balk at the idea of (gasp) a stripe.

The yarn: Knit Picks Swish Worsted in Jade. I'd originally purchased this for me, but decided to use it for my husband's sweater because I'd love to see him in it!

Now we just have to wait for the weather to get cold again.

Baby shawl #4!

I finished one last knitting project at the end of 2013: another baby shawl for another baby! But this time, Jaime is the proud mama!

I sent Jaime some choices and she picked the pattern: Haruni by Emily Ross. I had plenty of Debbie Bliss Rialto Lace Yarn leftover from my baby's shawl, which took less than a skein, so I started on.


The other choices on my list:

I think Jaime chose well!

Once again, this one was down to the wire. I managed to get it in the mail and it arrived the day before the Baby Girl's blessing!

You must have been a beautiful baby shawl . . .

My three daughters have all been blessed (christened) in the summertime, so instead of blankets, I've wrapped them in white lace shawls that I've knit for them. Last year, when I announced I was having my youngest, I asked for your help in picking out her shawl pattern.

And the winner was . . .


 Baby foot!


The Echo Flower Shawl!
Ravelry links: pattern | my project

This one came together on a tight deadline, and I was worried for a few days that I wouldn't finish on time.

Because we moved at the beginning of June, my white yarn went missing (at least I think that's why?), and I had to order new yarn, but of course I couldn't find the same yarn anywhere . . . Finally, I got the yarn ordered one month before the baby blessing. I finished and blocked the shawl the day before the blessing!

Something new I tried with this pattern: binding off with two strands of yarn held together. I really liked the result!

Something I don't know if I'll try again: I was so tired (and sore) from knitting those nupps (the little bobbles of yarn forming a zigzag in the bottom picture), I knew my next lace shawl would not feature that design element.

What crafting project/element will you not try again this year?

Cable project revealed!

If you watched Monday's video on knitting cables without a cable needle, you already know the secret of what project I was working on.


I needed a fast gift for my son's teacher. She's been really great for him, and she's helped me a lot with a personal project, so I wanted to do something for her. My son said her favorite colors were yellow and green, and I'd seen a picture of her wearing a cabled headband a few years ago. I know she doesn't like hats, so I thought a yellow cabled headband would be a great, fast gift to make for her. (Plus I have a ton of yellow Aran weight yarn.)


If you haven't used Ravelry and its pattern search--you've gotta. I searched for headbands with cables with free patterns online, and I came up with the Evenstar Headband by Jaime Louise, designed to match the Evenstar Gloves by Audrey M. (Here's my project on Ravelry.)


It's a really cool cable pattern--but be sure to follow the pattern! I thought I knew what I was doing the first repetition through, but I messed up about 10 rows and had to frog them. However, even with that set back, it knitted up in one day, blocked the next. Finally got a button yesterday, sewed it on today and sent it off!


My camera was a big smudgy, but the most interesting and unique part of the pattern is the "uncable," where the two cables come close in the middle, and then you actually just wrap the yarn around all those stitches, bundling them together. I've never done that before, and the result works really well in this pattern!

How do you pick thoughtful gifts?

Knitting without needles (well, one . . . )

There are actually ways to knit without any needles, but today we're talking about getting rid of an extra needle: the cable needle. When your cables are fairly small, you don't need the cable needle all the time. I made a cute craft yesterday (sharing the finished object Friday!) that featured fairly small cables: 3 and 4 stitches wide. It's the perfect candidate for cable needle-free knitting!

This is an intermediate-advanced technique. A basic understanding of knitting and cables helps a lot ;) .


The basic idea is that you move the yarn in front of the stitches you'd normally slip onto the cable needle (for a back cable; behind for a front cable). Instead of slipping them onto a cable needle, you just put them on your right-hand needle. Then you knit the other stitch(es) in your cable. With a bit of tricky finger work, you pick up the slipped stitches with your left needle, then take them off your right needle, twisting the stitches into the right place.

Sounds complex, doesn't it? You should probably just watch the video. ;) It's amazingly easy to do—and pretty darn hard to figure out from a written explanation!

Big news! (And help me pick what to knit next!)

I've been keeping a secret from you (and my mom & sisters have helped), and I'm sorry.

I'm having a baby! In about 8 weeks! And it's a girl!

Photo by Kristin Ausk of Meringue Bake Shop
And now I need your help—I'm putting out the CRAFT CALL! (It's like the Bat Call, but for crafters. Right?)

Naturally, having a baby means I have yet another reason to craft. This time, even more so. This will be my third girl and fourth child. I've started a tradition with my first two daughters. In the LDS Church, babies are traditionally given a blessing in church from a priesthood holder (usually their father). It's somewhat like a christening, but it's a blessing only, not a baptism, which happens later in life, when we believe children are old enough to be accountable for their actions.

It's traditional (but optional) for infants receiving blessings to wear white, and both of my daughters have worn the same Swiss dot blessing dress that my mother made me for my blessing, and which my sisters wore for their blessings. (My son wore the same little yellow suit that my father wore for his baby blessing.)

To go with the white dress, I wanted to make some sort of blanket for each of the girls—but my first two daughters were both summer babies, and most blankets would be too warm. So I had another idea: why not make a lace shawl?

I've always loved the idea of knitting lace, and I also love the idea of giving the shawls to my daughters on their wedding days.

For my older daughter, I bought the back-issue magazine with the Swallowtail Shawl pattern from Interweave Knits. Now, four and a half years later, the pattern is free. It took about three weeks to knit—including taking time off to actually have the baby!

Here she is, two weeks old, modeling my dress and matching bonnet, as well as the shawl. (I think she has on booties that were my mother's too!)


I kept up the tradition for my next daughter and made her a shawl too (she's a month old here):


This shawl is the Aeolian Shawl from Knitty online magazine. It's also free! I knit the shawlette size and omitted the beads from the pattern. It took me two weeks to knit.

Both of these were made from the same skein of Baruffa Cashwool laceweight yarn in white. (It was some of the only natural fiber laceweight wool I could find in white!) Each took a little over a third of the skein, so I hope I have enough left!

Since the day I finished my last shawl, I've been collecting patterns for another. I've got a collection of 18 patterns and now I have to choose one to knit!

A couple notes I used to narrow the selection down a bit:
  • Both of the previous shawls feature "nupps" (the white dots, or little balls, on the shawls).
  • Both of the previous shawls are triangular.
  • Both of the previous shawls feature points along the edging.
  • I love my lace light and airy. Large fields of plain stitching defeat the purpose of lace, in my opinion.
  • A pattern with charts is a lot easier for me to follow.
  • A minimum of yarn would be ideal. I'd hate to run out!
  • I'd really like a free pattern!
My top choices (mine will still be white; clicking on the photos will take you to the Flickr page for that picture; clicking on the pattern name will take you to the pattern page on Ravelry):

Echo Flower
Example by WoofBC
Percy
Example by sand_and_sky

Frozen Leaves
Example by ulygan


Fragaria Lace
Example by designer, Alina Appasov

What do you think? Which of these four is your favorite? Come vote!
Poll closes 11 Feb 2013.

Want more gorgeous lace shawls? Check out the runners up:
Related Posts Plugin for WordPress, Blogger...