

Showing posts with label home renovation. Show all posts
Showing posts with label home renovation. Show all posts

Help! I Have an Ugly Couch
I have an ugly couch. We got it from the thrift store so it has to be ugly apparently. Why don't you cover it you ask? Well it's a recliner sofa and they just don't make slipcovers for those. So I would have to completely recover it. My schedule clears up quite a bit in August (I'm graduating in July!!) so I will have time then to do some recovering. But I want to get it ready now. So what are your thoughts? We're newly weds so spending a bunch of money on fabric isn't really an option. I was thinking maybe buy painter's canvas since it comes in huge sheets and dye it? I don't know...HELP!!


2 comments
:
 Labels:
DIY
,
help
,
home decor
,
home renovation
,
homemade
,
Jasmine
,
recovering
,
sewing
,
tutorial
Labels:
DIY
,
help
,
home decor
,
home renovation
,
homemade
,
Jasmine
,
recovering
,
sewing
,
tutorial
Labels:
DIY
,
help
,
home decor
,
home renovation
,
homemade
,
Jasmine
,
recovering
,
sewing
,
tutorial

Wayward Tiling
Life is crazy at our house! As a part of getting ready for the wedding and Christmas, we decided to tile our kitchen floor. The husband laid the underflooring on Friday and then was too sore to tile on Saturday. So guess who got to do it? That's right, me.
It wasn't so hard, but it was very messy. It took a long time, and at the end I could hardly stand. The last box of tile was all broken so we couldn't even finish the room. We wrapped up our work at around 11:30 Saturday night, and then the three of us sat in the family room and ate cake!
It is now 1 week later, and we are still not done. Jasmine and I are about to grout because Ben has to work late.
The floor looks ok-- but some of my joints aren't straight. (The joints in the floor, not in my body.) Now I am looking at tiling everywhere I go to see if anyone else has wayward tiles like we do. Hopefully we will get finished tonight so we can move our major appliances out of the living room and dining room.

It wasn't so hard, but it was very messy. It took a long time, and at the end I could hardly stand. The last box of tile was all broken so we couldn't even finish the room. We wrapped up our work at around 11:30 Saturday night, and then the three of us sat in the family room and ate cake!
It is now 1 week later, and we are still not done. Jasmine and I are about to grout because Ben has to work late.
The floor looks ok-- but some of my joints aren't straight. (The joints in the floor, not in my body.) Now I am looking at tiling everywhere I go to see if anyone else has wayward tiles like we do. Hopefully we will get finished tonight so we can move our major appliances out of the living room and dining room.



Fireplace TV Cutout Turned Storage
Our house was only built 6 years ago and yet the builder put in a cut out above the fireplace that would be much more applicable to 15 years ago when tube TVs were all the rage. Needless to say our TV didn't come close to fitting in that space. Our realtor told us about how many people decorate the space or seal it off. My cute friend Rachel filled her space with salvaged wood.
I wanted to be able to use the space behind for storage so I explained what I wanted to my husband and he went to work. He had quite the busy schedule so it took him longer than he wanted but I love it and it works great!


I wanted to be able to use the space behind for storage so I explained what I wanted to my husband and he went to work. He had quite the busy schedule so it took him longer than he wanted but I love it and it works great!

I know you can't really tell the scale in the picture but this thing is huge. The hole was more than 4' tall and wide so it was a lot to cover. To make this we:
1. Measured the area and found out how many boards we would need. We used click together panel boards that were bare wood. (I don't think those are the technical terms...). We also got a piece of trim for the top and bottom, 2x4s for the cross bars, and hinges. Because of poor planning and mismeasurement this step took us 3 trips to the store...
2. My husband cut down each board to equal lengths, glued them together in between the interlocking pieces, and let them dry. He screwed the cross bars on to keep it all together.
3. He then sanded down any extra glue and stained the piece. The back has one coat of stain and the front has two.
4. He used four hinges and screwed them into studs on the wall. This was a hard steps because we had to stand on ladders and it was too heavy for me to hold. We carefully measured, took the hinges apart, and screwed one side to the wall and the other to the piece. He then held it in place as I put the pins back into the hinges.


5. (NOT YET COMPLETED) We will be adding shelves for DVDs and our board games. I'm so happy with how this turned out and for now it can just house that eagle :) 


DIY Wallpaper Removal


More kitchen makeovers!
So my husband went out of town for a couple days last week with our church youth group, and I took advantage of that time to add something else to our recent kitchen ceiling makeover: new cabinets!

I used Rustoleum Cabinet Transformations, and I was really excited by the initial results. I loved that the grain is supposed to show through with oak cabinets.
But now that I see them up close, I'm not quite as thrilled.

Yeeeah, I wasn't so much going for the "antiquey" look as my cousin generously described it.
Did I mention my husband was out of town? And I have three kids 6 and under? Yeeeah. I'm insane.

My kids spent a bunch of time in front of the TV while I was working on these (don't worry, we also hit the splash pad, the dentist and the store, so they weren't totally neglected). I really did work around the clock: the first night I was up until 3 AM, the second night I was up until 2, then woke up before 6 to put the final coat of protective cover on.

I got two doors up before DH got home, but was too discouraged & exhausted to finish at that point. When he got home, he helped tighten the hinge screws and hang the other 15 doors. It was a lot easier with his help!
I also bought new handles, which w love (but then found cheaper at Home Depot. CURSES), and spray painted the old hinges (probably should have just sprung for new ones).

The approximate numbers:
Cabinet kit: $75
Miscellaneous supplies (drop cloth, brushes, spray paint, etc): $35
New hardware: $100 (for all 50 cabinets)
Time from start to finish: ~48 hrs
I'll try another coat of the "bond coat" for touch up, but right now I kind of feel like this:
My tips? Paint in a VERY well lit area and paint THOROUGHLY.

I used Rustoleum Cabinet Transformations, and I was really excited by the initial results. I loved that the grain is supposed to show through with oak cabinets.
But now that I see them up close, I'm not quite as thrilled.

Yeeeah, I wasn't so much going for the "antiquey" look as my cousin generously described it.
Did I mention my husband was out of town? And I have three kids 6 and under? Yeeeah. I'm insane.

My kids spent a bunch of time in front of the TV while I was working on these (don't worry, we also hit the splash pad, the dentist and the store, so they weren't totally neglected). I really did work around the clock: the first night I was up until 3 AM, the second night I was up until 2, then woke up before 6 to put the final coat of protective cover on.

I got two doors up before DH got home, but was too discouraged & exhausted to finish at that point. When he got home, he helped tighten the hinge screws and hang the other 15 doors. It was a lot easier with his help!
I also bought new handles, which w love (but then found cheaper at Home Depot. CURSES), and spray painted the old hinges (probably should have just sprung for new ones).

The approximate numbers:
Cabinet kit: $75
Miscellaneous supplies (drop cloth, brushes, spray paint, etc): $35
New hardware: $100 (for all 50 cabinets)
Time from start to finish: ~48 hrs
I'll try another coat of the "bond coat" for touch up, but right now I kind of feel like this:
My tips? Paint in a VERY well lit area and paint THOROUGHLY.

It's a miracle! I have a ceiling!
Oh, my kitchen. I love it and I hate it. We've got tons of storage, lots of counter space and an oven I love, but pretty much everything in there looks like it was last updated in 1987 (because it was).
This probably doesn't look like much to you, but to me, it's pretty much a miracle.

Here's what it looked like when we moved in (picture taken facing the other direction) :

The ceiling became the most urgent issue over a year ago. It was a (yucky) drop ceiling with "cracked ice" light covers. The fluorescent bulbs began to flicker. After replacing several of them, we realized the fixtures themselves were failing.
It only took EVERY SINGLE LIGHT FAILING and then another month or two of working in the dark to finally tear out the drop ceiling and old fixtures and get our recessed lighting installed. (DH did a great job!)
But our redo was just starting. The textured plaster underneath the light fixtures was filthy, cracking and peeling off in places, and riddled with holes. Taking out the drop ceiling revealed unfinished walls on every side of the kitchen, including faux sheetrock walls forming the doorways into two other rooms.
Can you say overwhelmed?
It took us almost a year to make progress from there—it took my dad.
Dad (the Original Wayward) has done pretty much every home improvement ever. When he and Mom came to visit this month, we put them both to work.


Miracle!
Not to be outdone, Mom reorganized both of my kids' rooms and closets, as well as my living and dining room.


My girls love their closet! Before not only could you not see the floor in there, but it was overflowing with a mix of too-big and too-small clothes. Now all the too-small clothes are sorted and out of the way, and the clothes they're growing into are boxed by size and waiting!
The living room just looks clean now, but the space between the couch and the end table had become a collection point for things without homes: a case of flour, a box of dried fruit, all our tote bags, etc., etc.
This probably doesn't look like much to you, but to me, it's pretty much a miracle.

Here's what it looked like when we moved in (picture taken facing the other direction) :

The ceiling became the most urgent issue over a year ago. It was a (yucky) drop ceiling with "cracked ice" light covers. The fluorescent bulbs began to flicker. After replacing several of them, we realized the fixtures themselves were failing.
It only took EVERY SINGLE LIGHT FAILING and then another month or two of working in the dark to finally tear out the drop ceiling and old fixtures and get our recessed lighting installed. (DH did a great job!)
 |
| Picture taken from yet another angle. When you're really unhappy with your kitchen, you avoid photographing it! |
Can you say overwhelmed?
It took us almost a year to make progress from there—it took my dad.
Dad (the Original Wayward) has done pretty much every home improvement ever. When he and Mom came to visit this month, we put them both to work.

It took pretty much their entire visit (with time off for fun, of course), but Dad and DH got the ceiling completely finished and redid the walls. All we've had to do this week is final patching, sanding and painting!

Miracle!
Not to be outdone, Mom reorganized both of my kids' rooms and closets, as well as my living and dining room.


My girls love their closet! Before not only could you not see the floor in there, but it was overflowing with a mix of too-big and too-small clothes. Now all the too-small clothes are sorted and out of the way, and the clothes they're growing into are boxed by size and waiting!
The living room just looks clean now, but the space between the couch and the end table had become a collection point for things without homes: a case of flour, a box of dried fruit, all our tote bags, etc., etc.
THANK YOU, MOM & DAD!
How NOT to Paint Your Front Door Black
This was so wayward that I wished that I could just throw it away but I couldn't because it was my front door. It took me three long days to finish and I was so grateful to be done! Here is what not to do:
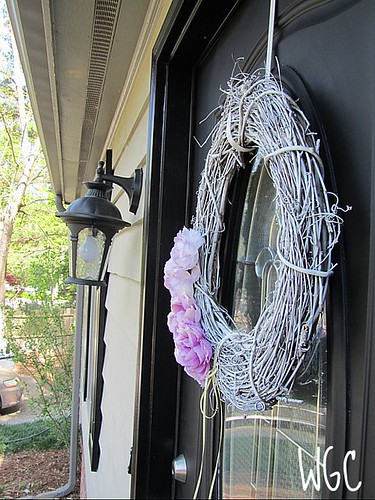 Day1: I painted two coats of regular latex paint on the door. It is black paint. It got hot in the sun. We live in the humid south. It never cured.
Day 2: I could scrap the paint off with my finger. So I got my husband to take it back off the hinges and I tried to strip the paint off. I ran out of paint stripper and motivation but I had no front door on my house. My husband had left for work. I called my sister-in-law who comes to my rescue with left over primer. She can't stay long because it's her ANNIVERSARY which I had totally spaced. We open the primer and it is dried up with no saving it. I go to the store to buy spray paint. She took her kids and PB and went to her house while I spray painted my door with this but had not scraped all the latex off.
Day 3: Unhappy with unevenness of the gloss and you could see the old latex. Scraped all the latex off, sanded with steel wool and painted it with this and FINALLY I was happy. I did about 7 coats and did it in the shade. My wrist ached for days because of all the scraping, sanding, and painting.
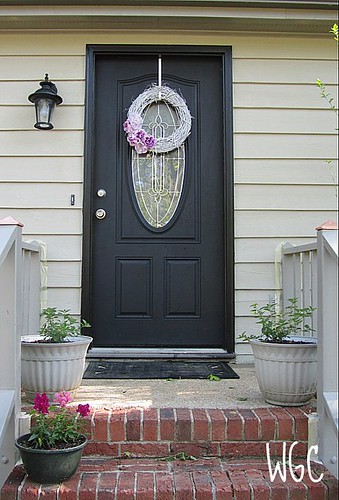
The before can be seen in this post. It was just plain white from the factory. Now I can't believe I let it go naked for so long!

Day 2: I could scrap the paint off with my finger. So I got my husband to take it back off the hinges and I tried to strip the paint off. I ran out of paint stripper and motivation but I had no front door on my house. My husband had left for work. I called my sister-in-law who comes to my rescue with left over primer. She can't stay long because it's her ANNIVERSARY which I had totally spaced. We open the primer and it is dried up with no saving it. I go to the store to buy spray paint. She took her kids and PB and went to her house while I spray painted my door with this but had not scraped all the latex off.
Day 3: Unhappy with unevenness of the gloss and you could see the old latex. Scraped all the latex off, sanded with steel wool and painted it with this and FINALLY I was happy. I did about 7 coats and did it in the shade. My wrist ached for days because of all the scraping, sanding, and painting.
The before can be seen in this post. It was just plain white from the factory. Now I can't believe I let it go naked for so long!
Wreath tutorial to come next week!
6 comments
:
Labels:
Brave Brooke
,
Family Life
,
Front Door Black
,
home
,
home decor
,
home renovation
,
Spray Paint Metal Door
Labels:
Brave Brooke
,
Family Life
,
Front Door Black
,
home
,
home decor
,
home renovation
,
Spray Paint Metal Door
Bathroom Reveal!
I need to catch up with you. I have two unfulfilled promises that I never followed up on. You can slap my wrist!
Promise # 1: I promised back in October that I would show you our costumes. I am disappointed to say we didn't win any contests but just as a refresher we went as X-Men. I was Storm, my hubby was Scott/Cyclops, Jasmine was Rogue, and PB was Professor Xavier.
 PB looks like a little boy but that's okay it was only one night :) I should have made sure she had in her pink paci. Oh well! Her suit I showed in a tutorial in the link above and her "shirt and tie" were sewn onto a bib and the edges were tucked in her coat.
Promise #2: I made a couple weeks before the costumes when I promised to show you our bathroom remodel. It did take us a while (3 months-ugh!) but it has been finished for a while so I need to make the grand reveal! This project was definitely wayward! There were a ton of set backs but we finally finished around Christmas. It was nice to have our bathroom back finally!
Man that list is a lot shorter than I was expecting. All of those projects are time consuming, though!
Here is a refresher as to what they looked like before we moved in:


Under construction. The walls are ripped out. The floors are mid-tiling project and yes that is the toilet in the bath tub.

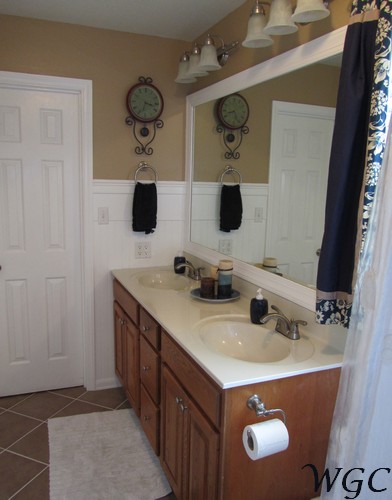
And here it is finished up!
Promise # 1: I promised back in October that I would show you our costumes. I am disappointed to say we didn't win any contests but just as a refresher we went as X-Men. I was Storm, my hubby was Scott/Cyclops, Jasmine was Rogue, and PB was Professor Xavier.

Promise #2: I made a couple weeks before the costumes when I promised to show you our bathroom remodel. It did take us a while (3 months-ugh!) but it has been finished for a while so I need to make the grand reveal! This project was definitely wayward! There were a ton of set backs but we finally finished around Christmas. It was nice to have our bathroom back finally!
A list of what we did:
- Tore out the tile on the walls and replaced it with wainscoting
- Replaced the vinyl flooring we put in right before we moved in with tile
- Replaced the thresholds, baseboards, and quarter round
- Touched up paint
- Framed the mirror
- Added accessories
Man that list is a lot shorter than I was expecting. All of those projects are time consuming, though!
Here is a refresher as to what they looked like before we moved in:


For the past 4 years:

Under construction. The walls are ripped out. The floors are mid-tiling project and yes that is the toilet in the bath tub.

And here it is finished up!
 |
| My accesories are from Michael's and Walmart :) |
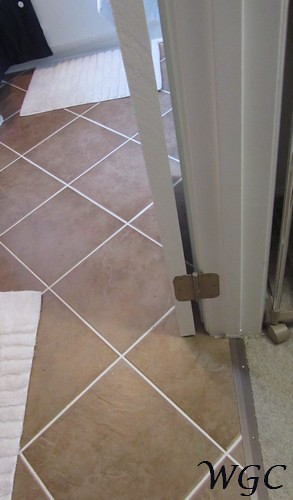 |
| A close up of the tile and threshold |
 |
| This is the only outlet in the bathroom and it used to be two plugs. My number one request since we moved in was to give me an extra outlet :) |
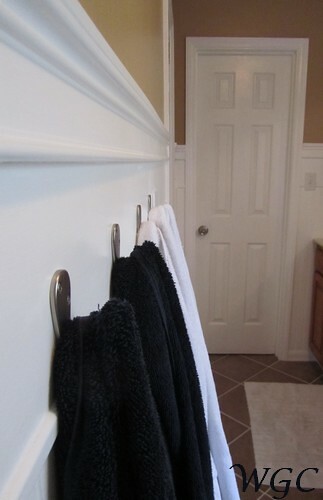 |
| Four hooks is so much better than 1 towel rod! |
It is so nice to have the bathroom back and it feels like my own spa!
Here I am making good on my promises! I hope you enjoyed!
Subscribe to:
Posts
(
Atom
)
