Showing posts with label pumpkin. Show all posts

Fancy Pumpkins

I was asked to decorate some pumpkins for a wedding this past weekend. I had tons of ideas and looked around on Pinterest for some inspiration. I purchased the pumpkins at Aldi. You can't beat a $3 huge pumpkin...except if it is impossible to carve by hand. It took A LOT of effort to carve these and eventually I resorted to power tools but we'll get to that in a minute. Here are the pumpkins!


1. Monogram
This was the obvious first choice of pumpkin, especially because it was a wedding. I looked around on the internet for a fancy font and mimicked it on the side of the pumpkin with a washable marker. I used marker because it wouldn't leave an indent and could be wiped off. To carve this I used a knife and exacto knife. I WISH I had carved it with my husband's Dremel like I did the later pumpkins.


2. Mr. and Mrs.
I used a few fabric scraps to make the bow and veil and used puff paints for the rest. Surprisingly the puff paints didn't stay on very well and I had to emergency glue some of the letters back on last minute! The other writing on it said phrases like "Just Married", "Happily Ever After", and "M+C 4ever" For the Mr. I tried to do a block manly font and for the Mrs. I used cursive.


3. Glitter Dipped
This was the first pumpkin I made. I taped off an area and applied Mod Podge and glitter. I wasn't very patient and put on too much Mod Podge. For the second coat I used a Mod Podge/glitter mix which filled in the gaps really well. I wish I had done one more coat but I didn't have enough time for it to dry.


4. Rhinestone swirls.
So when I was getting supplies for this venture at the craft store I purchased a ton of stuff. I ended up using almost none of it. I got lucky with this pumpkin. I purchased some rhinestone border in the dollar section and it worked out great! It was self adhesive and already easy to apply since I didn't have to add each stone. It was two stones wide so I cut them up the middle and applied them in swirls. I think this one was my favorite pumpkin. That may have been because it was the easiest!


5. Spray painted
I first cut out a swirly shape out of contact paper and applied it to the pumpkin. I taped around the pumpkin to prevent over spray.  I only had to apply one coat of gold spray paint. I let it dry and removed the tape. I used puff paint to add the date and a few more swirls. Then while it was drying I had some help in the form of a little girl who thought she was helping with painting. It turned out okay, though!


6. Drilled pattern
I used three different size drill bits in a pattern to create this pumpkin. The largest one was 1". After I drilled all the holes I added some rhinestones for some sparkle.

7. Initials
This is when I figured out using the Dremel was a super easy way to get the carving done without so much effort (or at all because my hands were so tired from carving and I was having an extremely hard time).  I used the drill to make some pilot holes and used the Dremel to carve between the holes and perfect the shapes of the letters. Just FYI you will have pumpkin crumbs EVERYWHERE after using the power tools but it's worth it!


Here is a shot of how they were displayed:


Which one was your favorite? Are you going for a scary face on your jack-o-lantern or a decorated one?

Chocolate Chip Pumpkin Cheesecake Dip

Do we really need an introduction with a headline like that?

As usual, I had an idea, I went hunting for recipes, and I didn't find anything I liked. So I took some inspiration and did my own thing. (Wayward!)

Chocolate chip pumpkin cheesecake dip
1/2 c pumpkin puree
1 (8oz) tub of light cream cheese
1 c powdered sugar
1/4 tsp pumpkin pie spice
Optional: 8 oz whipped topping (the dip is a little on the runny side; this gives it more body)
1/3 c, give or take, semi-sweet chocolate chips (mini chocolate chips would be fantastic)

Using a mixer or a stand mixer, combine puree, cream cheese, powdered sugar, and spice until smooth. Fold in (optional) whipped topping and chocolate chips. Serve with vanilla wafers, graham crackers or spoons ;) !

How do you like your pumpkin?

Pumpkin recipe roundup!

Last night after we finished trick-or-treating, my 5-year-old looked up at me and asked, "What's fun in the next year [month]?"

What's NOT fun? Fall is in full swing, the leaves are falling all around, and pumpkin recipes are helping us all get ready for Thanksgiving!


What are your favorite pumpkin recipes? 
Share links!

Pumpkin Caramel Custard Pie

Just in time for Thanksgiving, this elegant twist on the Thanksgiving classic pumpkin pie was my first original pie recipe! I’ve had pumpkin pie lovers and haters try this—and we all liked it!

The difference is subtle: it’s slightly sweeter with a more caramel flavor, and since it’s based on a pumpkin-caramel custard recipe, that’s not super surprising. (You can read more about the original 1964 recipe here!)

When I made it, I had enough for a 9″ pie and two 5″ pies. I modified a few of the amounts to try to make it fit into just a 9″ pie better, and Jasmine graciously tested the recipe. The filling worked out perfectly for her!

Recipe
Ingredients
  • 1 unbaked 9″ single pie crust
  • 3/4 c sugar, divided
  • 3 Tbsp water
  • 1 1/4 c canned pumpkin (not pumpkin pie filling)
  • 1/4 c brown sugar
  • 1 Tbsp molasses
  • 2 eggs
  • 3/4 tsp cinnamon
  • 3/4 tsp
  • dash nutmeg
  • 1 c cream (light or heavy)
1. Prick the pie crust with a fork. Lay a double layer of foil over the crust (I also weighted mine with rice) and bake according to recipe directions for a pre-baked pie.

2. Turn the oven to 325.

3. Once the crust is done, in a small sauce pan, combine 1/4 c + 2 Tbsp white sugar (half of the total amount) with 3 T water. Heat over medium high heat, stirring until the sugar is dissolved. Let boil until it turns the color of brown sugar. Promptly remove from the heat and pour into the baked pie crust. You only have a few seconds before this stiffens up, so spread it around the bottom and sides quickly (I used a pastry brush, but be sure your brush is rated for high heat!). (This step can be considered optional, but if you skip it, add the sugar to the pie filling.)

4. Combine the rest of the white sugar, pumpkin, brown sugar, molasses and spices. Mix until well combined. Stir in cream. The batter will be thin. It’s okay.

5. Place the prepared pie crust on the oven rack and pour the filling into the crust. You may want to cover the edges of the crust with foil*, but mine didn’t burn.

6. Bake for about 1 hour, or until a knife inserted about 1″ from the center comes out clean.

7. Cool on a wire rack.

For the adventurous, you can take this to the next level by making it a more of a pumpkin “crème brûlée” pie with an optional sugar crust (option B pictured above, option A pictured below):

either A. sprinkle enough white sugar onto the top of the pie to coat it well. Cover the edges of the crust with foil*. Place under the broiler, watching constantly, until sugar bubbles and browns (or use a kitchen torch).

OR B. In a small sauce pan, combine 1/4 c sugar and 2 Tbsp water. As in step 3 above, heat over medium high heat, stirring until the sugar is dissolved. Let boil until it turns the color of brown sugar. Promptly remove from the heat and pour over the cooled pie, keeping the pan moving constantly so it doesn’t pool too much in one place. (I recommend pouring in circles. When you cut the pie, crack the sugar crust first by tapping it with a sharp knife.)

Option A gives a subtle crunch to the top of the pie. Option B gives a solid sugar crust with significant crunch. I liked A better. Or you could do what I did: cover half (or you could do 3/4s) of the pie with foil, then sprinkle with sugar and broil (and you could do another quarter with the solid crust, if you want). All optional.

Happy Thanksgiving!

*Need to cover your crust with foil? Try this trick from the Better Homes and Gardens Cookbook: take a sheet of foil large enough to cover your pie. Fold it in quarters, then cut a circle from the middle of the foil sheet. Open and voila! Easy to apply crust protection!

What's your favorite Thanksgiving pie?

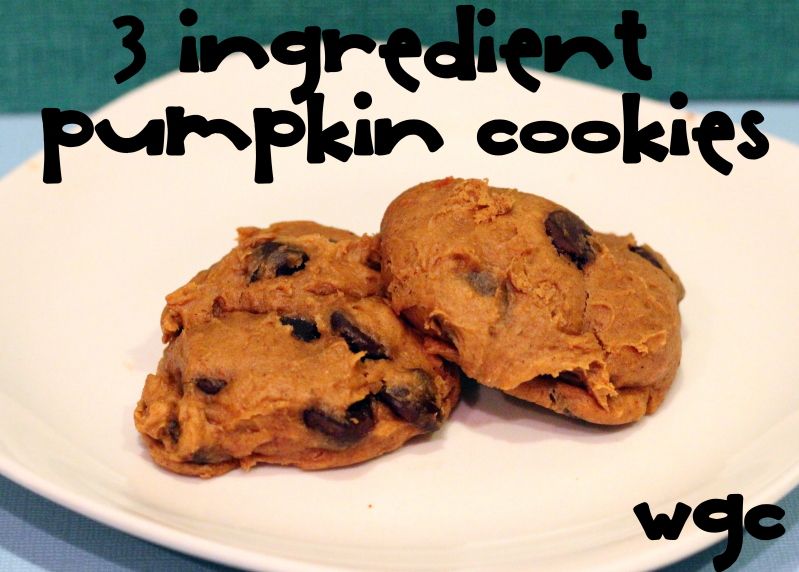
3 Ingredient Pumpkin Cookies

Fall baking means one thing to me: PUMPKIN! I've been meaning to make some pumpkin cookies and friends coming over for lunch in between General Conference Sessions was a great excuse. I found the idea of making pumpkin cookies with only 3 ingredients all over and I knew I had to make them myself.

Photobucket

3 Ingredient Pumpkin Cookies

Photobucket

Ingredients:
1 15 oz can of pumpkin puree (not pumpkin pie filling)
1 cake mix (I'd recommend Spice Cake)
1 bag (2 cups) of chocolate chips (I'd recommend dark chocolate chips)

Optional: Pumpkin pie spice. Really you only need this if you use a regular cake mix, rather than spice cake.

Directions:

1. Preheat oven to 350. Mix together pumpkin and cake mix using a mixer.

Photobucket 

2. Stir in chocolate chips

Photobucket

3. Glob 2 tablespoon sized cookies on a greased cookie sheet.

Photobucket

4. Cook at 350 for 12-15 minutes, or until a toothpick comes out clean.

Photobucket


5. ENJOY!

Photobucket


What excuse can you find to make these babies?

Pumpkin Caramel Custard Pie

UPDATE: Not long after I posted this, the LDW Magazine blog shut down. (I'm not sure when because I didn't notice until I tried to post another pie recipe!) The recipe has been unavailable—until now! I've posted the pumpkin caramel custard pie recipe here on Wayward Girls' Crafts!

For the last few months, I've been on a PieQuest over at the Latter-day Woman Magazine blog. Last week, I shared my first ever original pie recipe: a pumpkin caramel custard pie. My husband and I don't even like pumpkin pie all that much, but we liked this one!


 The story behind the pie
I like cookbooks. I can't resist them sometimes, especially at thrift stores. Vintage church cookbooks are especially exciting to me. I always hope to find some lost recipe gem—and this time I finally have! Unfortunately, it wasn't from the good sisters of the Coltman Ward Relief Society, who put the book together, but from the envelope in the back of the book:

Caramel-pumpkin custard from McCall's magazine. Do you see the date on the bottom? November 1964.

Unfortunately, the recipe only included the first two steps, because the clipping was actually of the pecan pie recipe on the back. So I looked at several other caramel custard recipes and decided to put it in a crust. Voila (with a little adaptation to fit in a pie crust): a pumpkin caramel custard pie.

The recipe includes steps to take it to the crème brûlée pumpkin pie level—oh yeah, I went there.

Add an elegant twist to the Thanksgiving classic for your house this year with a pumpkin caramel custard pie. Seriously. It's good.

How to sew a blind hem

Happy Halloween! I think this is the first year we've carved pumpkins (or at least the first time in a while). We let the kids choose the features, and my five year old drew the face on. Naturally, the adults (read: my husband) did the cutting.


And as always, I felt ridiculously compelled to sew our costumes. So I altered one of my dresses and sewed a whole new one for my older daughter. (You can see the full family on my blog.)


I had every intention of sewing one for my younger daughter, too, but I realized . . . I like being DONE with sewing more than actually doing it! Plus, I found a beautiful dress she hadn't worn yet. (My son's costume was purchased; it was actually a pirate costume, but it worked perfectly.)

Because it's not enough for me to sew something that's already beyond my skill level, I decided to tackle  a new skill while sewing my daughter's dress: sewing a blind hem. I really, REALLY hate pressing narrow hems, so I thought I'd give a blind hem a shot. (You still have to press it, but it was a little better.) I was pretty pleased with the result.

A blind hem is a bit less noticeable way to hem a dress. (It's also especially good for hemming pants . . . but I don't even want to think about how you'd have to fold and twist them to do that!) Here's how it looks:


This is how the blind hem stitch looks on my machine (this is for woven/non stretch fabrics; stretch fabrics have smaller zigzags between the big zigzag peaks).


The peaks of the zigzags are the only parts of the hem stitching that goes through the top layer of fabric to be visible from the outside. It's all in the folding before you sew--which is a bit tricky to explain, but this is how I figured out to do it, loosely based on instruction from the family seamstress maven, Jasmine, (in July) and . The instructions are much easier to demonstrate in a video:


Here's a diagram to show where to sew:


You just want to catch the edge of the fold of the front fabric with the point of the zigzags. I practiced on scrap fabric to try to get the stitch width right so I could aim the fold for the midline of my sewing foot and catch the zigzags.

The pattern is Simplicity 4647, view A, size 3 (with the overlay skirt from view B, size 6). I didn't sew the sash on quite right. I think I could still fix it, though--either take out the stitching line and sew it down further forward, or tack it down. The fabric was the $1.99 costume satin (but it feels nice), with a glittery tulle net for the overlay. Oh, and her crown? $4! (I was excited for the good deal.)

Have you ever sewn a blind hem? What are your best tips?

Pumpkin Cheesecake Truffles

We recently started a cooking club at church. This month's "secret ingredient" (aka "theme") was pumpkin pie spice. Naturally, all of our food actually included pumpkin, too.

I wanted to make pumpkin cheesecake truffles. I found recipes for pumpkin truffles, pumpkin cheesecake, and cheesecake truffles, but no true pumpkin cheesecake truffles. I didn't care much for most of the recipes I found--I didn't want to use white chocolate chips in my truffle center--and, you know, I'm wayward and crafty.

I decided to actually make a pumpkin cheesecake and then make it into truffles. But, honestly, I didn't want to have to deal (read: gain the weight from) an entire pumpkin cheesecake. So I searched out a pumpkin cheesecake recipe that was already adapted for muffin tins (recalculating baking time = nightmare! for me).

I took Tante Marie's newsletter's muffin tin pumpkin cheesecake I found and halved it, eliminating both the crust and the cream topping, and baking in a water bath to prevent cracking (which, admittedly, isn't super likely in such small cakes) or burning. Then I followed the steps from Edible Garden to make crustless cheesecake into truffles.

Pumpkin Cheesecake Truffles
  • 2-3 c. water for bath
  • 4 oz. (American) Neufchâtel cheese, softened (or cream cheese)
  • 1/4 c. canned pumpkin
  • 1 egg
  • 2 Tbsp light brown sugar
  • 1 Tbsp maple syrup
  • 1/4 tsp cinnamon
  • pinch ginger
  • pinch nutmeg
  • 3-1.55 oz. milk chocolate bars
Preheat oven to 325 F and line 6 muffin cups with paper liners. Put water on to boil. Mix cream cheese and pumpkin in mixing bowl until well combined. Add egg, brown sugar, maple syrup, and spices (can substitute 1/4 tsp pumpkin pie spice), and mix until combined. Pour into prepared muffin cups, dividing batter equally.

Place a jelly roll pan or deeper baking pan that's large enough to hold the muffin tin on the middle rack in the heated oven and pour the boiling water in the pan--be sure the water won't go over the top of the muffin tin! (As you can see, I added a kitchen towel in my water bath because of something I'd read on the Internet. Don't know if it helped, but it sure made me nervous!)

Place the filled muffin tin in the water bath and bake for 15-17 minutes, until centers are set. Remove from oven and cool. Once cool, freeze for at least 4 hours.

Once the cheesecakes are frozen solid, they're ready to dip in chocolate. Break the chocolate bars into a microwave safe bowl and melt them, heating for 30 second intervals (or over a double boiler, if you'd like). Remove the cheesecakes from the freezer, and peel the paper lining from the cheesecakes (paper liners aren't a picnic, but I think they'd be easier to remove than foil). Cut the cheesecakes in quarters.

Using two forks and working quickly, coat the quarters in melted chocolate. If necessary, reheat the chocolate. Seriously, work fast and be careful--not only does the chocolate solidify quickly on the surface, and have a bit of a hard time adhering, but also the condensation from the frozen cheesecakes can and will seize the chocolate if you're not fast enough.

Let the chocolates harden/cool on waxed paper (it won't take long). Store in the refrigerator or freezer (the crystals are noticeable in the frozen version, but the flavor is still great).

The result (when it worked out well!): a hard chocolate shell holding soft, smooth cheesecake. The cheesecake and pumpkin were both unmistakeable--it's a lot of flavor packed in a little bite!

I tried two variations of my truffles, and this one was far and away the favorite at my cooking club.

What's your favorite pumpkin pie spice recipe?
Related Posts Plugin for WordPress, Blogger...