Fast, easy, fantastic: quick thank you gifts for teachers!

We often give gifts to our kids' teachers at the end of the school year. A couple years ago, I hit on a gift idea that became a favorite: a "spa kit." (This may have been inspired by a birthday gift from Mom.) After a long, stressful school year, teachers need to relax! What better way than a spa kit?

I made the spa kit easy on myself: I hit up the dollar store and put together a basket or gift bag of things like exfoliating scrubbies, eye masks, bubble bath, bath pillows, lotion and scented candles. This year, I made the spa kits even more special with the addition of handmade "spa cloths."


The handmade gifts add an extra touch, and they're super quick to make: it took under three hours to make the first set of five hearts. I already had the yarn from another project, so it was no extra cost. Plus, there are tons of cool crochet or knitting patterns online for free (Ravelry lists over 4500 patterns, but you might need to be logged in to see them)!


The spa cloths came especially in handy with my two-year-old accidentally spilled her water bottle all over us and one of the gift bags. They got their very first use right away!

Want to make your child's teacher gift even more special? Have them write a thank you note, mentioning their favorite activities or memories of the school year!

My spa cloth projects on Ravelry

Patterns
Sweet Somethings (heart) by Julie of Simply Notable
Leafy Washcloth by Megan Goodacre of Tricksy Knitter (with mods from Ravelry user Penserosa--decreases at edge)
(Also to come: Starfish Cloth by Dione Read of Sew Funky)

Yarns
Hearts
Peaches & Cream in Hot Blue
Lion Brand Microspun in Red


Leaves
Knit Picks Shine Sport in Green Apple (held double for the larger leaf)

(Starfish will be done in Knit Picks Shine Worsted in Snapdragon)

Dying to dye (yarn)

One night, my husband came home and found the kitchen in disarray. "What's all this?" he asked.

"I'M DYYYYYYYEING," I wailed.

And I was. Dyeing with an E, that is! It's really easy to dye yarn made from animal fibers (wool, alpaca, cashmere, even silk) and nylon, and you can use common ingredients you probably already have in your kitchen!

My first dyeing experiments were for a colorwork sweater for my oldest daughter. First, I wanted to make sure we liked the colors, so I did little samples of 20" of yarn. I was trying to do about 1% of what I'd use for the final dye concentration, so I filled up my containers with 100 mL of water, added the dyes (food coloring and Kool-aid), and then used a dropper to get 1 mL of the dye stock. I mixed that 1% dye stock with more water.

Here's a secret of dyeing: it doesn't matter how much water you use. I measured the water to get the concentration right for a tiny test, but when you do the actual dyeing, as long as you have enough water to cover your yarn and let it circulate, the only proportion you really need to worry about is the amount of dye to the amount of yarn (by weight).

To prepare the yarn, you need to wind it in hanks (long loops) and tie figure-eight ties through the loops in three to four places to prevent tangling. Then soak it in clean water. (You'll need vinegar later, so you can add it to the soak water instead of the dye bath, but I usually don't.)
Then you can prepare the dye stocks. Tools of the trade: tons of measuring cups to get my 1% solutions, microwave safe containers and a kitchen scale.

The colors in my rainbow here are McCormick's neon pink food coloring, McCormick's yellow food coloring, McCormick's green food coloring, Ice Blue Raspberry Kool-aid, and a mix of McCormick's neon purple (2 parts) and neon blue (1 part).

In the foreground, I'm soaking the yarn samples to be dyed.


Now it's time to dye! You need heat and acid to set this dye on protein fibers. With food coloring, you have to add some vinegar; a tablespoon in the dye stock is plenty (this doesn't have to be measured either! No wonder I love this!). The Kool-aid doesn't need vinegar because it already has citric acid. The heat is simple too: microwave! (Stovetop and oven work just as well too--but don't boil the yarn; it felts.)

Above, my tests are ready to microwave: I put 1mL of the dye stock into a baggie, added more water, and put in my wet yarn. I did more of the blue because I had a few samples of other things I was thinking about dyeing.


I nuked them for 2 minutes, let them sit for 10 and nuked them for 2 minutes. I repeated this until the dye bath "exhausted," meaning the water was clear (or milky in the case of the Kool-aid, but the dye was absorbed by the yarn). Here they are after microwaving:

Baggies may not be the best choice for this... But notice how the yarn is colorful and the water, not so much.

My daughter and I picked the colors for her sweater from the samples and then I stuck the yarn to be dyed in the full dye baths:

And, below, after microwaving. Check out the water--it's clear, except in the purple. Blue dyes often take longer to exhaust, so I recommend leaving the yarn in overnight after heating:

This jar of yellow did something interesting. Maybe I didn't have enough acid in it, but while it was in a cool-down phase between microwave bouts, I was worried about how much dye was left in the water. I added more vinegar and turned around to put away my big ol' jug. By the time I looked back, the water was perfectly clear and the yarn a vibrant yellow!

Allow the yarn to cool--you can speed this up by taking it out of the dye bath, but DO NOT PUT COLD WATER ON HOT YARN. This will cause the yarn to felt.

Once it's cool, you'll want to rinse the yarn with clean water. Be sure the rinse water runs clear. If it doesn't, either your dye isn't set, and you need more acid and/or heat, or you've used more dye than the yarn can actually absorb, so the excess is washing off. The yarn will usually fade more dramatically if the problem is that the dye isn't set.

And now it's time to dry! Above, the yarn is hanging out in my salad spinner, which is really handy for drying small amount of yarn. Below, it's hanging on a chair with a fan to dry the rest of the way.

Since this was for colorwork, I made myself some posterboard bobbins and wound up the yarn. The darker pink and the white are purchased--Knit Picks Wool of the Andes Sport in Rouge and White--and the white is the base for the other colors.
And in the finished product:

Vivien lace baby cardigan

Vivien, my youngest niece's name, means alive or lively. I thought that was perfect for this sweater I designed for her that features leaf lace motifs (leaves are alive!).

My adorable niece wearing her cardigan!

I fell in love with the lace yoke of this Prinsessa Estellen nuttu cardigan, which was inspired by one worn by Princess Estelle of Sweden. (You knew there were other royal families of Europe, right? Princess Estelle is second in line for the crown after her mom, Crown Princess Victoria!)

I would have just used that pattern, but there were two problems: it was only available in the 0-3 months size, and . . . it was in Finnish.

Strangely enough, our (the Wayward Girls') dad is fluent in Finnish (he was a missionary there in the 1970s), but I didn't figure he'd have knitting terminology on the tip of his tongue. However, because of Dad's Finnish connection, I remembered that another friend, writer and knitter Annette Lyon, also speaks Finnish. In fact, she learned to knit in grade school in Finland (while her father was in charge of the missionaries there).

The lace pattern had a chart, which makes it almost universal, but I wanted to make sure I'd read it right, and Annette was kind enough to check my translation. With a whole bunch of math and some trial-and-error, I knit up a six month cardigan with the lace patterned yoke.


I wanted to make it even more unique, so instead of a seed stitch border as on the cuffs, button band and neckband, I used a provisional cast on and designed an original leaf lace border. It's a bit bigger than the sweater, though, so the leaf pattern is more obscured, and it looks more like a ruffle, which is also cute!

I'm planning to write up the pattern to share--anybody interested? I'll get around to it much quicker that way!

View the project on Ravelry

Learn to craft with Craftsy--on sale!

Wayward Girls' Crafts is an affiliate of Craftsy, so we receive a small percentage of any sales made through these links. But even if we didn't, we'd still love their classes!

Do you know Craftsy? I think it was Jaime who first introduced me to this awesome site for online crafting classes. They've got classes on quilting, sewing, knitting, baking, gardening, jewelry making, fine art and more! Best of all, their classes are on sale up to $20 off now through Monday, May 11! This is a great Mother's day gift *hint, hint*!

Here are a few classes we Waywards have taken & enjoyed.


Jordan: I was already a fan of Amy Herzog's body profiling and fitting techniques from her blog and book on the subject, and now I have a live class with hours of her live instruction to complete my knowledge of making flattering sweaters!

More fiber arts classes on sale


Jordan: I don't know if I'll every be quite talented enough as a seamstress to pull this off, but I learned a lot just by watching this class, from structuring garments to working with fine fabrics to fitting!

More sewing & quilting classes on sale


Jordan: Jaime picked out this class and put it on her wishlist (on Amazon, but Craftsy has a wishlist feature too!). When she got it, she told me, "I'm really excited! It was the first gift I 'opened' on Christmas morning!"

More art & photography classes on sale

Be sure to check out their other classes on Jewelry & Paper Crafts, Home & Garden, and 
Cake Decorating & Cooking, too!

Calli-Cardi! Sweater with a caterpillar

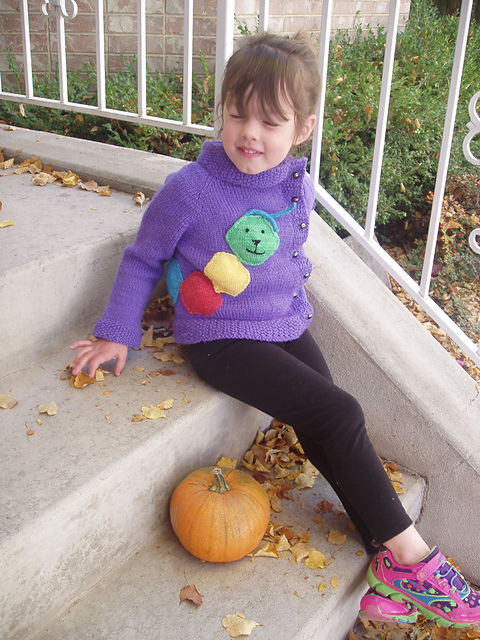
Last year I made sweaters for everyone in my family (except me...). My four-year-old's lovey is a multicolored caterpillar we call Cally. I wanted to incorporate it into her sweater to make it personal and unique for her: a Calli-Cardi!


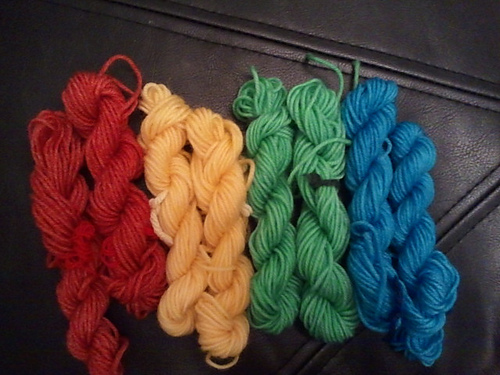
I looked for a cardigan with an off-center opening to maximize the room for the caterpillar on the front. As with my six-year-old's sweater, I knew I didn't want to buy five colors of yarn to only use a little of most of them so I dyed the caterpillar colors:

Each hank was about 14 yards; the eight of them together weighed about 36g.To dye them, I used food safe colors in Mason jars on the microwave (but that's another post!).

Red: one packet of cherry Kool-aid
Yellow: about five drops of yellow McCormick's food coloring (and white vinegar)
Green: about five drops of green McCormick's food coloring (and white vinegar)
Blue: one packet of mixed berry blue Kool-aid.

Originally I planned to work the caterpillar design as part of the sweater itself using the intarsia method of colorwork, but I realized that would be a big challenge, especially with two different weights (thicknesses) of yarn. So I made the cardigan normally and then knit hexagons to appliqué the caterpillar on.


I left an extra long tail on the end of each hexagon and used the tails to sew the caterpillar onto the sweater. I used backstitch in black yarn to make the caterpillar's face and short i-cords to make his antennae.

As you can see, she loves it!

For pattern notes, modifications and in-progress photos, see this project on Ravelry!
Cardigan Pattern: Peach Blossom Child Jacket by Jennifer Little
Cardigan Yarn: Cleckheaton Country Kids 8-ply (superwash wool in DK/8-ply weight) in purple
Caterpillar Pattern: Merit badge by Amanda Ochocki
Caterpillar Yarn: Knit Go Craft Super Soft Cashmere Wool in white (cream), hand dyed (claims to be DK weight but knit up more like fingering weight)

Related Posts Plugin for WordPress, Blogger...