One night, my husband came home and found the kitchen in disarray. "What's all this?" he asked.
"I'M DYYYYYYYEING," I wailed.
And I was. Dyeing with an E, that is! It's really easy to dye yarn made from animal fibers (wool, alpaca, cashmere, even silk) and nylon, and you can use common ingredients you probably already have in your kitchen!
My first dyeing experiments were for a colorwork sweater for my oldest daughter. First, I wanted to make sure we liked the colors, so I did little samples of 20" of yarn. I was trying to do about 1% of what I'd use for the final dye concentration, so I filled up my containers with 100 mL of water, added the dyes (food coloring and Kool-aid), and then used a dropper to get 1 mL of the dye stock. I mixed that 1% dye stock with more water.
Here's a secret of dyeing: it doesn't matter how much water you use. I measured the water to get the concentration right for a tiny test, but when you do the actual dyeing, as long as you have enough water to cover your yarn and let it circulate, the only proportion you really need to worry about is the amount of dye to the amount of yarn (by weight).
To prepare the yarn, you need to wind it in hanks (long loops) and tie figure-eight ties through the loops in three to four places to prevent tangling. Then soak it in clean water. (You'll need vinegar later, so you can add it to the soak water instead of the dye bath, but I usually don't.)
Then you can prepare the dye stocks. Tools of the trade: tons of measuring cups to get my 1% solutions, microwave safe containers and a kitchen scale.
The colors in my rainbow here are McCormick's neon pink food coloring, McCormick's yellow food coloring, McCormick's green food coloring, Ice Blue Raspberry Kool-aid, and a mix of McCormick's neon purple (2 parts) and neon blue (1 part).
In the foreground, I'm soaking the yarn samples to be dyed.
Now it's time to dye! You need heat and acid to set this dye on protein fibers. With food coloring, you have to add some vinegar; a tablespoon in the dye stock is plenty (this doesn't have to be measured either! No wonder I love this!). The Kool-aid doesn't need vinegar because it already has citric acid. The heat is simple too: microwave! (Stovetop and oven work just as well too--but don't boil the yarn; it felts.)
Above, my tests are ready to microwave: I put 1mL of the dye stock into a baggie, added more water, and put in my wet yarn. I did more of the blue because I had a few samples of other things I was thinking about dyeing.
I nuked them for 2 minutes, let them sit for 10 and nuked them for 2 minutes. I repeated this until the dye bath "exhausted," meaning the water was clear (or milky in the case of the Kool-aid, but the dye was absorbed by the yarn). Here they are after microwaving:
Baggies may not be the best choice for this... But notice how the yarn is colorful and the water, not so much.
My daughter and I picked the colors for her sweater from the samples and then I stuck the yarn to be dyed in the full dye baths:
And, below, after microwaving. Check out the water--it's clear, except in the purple. Blue dyes often take longer to exhaust, so I recommend leaving the yarn in overnight after heating:
This jar of yellow did something interesting. Maybe I didn't have enough acid in it, but while it was in a cool-down phase between microwave bouts, I was worried about how much dye was left in the water. I added more vinegar and turned around to put away my big ol' jug. By the time I looked back, the water was perfectly clear and the yarn a vibrant yellow!
Allow the yarn to cool--you can speed this up by taking it out of the dye bath, but DO NOT PUT COLD WATER ON HOT YARN. This will cause the yarn to felt.
Once it's cool, you'll want to rinse the yarn with clean water. Be sure the rinse water runs clear. If it doesn't, either your dye isn't set, and you need more acid and/or heat, or you've used more dye than the yarn can actually absorb, so the excess is washing off. The yarn will usually fade more dramatically if the problem is that the dye isn't set.
And now it's time to dry! Above, the yarn is hanging out in my salad spinner, which is really handy for drying small amount of yarn. Below, it's hanging on a chair with a fan to dry the rest of the way.
Since this was for colorwork, I made myself some posterboard bobbins and wound up the yarn. The darker pink and the white are purchased--Knit Picks Wool of the Andes Sport in Rouge and White--and the white is the base for the other colors.
And in the finished product:
Showing posts with label Dye. Show all posts
Dying to dye (yarn)
Calli-Cardi! Sweater with a caterpillar
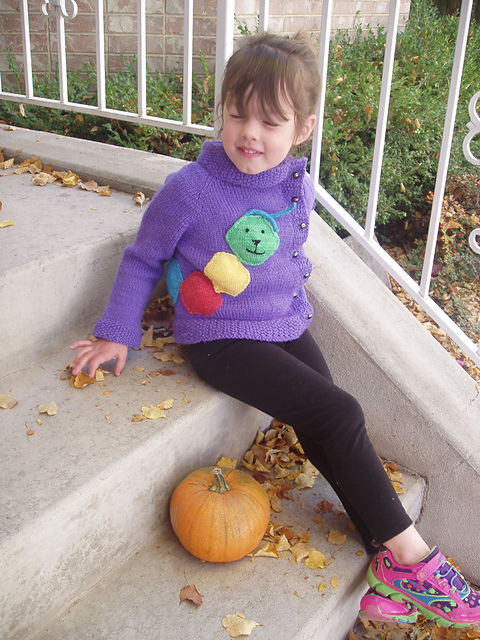
Last year I made sweaters for everyone in my family (except me...). My four-year-old's lovey is a multicolored caterpillar we call Cally. I wanted to incorporate it into her sweater to make it personal and unique for her: a Calli-Cardi!
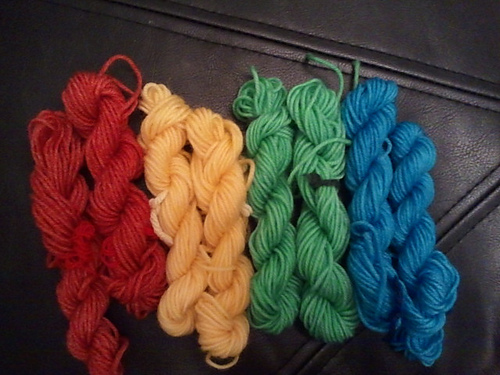
I looked for a cardigan with an off-center opening to maximize the room for the caterpillar on the front. As with my six-year-old's sweater, I knew I didn't want to buy five colors of yarn to only use a little of most of them so I dyed the caterpillar colors:
Each hank was about 14 yards; the eight of them together weighed about 36g.To dye them, I used food safe colors in Mason jars on the microwave (but that's another post!).
Red: one packet of cherry Kool-aid
Yellow: about five drops of yellow McCormick's food coloring (and white vinegar)
Green: about five drops of green McCormick's food coloring (and white vinegar)
Blue: one packet of mixed berry blue Kool-aid.
Originally I planned to work the caterpillar design as part of the sweater itself using the intarsia method of colorwork, but I realized that would be a big challenge, especially with two different weights (thicknesses) of yarn. So I made the cardigan normally and then knit hexagons to appliqué the caterpillar on.
I left an extra long tail on the end of each hexagon and used the tails to sew the caterpillar onto the sweater. I used backstitch in black yarn to make the caterpillar's face and short i-cords to make his antennae.
As you can see, she loves it!
For pattern notes, modifications and in-progress photos, see this project on Ravelry!
Cardigan Pattern: Peach Blossom Child Jacket by Jennifer Little
Cardigan Yarn: Cleckheaton Country Kids 8-ply (superwash wool in DK/8-ply weight) in purple
Caterpillar Pattern: Merit badge by Amanda Ochocki
Caterpillar Yarn: Knit Go Craft Super Soft Cashmere Wool in white (cream), hand dyed (claims to be DK weight but knit up more like fingering weight)
I looked for a cardigan with an off-center opening to maximize the room for the caterpillar on the front. As with my six-year-old's sweater, I knew I didn't want to buy five colors of yarn to only use a little of most of them so I dyed the caterpillar colors:
Each hank was about 14 yards; the eight of them together weighed about 36g.To dye them, I used food safe colors in Mason jars on the microwave (but that's another post!).
Red: one packet of cherry Kool-aid
Yellow: about five drops of yellow McCormick's food coloring (and white vinegar)
Green: about five drops of green McCormick's food coloring (and white vinegar)
Blue: one packet of mixed berry blue Kool-aid.
Originally I planned to work the caterpillar design as part of the sweater itself using the intarsia method of colorwork, but I realized that would be a big challenge, especially with two different weights (thicknesses) of yarn. So I made the cardigan normally and then knit hexagons to appliqué the caterpillar on.
I left an extra long tail on the end of each hexagon and used the tails to sew the caterpillar onto the sweater. I used backstitch in black yarn to make the caterpillar's face and short i-cords to make his antennae.
As you can see, she loves it!
For pattern notes, modifications and in-progress photos, see this project on Ravelry!
Cardigan Pattern: Peach Blossom Child Jacket by Jennifer Little
Cardigan Yarn: Cleckheaton Country Kids 8-ply (superwash wool in DK/8-ply weight) in purple
Caterpillar Pattern: Merit badge by Amanda Ochocki
Caterpillar Yarn: Knit Go Craft Super Soft Cashmere Wool in white (cream), hand dyed (claims to be DK weight but knit up more like fingering weight)
Posted by
Jordan McCollum
at
10:59 AM
No comments
:
Labels:
applique
,
Baby & Kids
,
cardigan
,
clothes
,
Clothing
,
Dye
,
dyeing clothing
,
Jordan
,
knitting
,
sweater
Sweater of many (custom!) colors
I've been way too quiet here on the blog lately, but not for lack of crafting! I've got a lot of things I keep meaning to share, but I'm so happy with this one, I had to make the time to blog.
Cast on: Sept 21
Finished: Oct 8
Pattern: Jolie Fleur from DROPS design.
Yarn: Knit Picks Wool of the Andes Sport in Rouge and White
That's right: the only two colors of yarn I purchased for this were the dark pink of the body and the white. The other colors were dyed on the white using McCormick food coloring and Kool Aid!
Dyeing yarn with these is not only easy (and awesome!) but completely food safe, so you can use your regular pots and pans, and it's okay to use them for food afterwards. (I actually used Mason jars in the microwave...) Kool Aid contains enough citric acid to "set" the food dyes on animal fibers (wool, alpaca, silk) and nylon. Food coloring requires additional acid, and I used vinegar. The only other thing you have to do is heat it enough and the yarn soaks the dye right up--but this is probably a post for another day!
I ran out of all the colors I'd dyed as well as the white and had to order and dye more. Fortunately, I'd kept careful notes of the dye formulas I'd used. Unfortunately, I lost those notes. But I was able to remember it pretty well!
I absolutely love how this turned out. But the best part is how much my daughter loves it. She came up to me while I was finishing it and spontaneously told me, "Thank you for working so hard on my sweater." And that makes it even more worth it.
Lots more information on the project and especially progress photos: Project on Ravelry
Cast on: Sept 21
Finished: Oct 8
Pattern: Jolie Fleur from DROPS design.
Yarn: Knit Picks Wool of the Andes Sport in Rouge and White
That's right: the only two colors of yarn I purchased for this were the dark pink of the body and the white. The other colors were dyed on the white using McCormick food coloring and Kool Aid!
- Light pink (it's in there): McCormick Neon Pink
- Yellow: McCormick Yellow
- Green: McCormick Green
- Blue: Ice Blue Raspberry Lemonade Kool Aid
- Purple: McCormick Neon Purple and McCormick Neon Blue, 2:1.
Dyeing yarn with these is not only easy (and awesome!) but completely food safe, so you can use your regular pots and pans, and it's okay to use them for food afterwards. (I actually used Mason jars in the microwave...) Kool Aid contains enough citric acid to "set" the food dyes on animal fibers (wool, alpaca, silk) and nylon. Food coloring requires additional acid, and I used vinegar. The only other thing you have to do is heat it enough and the yarn soaks the dye right up--but this is probably a post for another day!
I ran out of all the colors I'd dyed as well as the white and had to order and dye more. Fortunately, I'd kept careful notes of the dye formulas I'd used. Unfortunately, I lost those notes. But I was able to remember it pretty well!
I absolutely love how this turned out. But the best part is how much my daughter loves it. She came up to me while I was finishing it and spontaneously told me, "Thank you for working so hard on my sweater." And that makes it even more worth it.
Lots more information on the project and especially progress photos: Project on Ravelry
Posted by
Jordan McCollum
at
10:00 AM
2 comments
:
Labels:
Baby & Kids
,
Clothing
,
Dye
,
dyeing clothing
,
Jordan
,
knitting
Khaki to Blue Pants
I've had a pair of pants for an embarrassingly long time. There were light khaki and stretchy, therefore, they looked like I was wearing nothing. So since this trend of colored jeans is in I thought I would dye them. I wasn't sure it would work since they didn't start out white.
It worked quite well! I like the color they turned out although I feel it has faded a lot after washing them a couple times and although I followed all the instructions they bled on the first load I washed them with after washing them alone. After dyeing them the only thing that didn't dye was the zipper but no one sees that but me.
I used Aquamarine Rit Clothing Dye and followed the instructions on the bottle.
A few words of advice: make sure your gloves don't have a hole in them. Make sure all of your supplies are gathered before you start, and put on some music while you stir for 20+ minutes.
It worked quite well! I like the color they turned out although I feel it has faded a lot after washing them a couple times and although I followed all the instructions they bled on the first load I washed them with after washing them alone. After dyeing them the only thing that didn't dye was the zipper but no one sees that but me.
I used Aquamarine Rit Clothing Dye and followed the instructions on the bottle.
A few words of advice: make sure your gloves don't have a hole in them. Make sure all of your supplies are gathered before you start, and put on some music while you stir for 20+ minutes.
![]() |
| What do you think? |
So dyeing khakis does work.
Remember when Jaime dyed her pants red?
Do you have something to dye?
Posted by
Brave Brooke
at
5:20 PM
9 comments
:
Labels:
Brave Brooke
,
Dye
,
dyeing clothing
,
Dyeing Khakis
,
dyeing pants
Dyeing Your Own Shoes
I want cute turquoise shoes. I found a bunch of cute turquoise sandals, but not "shoes." I knew I was going to have to take matters into my own hands.
At first, I planned to get patent leather shoes and spray paint them, remembering one of the Wayward Weekend shares of spray painted shoes. But I just couldn't find a patent pair I really liked.
And then I found these fabric shoes. I was still planning to spray paint them until I remember Jaime dyeing her own pants, so I picked up some teal Rit liquid dye.
I debated dipping them, but then I checked out Rit's website and found this dye-painting shoe project.
First I had to make sure the fabric would work for this. Synthetic fabrics (like polyester) won't take up dye, so I'd need paint of some kind. However, this fabric felt like cotton, so I took the chance--after a test.
First I mixed the dye: I used 4 tsp (or 1 Tbsp + 1 tsp) dye in 1 cup of hot (140 degree F) water. Then I tested the dye first in an inconspicuous place: under the toes. You're supposed to set dye with heat, but, um, without talking about why, just trust me when I say that microwaving your shoes is a bad idea. (They still smell really bad...)
Satisfied that the fabric would take up the dye, I reheated the dye and grabbed a foam brush. Interestingly, there was a lot of variation in the dye color.
I protected the wedge heels with duct tape, which pulled off a little bit of the faux cork finish. The plastic soles did get dyed, but the "cork" wedges didn't soak up the dye.
I tried to be very liberal with the dye, especially in the knot. There were a few spots where glue or a fabric treatment got on the white fabric that didn't show up until after I'd dyed them. Once they were pretty soaked, I dried them in a 100 degree convection oven with the door cracked for about 5 minutes (then let them sit for a while, and repeated a few times. Yeah. STINK.)
You can see the color variation a little here, as well as some spots where the fabric treatment/glue blocked the dye (along the edge and a spot & line on the side).
And here's the result:
I really like how they turned out--but I still need to rinse out the excess dye. There's a handpainted, almost watercolor effect in the tone variation, which I like (and we'll see if that stays after the rinse). The thread is probably synthetic, and it absorbed the dye differently.
If I don't rinse them, if my feet sweat or my shoes get wet, I'll end up dying my toes (or worse, a carpet!)! Once I get a chance and get them dried again, I'll give you an update on the final color.
What do you think? What color would you dye your shoes?
At first, I planned to get patent leather shoes and spray paint them, remembering one of the Wayward Weekend shares of spray painted shoes. But I just couldn't find a patent pair I really liked.
And then I found these fabric shoes. I was still planning to spray paint them until I remember Jaime dyeing her own pants, so I picked up some teal Rit liquid dye.
I debated dipping them, but then I checked out Rit's website and found this dye-painting shoe project.
First I had to make sure the fabric would work for this. Synthetic fabrics (like polyester) won't take up dye, so I'd need paint of some kind. However, this fabric felt like cotton, so I took the chance--after a test.
First I mixed the dye: I used 4 tsp (or 1 Tbsp + 1 tsp) dye in 1 cup of hot (140 degree F) water. Then I tested the dye first in an inconspicuous place: under the toes. You're supposed to set dye with heat, but, um, without talking about why, just trust me when I say that microwaving your shoes is a bad idea. (They still smell really bad...)
![]() |
| Messy! Do this in a sink and rinse well afterwards--use rubber gloves and an apron. And then bleach. |
I protected the wedge heels with duct tape, which pulled off a little bit of the faux cork finish. The plastic soles did get dyed, but the "cork" wedges didn't soak up the dye.
![]() |
| Cooking my shoes. |
You can see the color variation a little here, as well as some spots where the fabric treatment/glue blocked the dye (along the edge and a spot & line on the side).
And here's the result:
I really like how they turned out--but I still need to rinse out the excess dye. There's a handpainted, almost watercolor effect in the tone variation, which I like (and we'll see if that stays after the rinse). The thread is probably synthetic, and it absorbed the dye differently.
If I don't rinse them, if my feet sweat or my shoes get wet, I'll end up dying my toes (or worse, a carpet!)! Once I get a chance and get them dried again, I'll give you an update on the final color.
What do you think? What color would you dye your shoes?
Dyeing Your Own Pants
Remember my RED Valentine's Day Party? Remember how you were supposed to wear red? Well I had the perfect outfit in mind. A cream shirt with red polka dots, that was sheer and gauzey. Fabulous red pants and red shoes with a red headband and red jewelery. The problem? The only part of that outfit in my closet were the red shoes. I tried to find the red pants for a good price. No luck. So with just a few days to spare, I went to my favorite thrift store, Savers. I found the perfect pants there.
White, 97% cotton, my size, and $7. Plus they fit really nicely! I told my friend I really thought I was blessed to find exactly what I was looking for.
But wait, these pants are white? What? A while back, I read this post about Cori dyeing some pants. I wanted to do that so badly. Finally I got my chance. I used Rit's Wesbite to choose my dye color. Seriously GO THERE FIRST before you dye anything! Their article gave me a ton of tips and tricks to use to help me dye my pants.


Materials Needed:
Fabric Dye, I used Rit's liquid dye in Cherry Red (pictured above)
Container to dye the product in, like a Rubbermaid container or sink
Garment made with natural fibers like cotton or silk
Warm water
Salt
Plastic Gloves
Drop cloth or something to cover the area. I used a plastic table cloth I had.
Paper towels
Washing machine
First thing I did was boring. I washed my pants. Then I heated about 3 gallons of hot water on my stove. Then I poured the water into a large Rubbermaid bin. The water wasn't boiling, but it was giving off a lot of steam and did so for at least 45 minutes. Next I poured in the salt (Don't do it this way! Rit recommends letting the garment sit in the dye for 5 minutes before putting the salt in the mixture), mixed it around and then poured in the dye.
Tips on dyeing clothing:
Only dye natural fibers, synthetics won't dye.
A lot of garments are sewn using synthetic thread. It won't pick up the dye, but in my case it didn't look bad
Make sure you wear gloves, cover your work area, and have a towel handy for any splashes. Otherwise you'll end up with dyed hands, floors or countertops.
Don't dye in a ceramic sink unless you want a pink sink.
Don't wash your garment with other garments the first few washes.
Read the whole article about tips and tricks before you start
But wait, these pants are white? What? A while back, I read this post about Cori dyeing some pants. I wanted to do that so badly. Finally I got my chance. I used Rit's Wesbite to choose my dye color. Seriously GO THERE FIRST before you dye anything! Their article gave me a ton of tips and tricks to use to help me dye my pants.
Materials Needed:
Fabric Dye, I used Rit's liquid dye in Cherry Red (pictured above)
Container to dye the product in, like a Rubbermaid container or sink
Garment made with natural fibers like cotton or silk
Warm water
Salt
Plastic Gloves
Drop cloth or something to cover the area. I used a plastic table cloth I had.
Paper towels
Washing machine
First thing I did was boring. I washed my pants. Then I heated about 3 gallons of hot water on my stove. Then I poured the water into a large Rubbermaid bin. The water wasn't boiling, but it was giving off a lot of steam and did so for at least 45 minutes. Next I poured in the salt (Don't do it this way! Rit recommends letting the garment sit in the dye for 5 minutes before putting the salt in the mixture), mixed it around and then poured in the dye.
The dye looks so pretty getting poured in (no pic of that as I was nervous, but just trust me). I used a measuring cup that I would throw away after because I didn't trust it after measuring dye.
After pouring the dye and mixing it in the water, I bravely put my pants in dye--there was no turning back now!
The tips and tricks said that the pants should be agitated constantly. I wasn't exactly down for that. I agitated every ten minutes or so.
I left the pants in the dye bath for about 40 minutes, then rinsed them (this took forever)
and washed them in the washing machine.
They came out....pink. So I repeated the process, but this time I did it in the sink, pouring the salt in at the right time, adding a tablespoon of laundry detergent and agitating for over an hour. Constantly. I had my husband turn on Netflix and I stirred those pants with all I had. Then I rinsed them. For twenty minutes. And then washed them. This is how they turned out.
This is how I wore them on Valentine's Day
I modeled this yesterday--a headache kept me from smiling
Tips on dyeing clothing:
Only dye natural fibers, synthetics won't dye.
A lot of garments are sewn using synthetic thread. It won't pick up the dye, but in my case it didn't look bad
Make sure you wear gloves, cover your work area, and have a towel handy for any splashes. Otherwise you'll end up with dyed hands, floors or countertops.
Don't dye in a ceramic sink unless you want a pink sink.
Don't wash your garment with other garments the first few washes.
Read the whole article about tips and tricks before you start
Posted by
Just Jaime
at
6:30 AM
14 comments
:
Labels:
Dye
,
dyeing clothing
,
dyeing pants
,
Just Jaime
Dying Rice
I haven't made it yet but my goal is to make a mosaic using colored rice. You can also use colorful beans, sand or pasta. I saw the idea on Martha Stewart's kids' crafting page but with beans. If it's a kids' craft, I'm pretty sure I can do it, too!
Thanks to google, I found out how to dye rice. Dying rice is a smelly but easy process. It's pretty simple to make and doesn't require much. You need a container with a lid, cookie sheet lined, strainer/sieve, vinegar, rice and food coloring.
Take 1/4 cup of vinegar and add food coloring. Then add 1/2 cup of rice.
Now shake, shake, shake! Make sure the lid's on tight, too!
Shake until all the rice is evenly coated. Then let stand for 5 minutes.
Now, drain the rice over a sink. Have a cookie sheet lined with tin foil ready. After you've drained the rice, spread it out on a cookie sheet. Try to get one layer of rice.
Since I'm impatient, I put them in the oven on convection around 140 degrees. Check on these often! (I always forget there's a gust of hot air when you open the oven and stick my face right in the gust's way, so remember when you open the oven to stand back!) They only took about 10 minutes to dry out. You can also leave them out to dry or place in the sun to dry. No matter what, it isn't going to smell all that great unless you like the smell of vinegar :)
You can do all sorts of things with colored rice. Next week's post will be the mosaic...as soon as I figure out what to do!
**Any suggestions for what I should do for the mosaic? I'm stumped!**
Thanks to google, I found out how to dye rice. Dying rice is a smelly but easy process. It's pretty simple to make and doesn't require much. You need a container with a lid, cookie sheet lined, strainer/sieve, vinegar, rice and food coloring.
Take 1/4 cup of vinegar and add food coloring. Then add 1/2 cup of rice.
Now shake, shake, shake! Make sure the lid's on tight, too!
Shake until all the rice is evenly coated. Then let stand for 5 minutes.
Now, drain the rice over a sink. Have a cookie sheet lined with tin foil ready. After you've drained the rice, spread it out on a cookie sheet. Try to get one layer of rice.
Since I'm impatient, I put them in the oven on convection around 140 degrees. Check on these often! (I always forget there's a gust of hot air when you open the oven and stick my face right in the gust's way, so remember when you open the oven to stand back!) They only took about 10 minutes to dry out. You can also leave them out to dry or place in the sun to dry. No matter what, it isn't going to smell all that great unless you like the smell of vinegar :)
You can do all sorts of things with colored rice. Next week's post will be the mosaic...as soon as I figure out what to do!
**Any suggestions for what I should do for the mosaic? I'm stumped!**
Subscribe to:
Posts
(
Atom
)