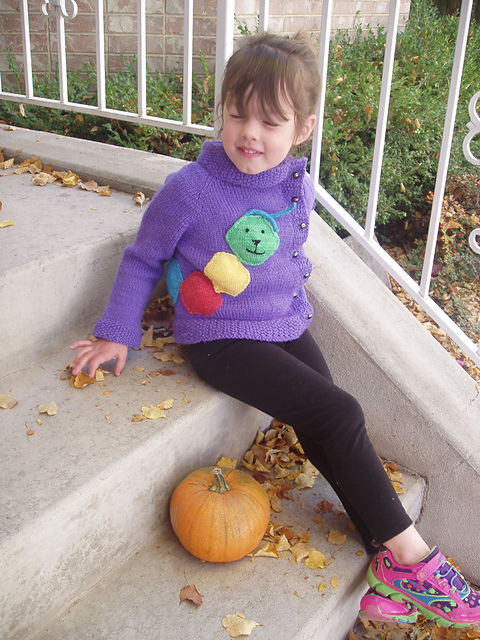
Last year I made sweaters for everyone in my family (except me...). My four-year-old's lovey is a multicolored caterpillar we call Cally. I wanted to incorporate it into her sweater to make it personal and unique for her: a Calli-Cardi!
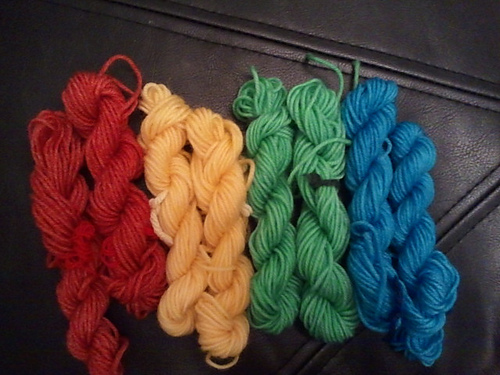
I looked for a cardigan with an off-center opening to maximize the room for the caterpillar on the front. As with my six-year-old's sweater, I knew I didn't want to buy five colors of yarn to only use a little of most of them so I dyed the caterpillar colors:
Each hank was about 14 yards; the eight of them together weighed about 36g.To dye them, I used food safe colors in Mason jars on the microwave (but that's another post!).
Red: one packet of cherry Kool-aid
Yellow: about five drops of yellow McCormick's food coloring (and white vinegar)
Green: about five drops of green McCormick's food coloring (and white vinegar)
Blue: one packet of mixed berry blue Kool-aid.
Originally I planned to work the caterpillar design as part of the sweater itself using the intarsia method of colorwork, but I realized that would be a big challenge, especially with two different weights (thicknesses) of yarn. So I made the cardigan normally and then knit hexagons to appliqué the caterpillar on.
I left an extra long tail on the end of each hexagon and used the tails to sew the caterpillar onto the sweater. I used backstitch in black yarn to make the caterpillar's face and short i-cords to make his antennae.
As you can see, she loves it!
For pattern notes, modifications and in-progress photos, see this project on Ravelry!
Cardigan Pattern: Peach Blossom Child Jacket by Jennifer Little
Cardigan Yarn: Cleckheaton Country Kids 8-ply (superwash wool in DK/8-ply weight) in purple
Caterpillar Pattern: Merit badge by Amanda Ochocki
Caterpillar Yarn: Knit Go Craft Super Soft Cashmere Wool in white (cream), hand dyed (claims to be DK weight but knit up more like fingering weight)

Showing posts with label clothes. Show all posts
Showing posts with label clothes. Show all posts

Calli-Cardi! Sweater with a caterpillar

Posted by
Jordan McCollum
at
10:59 AM
No comments
:
 Labels:
applique
,
Baby & Kids
,
cardigan
,
clothes
,
Clothing
,
Dye
,
dyeing clothing
,
Jordan
,
knitting
,
sweater

Another sweater!
Since I was on a finishing kick, I decided to finish a sweater I've been working on for my son for a long time. Fortunately, I made it a couple sizes to big for him when I started, anticipating spending too long to finish. Two and a half years, in case you're wondering—and yes, it fits him! I went ahead and made the button bands pretty wide just in case, and it seems to fit him pretty well.
In addition to recently finishing my husband's sweater, I wanted to get this done because the weather is still cool in the morning, but my son doesn't have a lightweight jacket to wear in the mornings and take off in the afternoons. So two weeks ago, I finally finished!
The buttons look a little off-center here. I wonder if you have to make buttonholes off-center for them to look centered.
The pattern: Hallows Cardigan by Melissa Metzbower. I knit the actual pieces of the sweater probably two years ago, but as I recall, it was pretty easy! One thing I found interesting about the pattern was that there's no armhole shaping, they're just square. However, the fit seems fine.
The yarn: Joann Sensations Kashmira I have to confess, I picked this yarn because the yarn name is similar to a Led Zeppelin song ("Kashmir") It wasn't anything remarkable to work with, but nothing to complain about.
My project on Ravelry: http://www.ravelry.com/projects/MamaBlogga/hallows-cardigan
The recipient: He loves it! The week after I gave it to him, his class watched a segment from the TV show Arthur where they talked about knitting (it was supposed to be about perspective & point-of-view). He became the class sensation and asked me to teach him to knit. Apparently the fact that it took me 2.5 years to finish this didn't set in.

Posted by
Jordan McCollum
at
12:27 AM
2 comments
:
 Labels:
Baby & Kids
,
cardigan
,
clothes
,
Jordan
,
knitting
,
sweater

Kids' Towel Coverup: the Wayward Way!
As part of my Summer Sewing Spree two years ago, I made . . .
I found this adorable terry towel coverup for kids, and I fully intended to sew something equally cute for my daughters. But a major time crunch hit and I ended up having to go the super-fast route. So here's thequick and dirty wayward way to make a cute, fast towel coverup for a child, boy or girl.
Step 1: Measure!
You'll need two (or three) measurements. The first is width around the chest (girls) or waist (boys). You'll want to add at least four inches for overlap. If you want to use elastic in the back (I recommend this for boys, but it doesn't seem to affect my girls'), you'll want to add more width to account for the gathering. Decide how long you want the elastic to be, then add that to the width. Remember this one, too! (Also keep in mind that the elastic will need to fall between the shoulder straps for girls.)
The second measurement is length--for girls, that's from underarm to however long you want the cover up to be (mid-thigh or knee length works well); for boys, that's from waist to the bottom of his swim trunks. (Which is often not his knees. Don't make the same mistake as me!)
Step 2: Materials!
You'll need:
Use your measurements to trim down a towel. Towels can be hard to cut, so I would use scissors or a rotary cutter to get through the hem, then rip the towel.
Many towels have decorative weaving near the ends. I cut out the towel between these lines, and save the weaving to form the straps. I also kept the top hem intact.
Step 4: Cut the fabric!
Add 4" to your width and 4" to the length of your rectangle (I added 2" to my length and used the selvage to form the long top edge on some of the pieces), then cut out a piece of fabric that size.
Step 5: Sew them together!
Center the towel on the fabric, wrong sides together (ff your towel has a wrong side). (If you're using the selvage on top, make sure the top edges of the fabrics align.) Fold over the edge of the fabric to meet the edge of the towel, and press. Then fold that folded edge of the fabric again, overlapping the edge of the towel:
Sew along the folded edge where it overlaps the towel (indicated by a dashed line above)--but do not sew the top edge of the fabric to the towel! (You can, however, sew the hem of just the fabric along the top if you're not using the selvage.)
Step 6: Place the elastic! (May be optional for girls; didn't really make a difference for mine)
Remember the elastic measurement we used in step 1? We need it again. Cut that length of elastic. If you want the finished product to have 4" elasticized, we need to work with 8" of fabric. Find the center of the towel & fabric, and measure out 4" (or whatever your chosen # is) on either side. Mark both of these points.
Pin either end of the elastic between the towel and the fabric at the points you've marked. Sew in the elastic (more details here).
Step 7 (girls only): Place the straps!
Either cut 2" strips from the towel remnant, or get the decorative woven strips you saved earlier. If you placed elastic in, pin the straps between the fabric and towel on either side of the elastic. Otherwise, you might want to have your child try on the cover up to determine the best placement and length for the straps.
Measure the strap length twice!
Sew the straps in place between the towel and the fabric. (You can use a reinforced box stitch pattern for this if you'd like.)
Step 8: Velcro/snaps and finish!
If you're very picky, you might want to sew the Velcro or snaps on the front flap to only the towel, so that the sewing lines don't show through. But let's face it, if you were very picky, you wouldn't be doing it the wayward way, would you?
Place the Velcro or snaps on the front flaps. Remember that the inner flap will have the Velcro on the outside (fabric side)! Sew in place. Sew any unfinished edges along the top. And voila!
Wayward Kids' Towel Coverups!
I found this adorable terry towel coverup for kids, and I fully intended to sew something equally cute for my daughters. But a major time crunch hit and I ended up having to go the super-fast route. So here's the
Step 1: Measure!
You'll need two (or three) measurements. The first is width around the chest (girls) or waist (boys). You'll want to add at least four inches for overlap. If you want to use elastic in the back (I recommend this for boys, but it doesn't seem to affect my girls'), you'll want to add more width to account for the gathering. Decide how long you want the elastic to be, then add that to the width. Remember this one, too! (Also keep in mind that the elastic will need to fall between the shoulder straps for girls.)
The second measurement is length--for girls, that's from underarm to however long you want the cover up to be (mid-thigh or knee length works well); for boys, that's from waist to the bottom of his swim trunks. (Which is often not his knees. Don't make the same mistake as me!)
Step 2: Materials!
You'll need:
- A towel at least as big as the rectangle formed from your measurements.
- A piece of cute fabric 4" wider and 2-4" longer than your measurements.
- Sewable Velcro (or snaps)
- Elastic (may be optional for girls' coverups; at least 3/8" wide)
- Thread
- Pins
- Scissors or rotary cutter
- Iron
- Sewing machine
Use your measurements to trim down a towel. Towels can be hard to cut, so I would use scissors or a rotary cutter to get through the hem, then rip the towel.
Many towels have decorative weaving near the ends. I cut out the towel between these lines, and save the weaving to form the straps. I also kept the top hem intact.
Step 4: Cut the fabric!
Add 4" to your width and 4" to the length of your rectangle (I added 2" to my length and used the selvage to form the long top edge on some of the pieces), then cut out a piece of fabric that size.
Step 5: Sew them together!
Center the towel on the fabric, wrong sides together (ff your towel has a wrong side). (If you're using the selvage on top, make sure the top edges of the fabrics align.) Fold over the edge of the fabric to meet the edge of the towel, and press. Then fold that folded edge of the fabric again, overlapping the edge of the towel:
Sew along the folded edge where it overlaps the towel (indicated by a dashed line above)--but do not sew the top edge of the fabric to the towel! (You can, however, sew the hem of just the fabric along the top if you're not using the selvage.)
Step 6: Place the elastic! (May be optional for girls; didn't really make a difference for mine)
Remember the elastic measurement we used in step 1? We need it again. Cut that length of elastic. If you want the finished product to have 4" elasticized, we need to work with 8" of fabric. Find the center of the towel & fabric, and measure out 4" (or whatever your chosen # is) on either side. Mark both of these points.
Pin either end of the elastic between the towel and the fabric at the points you've marked. Sew in the elastic (more details here).
 |
| Last year's coverup almost fits this year... |
Either cut 2" strips from the towel remnant, or get the decorative woven strips you saved earlier. If you placed elastic in, pin the straps between the fabric and towel on either side of the elastic. Otherwise, you might want to have your child try on the cover up to determine the best placement and length for the straps.
Measure the strap length twice!
Sew the straps in place between the towel and the fabric. (You can use a reinforced box stitch pattern for this if you'd like.)
Step 8: Velcro/snaps and finish!
If you're very picky, you might want to sew the Velcro or snaps on the front flap to only the towel, so that the sewing lines don't show through. But let's face it, if you were very picky, you wouldn't be doing it the wayward way, would you?
Place the Velcro or snaps on the front flaps. Remember that the inner flap will have the Velcro on the outside (fabric side)! Sew in place. Sew any unfinished edges along the top. And voila!

Posted by
Jordan McCollum
at
7:00 AM
1 comment
:
 Labels:
Baby & Kids
,
bath
,
beach
,
clothes
,
Clothing
,
cover up
,
Holidays and Entertaining
,
Jordan
,
kids
,
sewing
,
summer
,
towel
,
tutorial

Heart Stamped Shirt
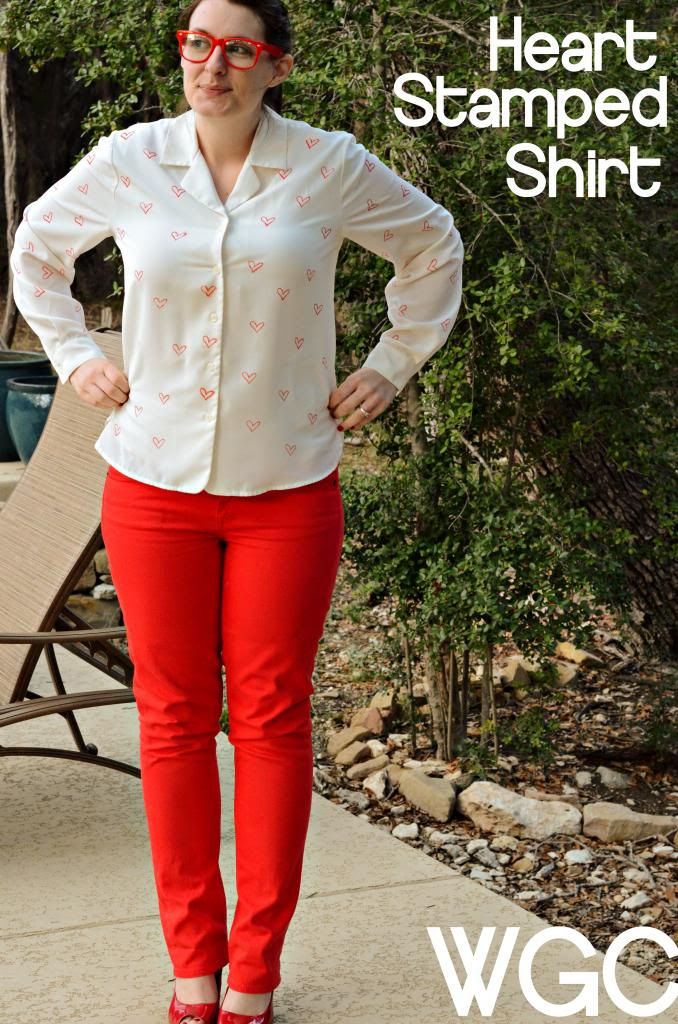
Last weekend was my big Valentine's Day party! Last year I dyed my own pants. This year I decided to decorate a shirt using fabric ink.
Materials:
Shirt
Stamp
Fabric Ink Pad (Mine was from Hobby Lobby, $3.99)
Cardboard
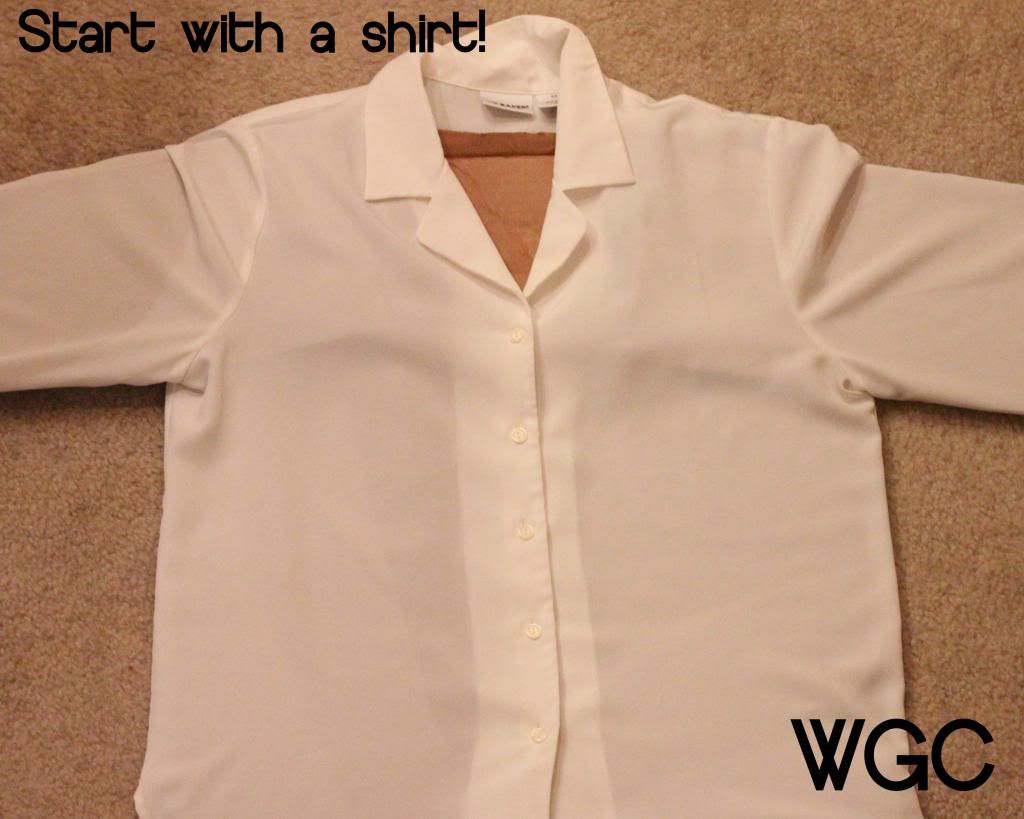
First step, get a shirt. I picked up this beauty at Goodwill:
This is how I wore it to the party.
Materials:
Shirt
Stamp
Fabric Ink Pad (Mine was from Hobby Lobby, $3.99)
Cardboard
First step, get a shirt. I picked up this beauty at Goodwill:
This shirt is 100% polyester, although the ink says it works best with natural fibers.
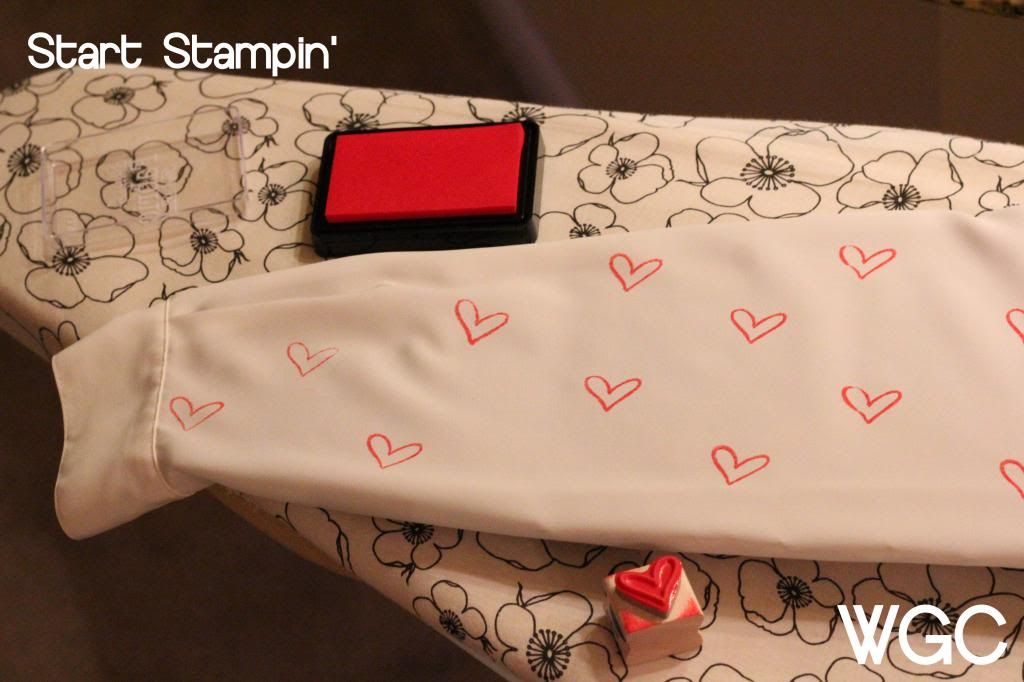
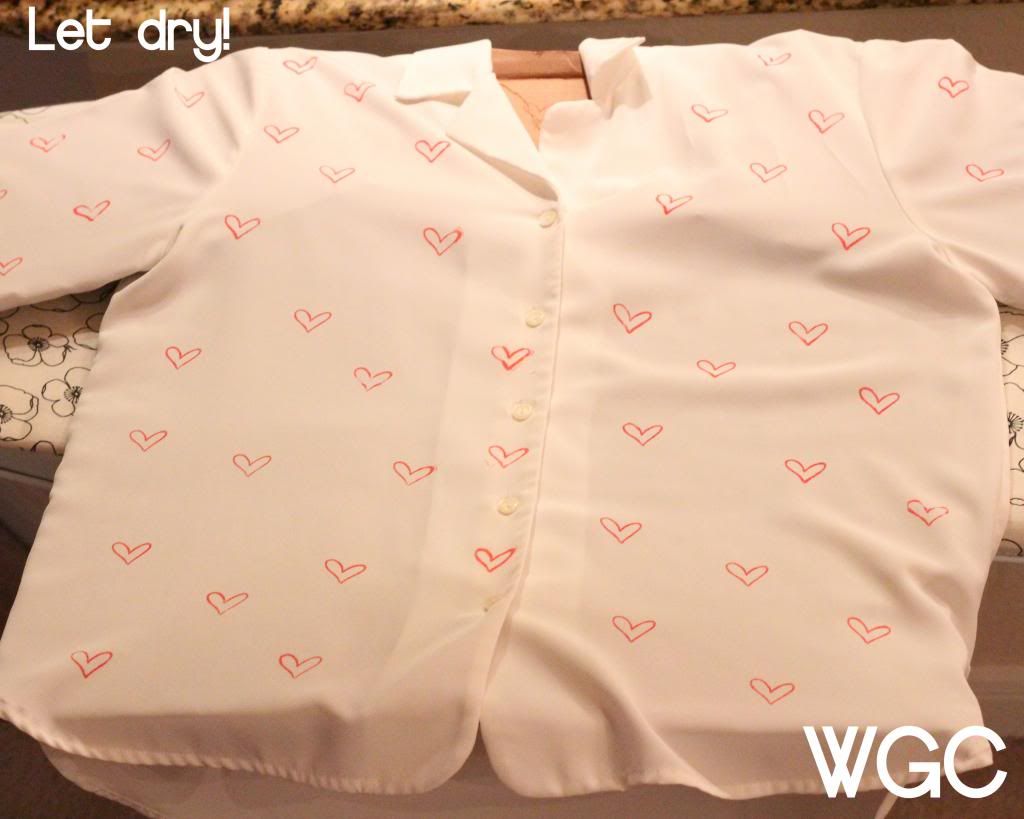
As you can see, I placed cardboard in the shirt and sleeves to separate the layers. This is an important step! If you don't do it, you'll be stamping through both sides.
I flew by the seat of my pants on this (and always, I'm wayward) and just started on the sleeve. If I were to do it again, I'd start on the back side. It went quickly and I was quite excited with the results.
I let the shirt dry overnight and then used a hot, dry iron to "set" the stamping, as recommended on the back of the stamp pad. Then I flipped the shirt over and completed the same thing on the back side.
This is how it turned out!
This is how it turned out!
This is how I wore it to the party.
make animated gifs like this at MakeAGif
Not bad, eh? Best compliments: people didn't believe I'd done design! I had to show them my little mess ups to prove it to them.
The possibilities are endless for shirts! I'm thinking about having a little craft night with friends to do it all over again!

Posted by
Just Jaime
at
6:30 AM
6 comments
:
 Labels:
clothes
,
Clothing
,
fabric stamp
,
fabric stamping
,
Just Jaime
,
shirt
,
stamps
,
tutorial

Kids' Towel Coverup: the Wayward Way!
As part of my Summer Sewing Spree last year, I made sunhats for my daughters, a sunhat for me and . . .
I found this adorable terry towel coverup for kids, and I fully intended to sew something equally cute for my daughters. But a major time crunch hit and I ended up having to go the super-fast route. So here's thequick and dirty wayward way to make a cute, fast towel coverup for a child, boy or girl.
Step 1: Measure!
You'll need two (or three) measurements. The first is width around the chest (girls) or waist (boys). You'll want to add at least four inches for overlap. If you want to use elastic in the back (I recommend this for boys, but it doesn't seem to affect my girls'), you'll want to add more width to account for the gathering. Decide how long you want the elastic to be and double that for the fabric, then add that to the width. Remember this one, too! (Also keep in mind that the elastic will need to fall between the shoulder straps for girls.)
The second measurement is length--for girls, that's from underarm to however long you want the cover up to be (mid-thigh or knee length works well); for boys, that's from waist to the bottom of his swim trunks. (Which is often not his knees. Don't make the same mistake as me!)
Step 2: Materials!
You'll need:
Use your measurements to trim down a towel. Towels can be hard to cut, so I would use scissors or a rotary cutter to get through the hem, then rip the towel.
Many towels have decorative weaving near the ends. I cut out the towel between these lines, and save the weaving to form the straps. I also kept the top hem intact.
Step 4: Cut the fabric!
Add 4" to your width and 4" to the length of your rectangle (I added 2" to my length and used the selvage to form the long top edge on some of the pieces), then cut out a piece of fabric that size.
Step 5: Sew them together!
Center the towel on the fabric, wrong sides together (ff your towel has a wrong side). (If you're using the selvage on top, make sure the top edges of the fabrics align.) Fold over the edge of the fabric to meet the edge of the towel, and press. Then fold that folded edge of the fabric again, overlapping the edge of the towel:
Sew along the folded edge where it overlaps the towel (indicated by a dashed line above)--but do not sew the top edge of the fabric to the towel! (You can, however, sew the hem of just the fabric along the top if you're not using the selvage.)
Step 6: Place the elastic! (May be optional for girls; didn't really make a difference for mine)
Remember the elastic measurement we used in step 1? We need it again. Cut that length of elastic. If you want the finished product to have 4" elasticized, we need to work with 8" of fabric. Find the center of the towel & fabric, and measure out 4" (or whatever your chosen # is) on either side. Mark both of these points.
Pin either end of the elastic between the towel and the fabric at the points you've marked. Sew in the elastic (more details here).
Step 7 (girls only): Place the straps!
Either cut 2" strips from the towel remnant, or get the decorative woven strips you saved earlier. If you placed elastic in, pin the straps between the fabric and towel on either side of the elastic. Otherwise, you might want to have your child try on the cover up to determine the best placement and length for the straps.
Measure the strap length twice!
Sew the straps in place between the towel and the fabric. (You can use a reinforced box stitch pattern for this if you'd like.)
Step 8: Velcro/snaps and finish!
If you're very picky, you might want to sew the Velcro or snaps on the front flap to only the towel, so that the sewing lines don't show through. But let's face it, if you were very picky, you wouldn't be doing it the wayward way, would you?
Place the Velcro or snaps on the front flaps. Remember that the inner flap will have the Velcro on the outside (fabric side)! Sew in place. Sew any unfinished edges along the top. And voila!
Wayward Kids' Towel Coverups!
I found this adorable terry towel coverup for kids, and I fully intended to sew something equally cute for my daughters. But a major time crunch hit and I ended up having to go the super-fast route. So here's the
Step 1: Measure!
You'll need two (or three) measurements. The first is width around the chest (girls) or waist (boys). You'll want to add at least four inches for overlap. If you want to use elastic in the back (I recommend this for boys, but it doesn't seem to affect my girls'), you'll want to add more width to account for the gathering. Decide how long you want the elastic to be and double that for the fabric, then add that to the width. Remember this one, too! (Also keep in mind that the elastic will need to fall between the shoulder straps for girls.)
The second measurement is length--for girls, that's from underarm to however long you want the cover up to be (mid-thigh or knee length works well); for boys, that's from waist to the bottom of his swim trunks. (Which is often not his knees. Don't make the same mistake as me!)
Step 2: Materials!
You'll need:
- A towel at least as big as the rectangle formed from your measurements.
- A piece of cute fabric 4" wider and 2-4" longer than your measurements.
- Sewable Velcro (or snaps)
- Elastic (may be optional for girls' coverups; at least 3/8" wide)
- Thread
- Pins
- Scissors or rotary cutter
- Iron
- Sewing machine
Use your measurements to trim down a towel. Towels can be hard to cut, so I would use scissors or a rotary cutter to get through the hem, then rip the towel.
Many towels have decorative weaving near the ends. I cut out the towel between these lines, and save the weaving to form the straps. I also kept the top hem intact.
Step 4: Cut the fabric!
Add 4" to your width and 4" to the length of your rectangle (I added 2" to my length and used the selvage to form the long top edge on some of the pieces), then cut out a piece of fabric that size.
Step 5: Sew them together!
Center the towel on the fabric, wrong sides together (ff your towel has a wrong side). (If you're using the selvage on top, make sure the top edges of the fabrics align.) Fold over the edge of the fabric to meet the edge of the towel, and press. Then fold that folded edge of the fabric again, overlapping the edge of the towel:
Sew along the folded edge where it overlaps the towel (indicated by a dashed line above)--but do not sew the top edge of the fabric to the towel! (You can, however, sew the hem of just the fabric along the top if you're not using the selvage.)
Step 6: Place the elastic! (May be optional for girls; didn't really make a difference for mine)
Remember the elastic measurement we used in step 1? We need it again. Cut that length of elastic. If you want the finished product to have 4" elasticized, we need to work with 8" of fabric. Find the center of the towel & fabric, and measure out 4" (or whatever your chosen # is) on either side. Mark both of these points.
Pin either end of the elastic between the towel and the fabric at the points you've marked. Sew in the elastic (more details here).
 |
| Last year's coverup almost fits this year... |
Either cut 2" strips from the towel remnant, or get the decorative woven strips you saved earlier. If you placed elastic in, pin the straps between the fabric and towel on either side of the elastic. Otherwise, you might want to have your child try on the cover up to determine the best placement and length for the straps.
Measure the strap length twice!
Sew the straps in place between the towel and the fabric. (You can use a reinforced box stitch pattern for this if you'd like.)
Step 8: Velcro/snaps and finish!
If you're very picky, you might want to sew the Velcro or snaps on the front flap to only the towel, so that the sewing lines don't show through. But let's face it, if you were very picky, you wouldn't be doing it the wayward way, would you?
Place the Velcro or snaps on the front flaps. Remember that the inner flap will have the Velcro on the outside (fabric side)! Sew in place. Sew any unfinished edges along the top. And voila!

Posted by
Jordan McCollum
at
10:37 AM
3 comments
:
 Labels:
Baby & Kids
,
bath
,
beach
,
clothes
,
Clothing
,
cover up
,
Holidays and Entertaining
,
Jordan
,
kids
,
sewing
,
summer
,
towel
,
tutorial

Modest makeover: 50¢ shirred maxi dress!
I seldom get up early enough to go yard saling, but a few weeks ago, our church and our school were holding yard sales just a couple blocks apart, so our family made an effort to hit them both. One of the things we picked up was a cute shirred-top dress. The back tag was ripped out, but I suspect it's not really supposed to be a little girl's maxi dress (probably a medium girl's knee-length dress?).
It was a little big for my daughter (and I wouldn't let her wear a strapless dress to church)(especially not one that would fall down!), so I wanted to add sleeves to help it fit her better.
Matching the fabric wasn't an issue: the tiered skirt also had another layer of the same fabric underneath.
I had my daughter try on the dress, and I measured from the side seam to what seemed like a good point in the front to get the width, about 4 inches. I made sure that width would cover her shoulders, too. Using a rotary cutter, I cut 4 inches off the bottom part of the underlayer of the skirt. The fabric is a gauzy-type cotton weave, so I did a fake overlock stitch (a zigzag stitch along the edge) to minimize fraying.
I took my extra fabric and cut it in four pieces. Then I failed to pin right sides together and totally messed up sewing those pieces together. (Hooray! Wayward! As if breaking yet another needle wasn't wayward enough!) I wanted to make a double-wide fabric so I could gather it to help match the dress, and I would use the presewn rolled hems instead of having to sew my own. But I wasn't careful about which way the hems were facing, and three of them ended up facing out. (Seriously?!)
 I gathered the ends of the sleeves and sewed them along the top edge of the front, then had another fitting with my daughter to get them the right length before sewing them in the back. (I mean, I wish I'd done it that way. I really kept it all pinned during the fitting and it was a big hassle.)
My daughter is happy with the result (but she wasn't happy I interrupted her during her favorite show to take pictures!). When I wash it, the gathers will take on the same wrinkly appearance as the rest of the dress. I love that they totally look like they belong, and it was WAY easier than cutting out a real sleeve pattern and all that entails.
Best of all, total bill for the project: $0.50!
What are your weekend thrifting finds?
It was a little big for my daughter (and I wouldn't let her wear a strapless dress to church)(especially not one that would fall down!), so I wanted to add sleeves to help it fit her better.
Matching the fabric wasn't an issue: the tiered skirt also had another layer of the same fabric underneath.
I had my daughter try on the dress, and I measured from the side seam to what seemed like a good point in the front to get the width, about 4 inches. I made sure that width would cover her shoulders, too. Using a rotary cutter, I cut 4 inches off the bottom part of the underlayer of the skirt. The fabric is a gauzy-type cotton weave, so I did a fake overlock stitch (a zigzag stitch along the edge) to minimize fraying.
I took my extra fabric and cut it in four pieces. Then I failed to pin right sides together and totally messed up sewing those pieces together. (Hooray! Wayward! As if breaking yet another needle wasn't wayward enough!) I wanted to make a double-wide fabric so I could gather it to help match the dress, and I would use the presewn rolled hems instead of having to sew my own. But I wasn't careful about which way the hems were facing, and three of them ended up facing out. (Seriously?!)
 I gathered the ends of the sleeves and sewed them along the top edge of the front, then had another fitting with my daughter to get them the right length before sewing them in the back. (I mean, I wish I'd done it that way. I really kept it all pinned during the fitting and it was a big hassle.)
My daughter is happy with the result (but she wasn't happy I interrupted her during her favorite show to take pictures!). When I wash it, the gathers will take on the same wrinkly appearance as the rest of the dress. I love that they totally look like they belong, and it was WAY easier than cutting out a real sleeve pattern and all that entails.
Best of all, total bill for the project: $0.50!
What are your weekend thrifting finds?

The 30-minute, $5 Shrug shrug
(Yes, shrug shrug.)
 Next month, I'll have the honor of presenting one of the 2011 Whitney Awards. I have a dress I really like, but it's sleeveless and a little too low in the back (we don't do sleeveless!). In the past, I've worn a beautiful pashmina-style scarf, but it's just a little too big for this event, and I really love the top and waist detail of the dress, which tend to get lost with a big coverup.
So I decided to sew a shrug. I looked for the easiest pattern I could find, and I came across Modest Prom's 30-minute, $5 shrug pattern. It's very easy (easier than it sounds from the description, or at least to me!) to sew, and it really did come together in 30 minutes or less. (Since I used a medium weight fashion knit, I didn't bother with hemming the edge.)
To make the shrug, you get 1/2 yard of 45" fabric, and sew the short ends together, right sides in (of course). Then you move that seam to the middle of the fabric "tube" and sew one long side together, starting and stopping 6" from either end. For added style, fold that last seam open and run a straight perpendicular line of gathering stitches in the middle of the last seam.
See? Sounds complicated, but it's really easy--I only had to sew 4 straight lines to make this! (There are also drawings on the pattern page that might help you.)
So why do I call it the "shrug shrug"? Because I can't really decide if I want to wear it. The sleeves are a little looser than I'd like, and the back covers up the waist detail I love so much. And I like the fabric--but I'm not sure I like it with this dress.
What's your favorite way to stay modest?
 Next month, I'll have the honor of presenting one of the 2011 Whitney Awards. I have a dress I really like, but it's sleeveless and a little too low in the back (we don't do sleeveless!). In the past, I've worn a beautiful pashmina-style scarf, but it's just a little too big for this event, and I really love the top and waist detail of the dress, which tend to get lost with a big coverup.
So I decided to sew a shrug. I looked for the easiest pattern I could find, and I came across Modest Prom's 30-minute, $5 shrug pattern. It's very easy (easier than it sounds from the description, or at least to me!) to sew, and it really did come together in 30 minutes or less. (Since I used a medium weight fashion knit, I didn't bother with hemming the edge.)
To make the shrug, you get 1/2 yard of 45" fabric, and sew the short ends together, right sides in (of course). Then you move that seam to the middle of the fabric "tube" and sew one long side together, starting and stopping 6" from either end. For added style, fold that last seam open and run a straight perpendicular line of gathering stitches in the middle of the last seam.
See? Sounds complicated, but it's really easy--I only had to sew 4 straight lines to make this! (There are also drawings on the pattern page that might help you.)
So why do I call it the "shrug shrug"? Because I can't really decide if I want to wear it. The sleeves are a little looser than I'd like, and the back covers up the waist detail I love so much. And I like the fabric--but I'm not sure I like it with this dress.
What to do?
What's your favorite way to stay modest?

Posted by
Jordan McCollum
at
11:59 AM
7 comments
:
 Labels:
cheap and easy
,
clothes
,
Clothing
,
easy
,
Jordan
,
modesty
,
sewing
,
shrug
,
tutorial

Silhouette Shirt
This isn't done by me but I thought it was so stinkin' cute I had to share it (plus I've been traveling all day and didn't prepare a post.) Jordan's sister in law made Jordan's oldest daughter this cute shirt. She bought a striped shirt. Easy beezy right? Then using her Silhouette, she cut out an even cuter owl on suede (made for the Silhouette) and applied it to the shirt. And just like that, Jordan's daughter now had a one of a kind, stinkin' cute shirt!

Posted by
Jasmine
at
11:17 PM
3 comments
:
 Labels:
baby clothes
,
clothes
,
Jasmine
,
Silhouette Cameo
,
t shirt

Jaime's Tips for Thrifting
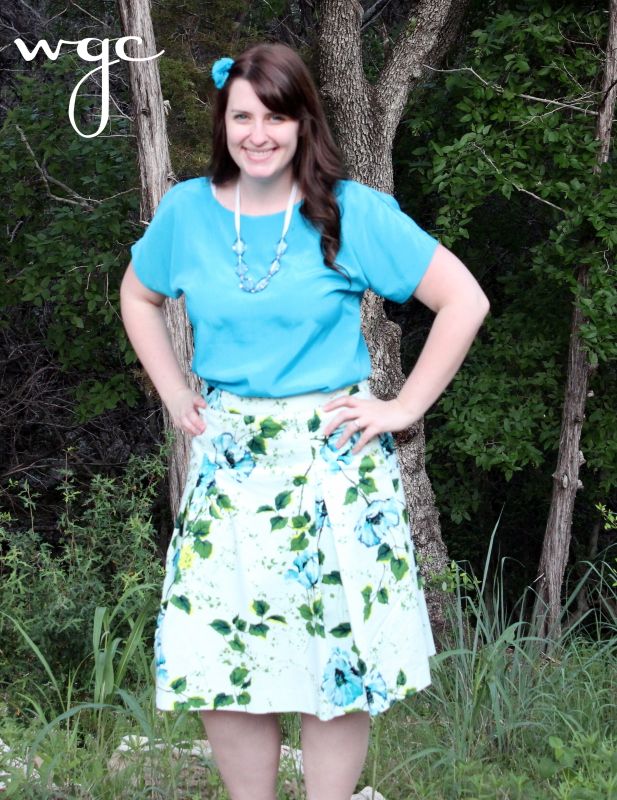
This year my entire Easter outfit came from the thrift store.
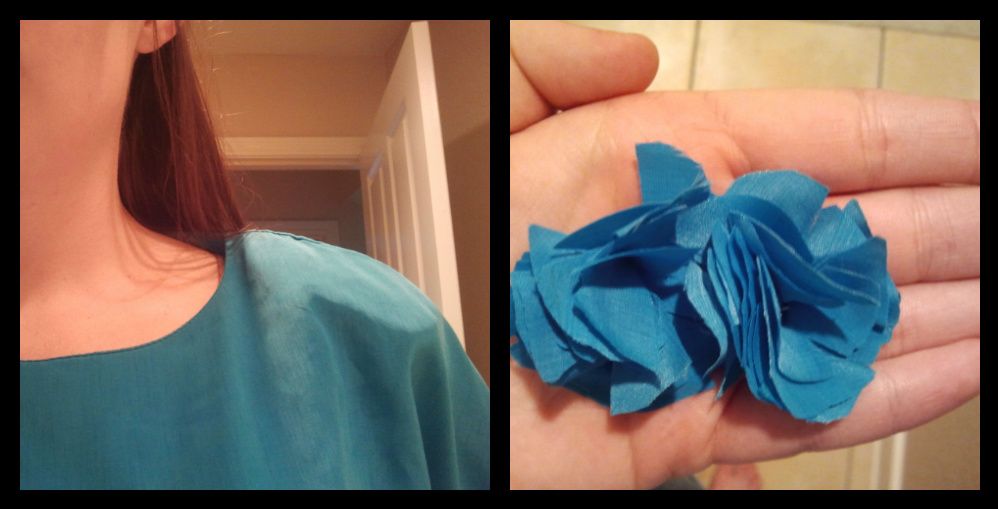
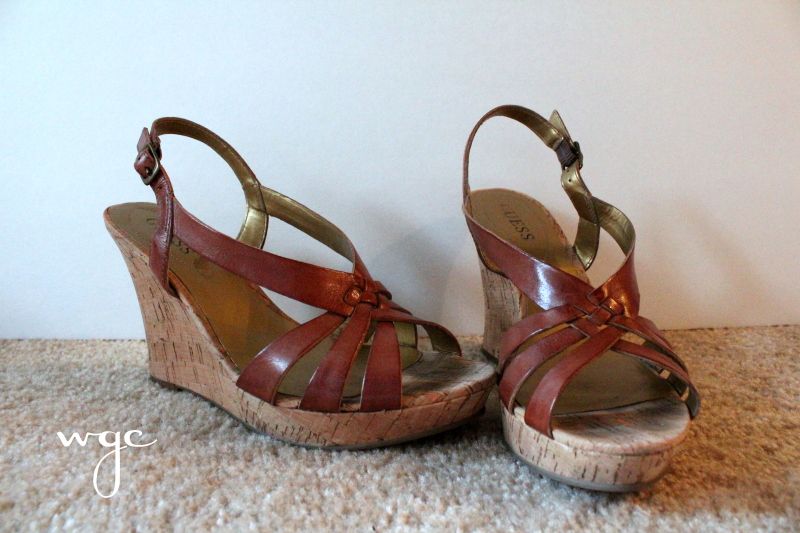
Top and hair flowers: '80s classic, Skirt: Banana Republic, Shoes: Guess(see below), Necklace: ME
I have found some real treasures at my local thrift stores. I've talked about a few of them before. Here are my tips for successful thrifting:
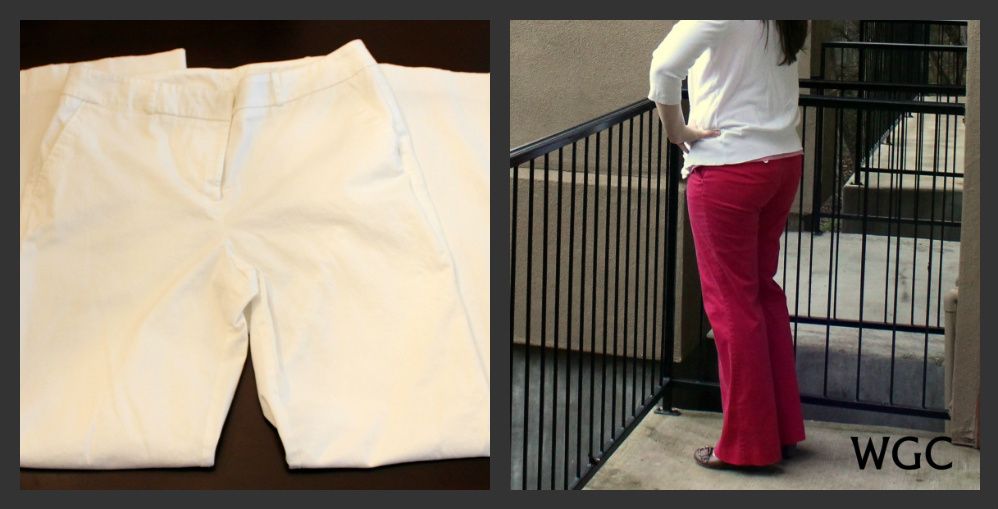
1. Shop with something in mind. Sorting through racks and racks of clothing just trying to find something "cute" may be overwhelming, at least it would be for me. Before I go, I have a game plan of different things I'm looking for. There are some things I'm always looking for, like skirts, but other times I have something specific in mind, like white, cotton pants to dye:
2. Keep your options and eyes open. If you are handy with a needle or dye, think outside the box: sizes that are too big or even menswear! Make sure to check in different areas. My local thrift store divides clothes into knits, sweaters, tees and blouses. If I'm looking for something in a particular color, I check all of the sections. The blouse from my Easter outfit was totally '80s--I removed the shoulder pads and took it in a touch on the sides. Bonus: I used the fabric from the shoulder pads to make the flowers on my hair accessory.
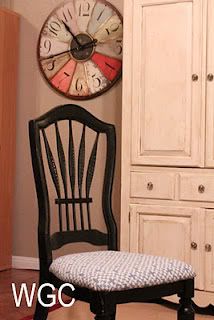
3. Give yourself enough time. I'm pretty bad about this one, I like to go thrifting during lunch. If you are focused, you can do this. I usually am looking for just one item and can be in and out quickly. But as to not feel pressures give yourself enough time to look through the racks. I did find my chair during my lunch hour though!
4. Shop out of season. I got my Easter skirt in the fall. I snagged the shoes right after Christmas. Another bonus: Savers runs sales at the end of the winter season on long sleeved items, coats, etc.
5. Know your store. Savers is my store. I know about the Super Savers card, and about the color system and I get emails about the sales they are having. Other stores in my area get overstock-like merchandise from Target on Tuesdays. Goodwill has a discount store in my area where everything is priced by the pound. I know Salvation Army has sale days. Try asking the employees at your local store. Another great thing about Savers: they give you coupons or card punches for every bag you donate! Love it!
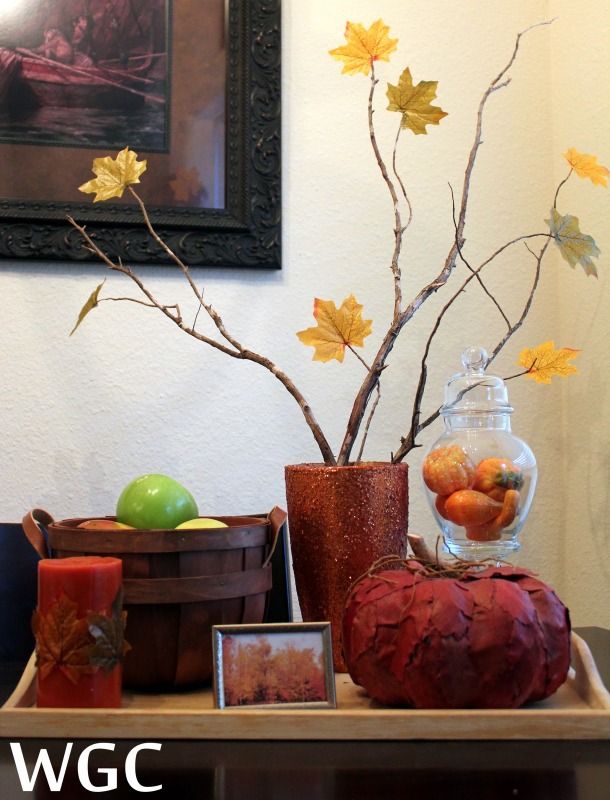
6. Shop for craft, decorating and organizational items. Goodwill has TONS of baskets, I would never buy one full price after having seen all the different kinds they have. I've gotten an awesome shoe organizer and hanging closet organizer as well as tons of decor items like these:
Top and hair flowers: '80s classic, Skirt: Banana Republic, Shoes: Guess(see below), Necklace: ME
I have found some real treasures at my local thrift stores. I've talked about a few of them before. Here are my tips for successful thrifting:
1. Shop with something in mind. Sorting through racks and racks of clothing just trying to find something "cute" may be overwhelming, at least it would be for me. Before I go, I have a game plan of different things I'm looking for. There are some things I'm always looking for, like skirts, but other times I have something specific in mind, like white, cotton pants to dye:
3. Give yourself enough time. I'm pretty bad about this one, I like to go thrifting during lunch. If you are focused, you can do this. I usually am looking for just one item and can be in and out quickly. But as to not feel pressures give yourself enough time to look through the racks. I did find my chair during my lunch hour though!
So this is love? do do do do
5. Know your store. Savers is my store. I know about the Super Savers card, and about the color system and I get emails about the sales they are having. Other stores in my area get overstock-like merchandise from Target on Tuesdays. Goodwill has a discount store in my area where everything is priced by the pound. I know Salvation Army has sale days. Try asking the employees at your local store. Another great thing about Savers: they give you coupons or card punches for every bag you donate! Love it!
6. Shop for craft, decorating and organizational items. Goodwill has TONS of baskets, I would never buy one full price after having seen all the different kinds they have. I've gotten an awesome shoe organizer and hanging closet organizer as well as tons of decor items like these:
Picture frame, glitter vase, fake apothecary jar and tray all came from the thrift store
My biggest tip: Have fun! I love thrifting! Oh, and be sure to bring your hand sanitizer!

Posted by
Just Jaime
at
6:00 AM
7 comments
:
 Labels:
clothes
,
Just Jaime
,
thrifting
,
tips
,
tutorial
Subscribe to:
Posts
(
Atom
)

