Showing posts with label Jordan. Show all posts

Orzo: Mexican Orzo

So I bought my orzo early in the month, planning on doing a new variation of Pam Anderson's orzo recipe from How to Cook Without a Book: Recipes and Techniques Every Cook Should Know by Heart (again, I know). But then . . . suddenly it was May 31st and a Sunday and the last day a large amount of leftover Mexican-flavored chicken in our fridge would be edible.

So I went with Mexican orzo.

Pam Anderson's orzo recipe treats the short pasta like rice for making risotto, but without stirring. Orzotto. (I like that!) She uses more Italian ingredients, such as Parmesan cheese. But since I had a Mexican main course, I didn't feel like multiculturalism was the dish of the day. I substituted Cheddar (okay, fine, Cheddar is English not Mexican, sue me), parsley (because I had it on hand) and green onions (yay for my garden!) to make a creamy, Mexican themed "orzotto." I topped it with cilantro-lime chicken, black beans, corn, tomatoes and parsley.

Yum.

Wonton Wrappers: Giant Ravioli!


One of my favorite cooking tips from How to Cook Without a Book: Recipes and Techniques Every Cook Should Know by Heart comes from the weeknight Italian section. She suggests using wonton wrappers to make freeform lasagna and giant ravioli! While it's a little labor intensive, it's worth it!


My filling this time was spinach and ricotta, but I've done all cheese and wild mushroom as well. I kind of winged it (and it was kind of four months ago) (holy cow), so I don't really have a recipe, but once you make your filling, you plop about a tablespoon onto the middle of one wonton wrapper. Dip a finger into a bowl of water (my kids loved helping with this part!) and wet the sides of the wonton wrapper. Place another wonton wrapper on top, pushing out extra air and sealing the edges of the wonton wrappers together. Boil in a shallow pan of water for 3-5 minutes.


Pam Anderson suggests serving them topped with a little bit of the starchy pasta water, olive oil, Parmesan and pepper, which is a tasty sauce; my husband tends to prefer marinara. Both are good!

I have to add a suggestion: if you make a huge batch like I did, don't stack them into multiple layers. Even with oil between the layers, they'll get stuck. But hey, then it's basically lasagna, right?

Agave: refreshing fruit slush bowls

This recipe comes from my good friend Queen Emily. She served this to me once as a dessert while we were visiting her house, and I loved it!

1 pint of strawberries (I think?)
4 medium pink grapefruit
3 bananas
Agave to taste

Slice strawberries and banana into a bowl. Cut peel off grapefruit and section into supremes over the bowl, allowing the juice to collect in the bowl along with the sections. Squeeze the juice out of the leftover pulp into the bowl and discard the pulp. Add agave liberally to taste and toss. Divide into four Tupperware containers and freeze for 1-2 hours, or until mostly frozen. Enjoy!

Indian: Chicken Korma

I wanted to recreate my Indian restaurant experience at home, so I found a recipe for the dish I had: Chicken Korma. This particular recipe requires a bit of work and ingredient coordination—and salt, since the recipe doesn't call for any—but it's very tasty. (You may want to increase the spices or heat; we omitted all heat from ours.)


I wish you had smell-o-vision right now. The wok has the spices below (1 tsp each) plus an onion, 3 cloves of garlic and 2 bay leaves in oil. (The blender has 1/2 c half and half, 1/2 c plain yogurt and 1/3 c cashews soaked in 1/3 c boiling water.)


Add three chicken breasts, cubed, to the wok and cook for five minutes. Add 1 c chicken broth and 1/4 c tomato sauce. Simmer 15 minutes. Add blender mixture and simmer 15 minutes more.

Add a slurry of 1 tsp cornstarch + 1 tsp water and cook to desired thickness.

Serve over rice!


Fast, easy, fantastic: quick thank you gifts for teachers!

We often give gifts to our kids' teachers at the end of the school year. A couple years ago, I hit on a gift idea that became a favorite: a "spa kit." (This may have been inspired by a birthday gift from Mom.) After a long, stressful school year, teachers need to relax! What better way than a spa kit?

I made the spa kit easy on myself: I hit up the dollar store and put together a basket or gift bag of things like exfoliating scrubbies, eye masks, bubble bath, bath pillows, lotion and scented candles. This year, I made the spa kits even more special with the addition of handmade "spa cloths."


The handmade gifts add an extra touch, and they're super quick to make: it took under three hours to make the first set of five hearts. I already had the yarn from another project, so it was no extra cost. Plus, there are tons of cool crochet or knitting patterns online for free (Ravelry lists over 4500 patterns, but you might need to be logged in to see them)!


The spa cloths came especially in handy with my two-year-old accidentally spilled her water bottle all over us and one of the gift bags. They got their very first use right away!

Want to make your child's teacher gift even more special? Have them write a thank you note, mentioning their favorite activities or memories of the school year!

My spa cloth projects on Ravelry

Patterns
Sweet Somethings (heart) by Julie of Simply Notable
Leafy Washcloth by Megan Goodacre of Tricksy Knitter (with mods from Ravelry user Penserosa--decreases at edge)
(Also to come: Starfish Cloth by Dione Read of Sew Funky)

Yarns
Hearts
Peaches & Cream in Hot Blue
Lion Brand Microspun in Red


Leaves
Knit Picks Shine Sport in Green Apple (held double for the larger leaf)

(Starfish will be done in Knit Picks Shine Worsted in Snapdragon)

Dying to dye (yarn)

One night, my husband came home and found the kitchen in disarray. "What's all this?" he asked.

"I'M DYYYYYYYEING," I wailed.

And I was. Dyeing with an E, that is! It's really easy to dye yarn made from animal fibers (wool, alpaca, cashmere, even silk) and nylon, and you can use common ingredients you probably already have in your kitchen!

My first dyeing experiments were for a colorwork sweater for my oldest daughter. First, I wanted to make sure we liked the colors, so I did little samples of 20" of yarn. I was trying to do about 1% of what I'd use for the final dye concentration, so I filled up my containers with 100 mL of water, added the dyes (food coloring and Kool-aid), and then used a dropper to get 1 mL of the dye stock. I mixed that 1% dye stock with more water.

Here's a secret of dyeing: it doesn't matter how much water you use. I measured the water to get the concentration right for a tiny test, but when you do the actual dyeing, as long as you have enough water to cover your yarn and let it circulate, the only proportion you really need to worry about is the amount of dye to the amount of yarn (by weight).

To prepare the yarn, you need to wind it in hanks (long loops) and tie figure-eight ties through the loops in three to four places to prevent tangling. Then soak it in clean water. (You'll need vinegar later, so you can add it to the soak water instead of the dye bath, but I usually don't.)
Then you can prepare the dye stocks. Tools of the trade: tons of measuring cups to get my 1% solutions, microwave safe containers and a kitchen scale.

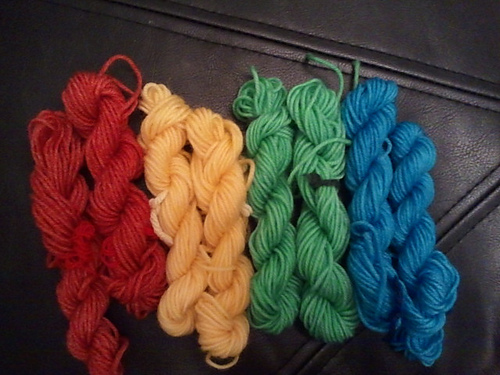
The colors in my rainbow here are McCormick's neon pink food coloring, McCormick's yellow food coloring, McCormick's green food coloring, Ice Blue Raspberry Kool-aid, and a mix of McCormick's neon purple (2 parts) and neon blue (1 part).

In the foreground, I'm soaking the yarn samples to be dyed.


Now it's time to dye! You need heat and acid to set this dye on protein fibers. With food coloring, you have to add some vinegar; a tablespoon in the dye stock is plenty (this doesn't have to be measured either! No wonder I love this!). The Kool-aid doesn't need vinegar because it already has citric acid. The heat is simple too: microwave! (Stovetop and oven work just as well too--but don't boil the yarn; it felts.)

Above, my tests are ready to microwave: I put 1mL of the dye stock into a baggie, added more water, and put in my wet yarn. I did more of the blue because I had a few samples of other things I was thinking about dyeing.


I nuked them for 2 minutes, let them sit for 10 and nuked them for 2 minutes. I repeated this until the dye bath "exhausted," meaning the water was clear (or milky in the case of the Kool-aid, but the dye was absorbed by the yarn). Here they are after microwaving:

Baggies may not be the best choice for this... But notice how the yarn is colorful and the water, not so much.

My daughter and I picked the colors for her sweater from the samples and then I stuck the yarn to be dyed in the full dye baths:

And, below, after microwaving. Check out the water--it's clear, except in the purple. Blue dyes often take longer to exhaust, so I recommend leaving the yarn in overnight after heating:

This jar of yellow did something interesting. Maybe I didn't have enough acid in it, but while it was in a cool-down phase between microwave bouts, I was worried about how much dye was left in the water. I added more vinegar and turned around to put away my big ol' jug. By the time I looked back, the water was perfectly clear and the yarn a vibrant yellow!

Allow the yarn to cool--you can speed this up by taking it out of the dye bath, but DO NOT PUT COLD WATER ON HOT YARN. This will cause the yarn to felt.

Once it's cool, you'll want to rinse the yarn with clean water. Be sure the rinse water runs clear. If it doesn't, either your dye isn't set, and you need more acid and/or heat, or you've used more dye than the yarn can actually absorb, so the excess is washing off. The yarn will usually fade more dramatically if the problem is that the dye isn't set.

And now it's time to dry! Above, the yarn is hanging out in my salad spinner, which is really handy for drying small amount of yarn. Below, it's hanging on a chair with a fan to dry the rest of the way.

Since this was for colorwork, I made myself some posterboard bobbins and wound up the yarn. The darker pink and the white are purchased--Knit Picks Wool of the Andes Sport in Rouge and White--and the white is the base for the other colors.
And in the finished product:

Vivien lace baby cardigan

Vivien, my youngest niece's name, means alive or lively. I thought that was perfect for this sweater I designed for her that features leaf lace motifs (leaves are alive!).

My adorable niece wearing her cardigan!

I fell in love with the lace yoke of this Prinsessa Estellen nuttu cardigan, which was inspired by one worn by Princess Estelle of Sweden. (You knew there were other royal families of Europe, right? Princess Estelle is second in line for the crown after her mom, Crown Princess Victoria!)

I would have just used that pattern, but there were two problems: it was only available in the 0-3 months size, and . . . it was in Finnish.

Strangely enough, our (the Wayward Girls') dad is fluent in Finnish (he was a missionary there in the 1970s), but I didn't figure he'd have knitting terminology on the tip of his tongue. However, because of Dad's Finnish connection, I remembered that another friend, writer and knitter Annette Lyon, also speaks Finnish. In fact, she learned to knit in grade school in Finland (while her father was in charge of the missionaries there).

The lace pattern had a chart, which makes it almost universal, but I wanted to make sure I'd read it right, and Annette was kind enough to check my translation. With a whole bunch of math and some trial-and-error, I knit up a six month cardigan with the lace patterned yoke.


I wanted to make it even more unique, so instead of a seed stitch border as on the cuffs, button band and neckband, I used a provisional cast on and designed an original leaf lace border. It's a bit bigger than the sweater, though, so the leaf pattern is more obscured, and it looks more like a ruffle, which is also cute!

I'm planning to write up the pattern to share--anybody interested? I'll get around to it much quicker that way!

View the project on Ravelry

Calli-Cardi! Sweater with a caterpillar

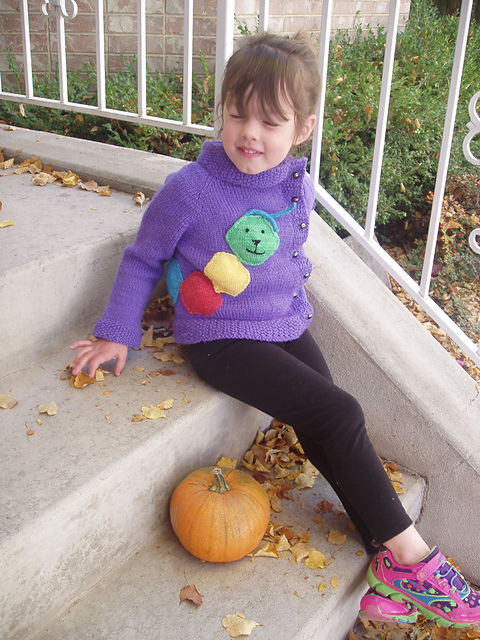
Last year I made sweaters for everyone in my family (except me...). My four-year-old's lovey is a multicolored caterpillar we call Cally. I wanted to incorporate it into her sweater to make it personal and unique for her: a Calli-Cardi!


I looked for a cardigan with an off-center opening to maximize the room for the caterpillar on the front. As with my six-year-old's sweater, I knew I didn't want to buy five colors of yarn to only use a little of most of them so I dyed the caterpillar colors:

Each hank was about 14 yards; the eight of them together weighed about 36g.To dye them, I used food safe colors in Mason jars on the microwave (but that's another post!).

Red: one packet of cherry Kool-aid
Yellow: about five drops of yellow McCormick's food coloring (and white vinegar)
Green: about five drops of green McCormick's food coloring (and white vinegar)
Blue: one packet of mixed berry blue Kool-aid.

Originally I planned to work the caterpillar design as part of the sweater itself using the intarsia method of colorwork, but I realized that would be a big challenge, especially with two different weights (thicknesses) of yarn. So I made the cardigan normally and then knit hexagons to appliqué the caterpillar on.


I left an extra long tail on the end of each hexagon and used the tails to sew the caterpillar onto the sweater. I used backstitch in black yarn to make the caterpillar's face and short i-cords to make his antennae.

As you can see, she loves it!

For pattern notes, modifications and in-progress photos, see this project on Ravelry!
Cardigan Pattern: Peach Blossom Child Jacket by Jennifer Little
Cardigan Yarn: Cleckheaton Country Kids 8-ply (superwash wool in DK/8-ply weight) in purple
Caterpillar Pattern: Merit badge by Amanda Ochocki
Caterpillar Yarn: Knit Go Craft Super Soft Cashmere Wool in white (cream), hand dyed (claims to be DK weight but knit up more like fingering weight)

Happy Halloween! (And FAST costumes!)

My son wanted to be a sword guy after his Mastering Knighthood Summit a couple months ago. He received a foam sword (not pictured, as swords aren't allowed at school) and a shield he decorated there. To make an easy tabard, I asked Summit's Queen Emily. She recommended using a long rectangle of fabric folded in half lengthwise, or even a pillowcase (slit the long sides). Cut a head hole and put a belt on it: BAM. You're a knight.


Like Brooke's daughter and 10,000,000 other little girls, my middle girls wanted to be characters from Frozen. We got storebought dresses from Mom Approved Costumes, which arrived JUST in time. I braided some snowflake Christmas ornaments into Elsa's hair and used gel and hairpins along with white and glitter hairspray. Anna got a white strip of hair (hiding in the back plus more glitter, of course!) and a homemade cloak. I used felt instead of fleece and made the undercape a cape (which Anna's is in the movie) instead of a vest, but mostly followed Eclectic Housewife's Anna Cloak tutorial.


The rest of the morning will be spent sewing on the trim and button.

And of course, we have our troll . . . trolling.


Her costume is a towel cut into a long rectangle. I folded it in half lengthwise and sewed up a couple inches of each side, then cut a head hole. Slip on over a gray sweatsuit, tie on a raffia belt and voila, troll!

She hates it. At least it only took five minutes.

What are your favorite fast costumes?

Sweater of many (custom!) colors

I've been way too quiet here on the blog lately, but not for lack of crafting! I've got a lot of things I keep meaning to share, but I'm so happy with this one, I had to make the time to blog.


Cast on: Sept 21
Finished: Oct 8
Pattern: Jolie Fleur from DROPS design.
Yarn: Knit Picks Wool of the Andes Sport in Rouge and White

That's right: the only two colors of yarn I purchased for this were the dark pink of the body and the white. The other colors were dyed on the white using McCormick food coloring and Kool Aid!

  • Light pink (it's in there): McCormick Neon Pink
  • Yellow: McCormick Yellow
  • Green: McCormick Green
  • Blue: Ice Blue Raspberry Lemonade Kool Aid
  • Purple: McCormick Neon Purple and McCormick Neon Blue, 2:1.

Dyeing yarn with these is not only easy (and awesome!) but completely food safe, so you can use your regular pots and pans, and it's okay to use them for food afterwards. (I actually used Mason jars in the microwave...) Kool Aid contains enough citric acid to "set" the food dyes on animal fibers (wool, alpaca, silk) and nylon. Food coloring requires additional acid, and I used vinegar. The only other thing you have to do is heat it enough and the yarn soaks the dye right up--but this is probably a post for another day!

I ran out of all the colors I'd dyed as well as the white and had to order and dye more. Fortunately, I'd kept careful notes of the dye formulas I'd used. Unfortunately, I lost those notes. But I was able to remember it pretty well!

I absolutely love how this turned out. But the best part is how much my daughter loves it. She came up to me while I was finishing it and spontaneously told me, "Thank you for working so hard on my sweater." And that makes it even more worth it.

Lots more information on the project and especially progress photos: Project on Ravelry

Why I quit clipping coupons--and spend even less on groceries!

Yes, you read that headline right. I don’t coupon, and typically I pay $30-50 a week for groceries for a family of six—three meals a day (including lunches for my kids). I know that a lot of bloggers will tell you how wonderful couponing is, and it’s true that you can save a lot of money. I've done couponing in the past—I tried the Grocery Game for 12 weeks and did save money . . . when it worked. But here are the reasons why couponing just didn’t work for us.


Local grocery store sales schedules don’t cooperate

First of all, when I tried the Grocery Game years ago, they included some of the larger (more expensive) grocery stores. Now they only list deals for chains like Walgreens, RiteAid, and Walmart. When they did list actual grocery stores, the deal list came out on Sundays, and the deals ended on Tuesday. To get deals, that means I absolutely hdd to go shopping on Monday or Tuesday. If I’m busy or sick, too bad. Plus . . .

By the time I could shop, the shelves were picked clean

That wouldn’t be quite as bad except for the fact that, when I finally did get to go out armed with the best coupon/deal/sale combinations, there was nothing left. No, I don’t mean “Oh, my favorite flavor of this is gone, so I’ll have to settle for my second favorite” gone.

I mean the shelves with the sale items were completely empty. The end-of-aisle displays and island displays were gone. There was no more stock in the back. And the next shipment wouldn’t be in for days—till after the sale ended. “Gone” gone. No rainchecks.

Granted, this only happened with the absolute best sales, but it usually happened by Friday night (sometimes as early as 9 PM on day one of the sale, though!). The premise behind the Grocery Game is that sales run in 12 week cycles. If they’re so predictable, why not time the new lists so I can go at the beginning of the sales, before everything is picked over? And, really, are there that many good coupons in the coming week that waiting until the next Sunday’s paper justifies missing most of the good sales?

Frankly, I don’t need this stuff

To paraphrase Jurassic Park, couponing keeps you so preoccupied with whether or not you can, you didn’t stop to think if you should. You can get 50,000 razors for pennies apiece, but what are you going to do with them?

If you really want to save money, don't buy stuff you don't need. At all. Ever.

It’s just food

I know, I know, food is a little bit important in sustaining life. Right. But the things that coupons come for most of the time will not form part of a complete meal. For example, in this week’s paper, I found coupons for:
  • Fruit snacks
  • Cinnamon rolls, biscuits
  • Cereal
  • Desserts
  • Snack cakes
  • Chips
  • Candy
  • Frozen pizza and pizza-type things
  • Spaghetti-Os
Actual meals in there? Breakfast, biscuits as a side with dinner, freezer pizza and canned spaghetti (which I don’t even like). Healthy.

It’s mostly just food—food I probably didn’t need anyway. Again, even if I can get $50 worth of snack food for $0.50, once again, it doesn’t mean I should. It’s $0.50 I don’t really need to spend (and it’s never just $0.50) and it’s probably 50 pounds I don’t need to gain.

Granted, many couponing programs do note when there’s a good sale on fruit and meat, but I can figure that out myself.

I’m just not convinced

I know that it’s so easy to come home from couponing with a huge amount listed on the receipt as your “Amount Saved.” The rewards seem very tangible. But when I buy the store brand on sale instead of the name brand, my receipt doesn’t list that as part of my amount saved. While I could be saving just as much, the rewards are less tangible.

For example, I took a look at my grocery receipt for last week and compared prices on a few things that you just can’t use coupons on: store-brand milk, store-brand juice, meat (London broil), cucumbers, tomatoes and nectarines. I chose these because they happened to be on sale at both the discount store and the larger store I used the Grocery Game with store that week.

What did I discover? I was overcharged for my nectarines! I want my $1.47 back!

Erm, um. . . . In the amounts that I bought of these six things, the discount store was cheaper by more than $5 for one week’s worth of groceries. But if I really wanted to compare prices, one thing I’d have to take into account: I bought 2.23 lbs of meat, and the sale price at the other store (already $1/lb more) only applied to “Super Value Packs,” which would probably be at least twice as much meat. (And then I’d have to figure out a place to store it…)

Taking into account what I’d really have to spend to get that price, assuming I could find a small Super Value Pack (5 lbs, or two London broils), the difference grew to $13.63. On six things. That’s a lot of coupons.

What Works for Me


When I was on top of couponing, I review my stock of coupons before looking at the cheaper grocery store’s fliers. Then I look at the fliers and plan the week’s meals around what’s on sale. Then I write down anything else that’s a good deal that we normally eat and check my shelves to see if we’re low. Finally, I see if I have a coupon for anything in the flier and decide whether I really want it. (More ways I save money on groceries.)

We do still stock up on many things and rotate through our stock, but the #1 thing that helps save money is getting a sense of good prices for products. It takes observation and time, but eventually you'll be able to tell whether that's a good deal on meat or milk or mangoes.

My favorite shopping trick: Local stores periodically offer “case lot sales,” where canned goods (usually store brand) are marked down considerably—usually 50¢ a can or less. We stockpile canned goods during these sales. We use several FIFO organizers (first in, first out) and I’ve never run out of canned goods since we started really stockpiling during these sales.

I prefer shopping when and where I want, bringing less junk food into my house, and bringing home meals and food we’ll actually eat. To me, that’s the most cost effective way to get our grocery shopping done.

Need more help grocery shopping? Check out 11 ways to stay sane while grocery shopping with kids and 25 unconventional ways to save money on groceries.

Photo credit: coupons by OOingle.com 

Have knitting, will travel

I do most of my knitting on lazy Sunday afternoons, and sometimes while my husband is driving—but really, knitting can be a very portable craft! I remember one woman who'd bring her knitting to the gym and work while she walked!

Adapting your knitting to the road: use the right tools
You might not be planning on walking and knitting at the same time, but seriously: carrying your knitting is an essential part to taking it with you! You might want a bag with handles, if that's all you're planning to carry (or you'll put your wallet inside your knitting bag—make sure it has pockets!), or you might want another container that fits inside your purse or other bag. Either way, water-resistant material is handy for keeping your knitting clean.

On my trip, I put my knitting in a plastic grocery bag to keep it clean and grabbed a canvas market bag that was a gift from my sister-in-law, but the needles kept poking through the plastic bag, market bag, and my backpack!

Fortunately, they make tons of bags especially for knitting! Most of these include a good system for keeping the yarn safe while freely feeding yarn to your flying fingers.

This one has accessory pockets and a needle pouch. It holds up to 8 skeins of yarn and has a hole in the lid to feed the working yarn through—with a slit to be able to remove the yarn!This one has a stand, a large pocket for knitting books, and lots of storage space for yarn, needles and accessories. While it's a travel bag, it may become the only storage you use (if you're not a yarn hoarder).This one keeps your yarn very clean and portable, and fits into a larger bag. However, once you're working, you can't remove the yarn from the container unless you cut it.

Whether you're working on double point needles or single, the more you move your knitting, the likelier you are to lose a stitch or two hundred. To prevent this, consider using point protectors:


They slip on to the tips of your needles and (hopefully) keep your yarn from slipping off while you're not knitting. I also hear rubberbands can work well (but obviously that will depend on your yarn and your stitch size).

Keep it simple
I happened to bring fairly easy projects to work on, so I was also able to read while knitting. Two hobbies at once!

However, keeping it simple has another benefit: for me, I only had one page, front and back, to keep track of for each project with my pattern. I didn't have to keep a cable needle handy. I had stitch markers already in place on the projects—really, all I did was grab the project and some extra yarn if I had it, and go. I didn't even bring scissors!

You don't have to go that minimal, but the less you bring with you, the less you have to manage, and the less you stand to lose. Plus, constantly shuffling through all the loose pages of your pattern is a pain!

For more complicated pieces like lace, you might consider getting a pattern holder like this one (or its smaller counterpart):


It folds to keep your pattern clean and portable, and can lay flat or stand up to display your pattern. It also has magnets to not only keep your pattern in place, but a magnetic bar to help you remember what line you're on!


Knitting that isn't well suited to travel
Knitting with extensive colorwork may not be well suited to travel. It's highly likely that your bobbins and skeins will get tangled—but if you're always very careful about managing them, this may not be a problem for you!

I went on a trip last month and I brought two WIPs with me. One of them was done with finer yarn (fingering weight, I think) on US #2 or #3 double point needles. This often lead to stitches slipping off, so this might not be good for travel unless you take the precautions above.

What's your best tip for knitting while traveling?
Related Posts Plugin for WordPress, Blogger...