I made this card for my husband for Father's Day. (Inspiration found here)
Another card using my pen holder. It's so fun! I can't wait to use it to address envelopes!
Happy Father's Day to all the dads reading this blog, even if it is only mine =)

Showing posts with label cards. Show all posts
Showing posts with label cards. Show all posts
Father's Day Card: Thanks, Dad. I turned out spectacular
Here's the card I made for my dad for Father's Day: (Inspiration found here)
This was the first time I used my pen holder with Silhouette Studio. It was really fun! I did a little researching (ok Googling) and found some really cool ideas using the pen holder. Anyone have some gel pens they wanna give me? The one I used wasn't the best (Souffle) and I had to go back over the design myself. It gives it the handmade look, right?
Happy Father's Day!

Father's Day Card: Papa Bear
This card is for my husband from my daughter. Ok she's 7 months old, so I made it. Anyways. I found this shape in the Silhouette store and I loved it, but it didn't quite meet what I was looking for. So I modified it.
First I erased all the shapes except the bear. Then I duplicated the bear (or copy + paste) and flipped it to face the other bear. To make sure it would fold correctly, I spaced the bears away from each other a little and drew two cut lines. Voila!
Closed
Open

I really love this one! Happy Father's Day!
First I erased all the shapes except the bear. Then I duplicated the bear (or copy + paste) and flipped it to face the other bear. To make sure it would fold correctly, I spaced the bears away from each other a little and drew two cut lines. Voila!
Closed

I really love this one! Happy Father's Day!

Posted by
Just Jaime
at
5:00 AM
No comments
:
 Labels:
Card
,
cards
,
Father's day
,
Father's Day Card
,
father's day ideas
,
Just Jaime
,
papercrafts
,
Silhouette Cameo

Father's Day Card: Best Dad of All Time
Here's a card I made for Father's Day for my pawpaw, father-in-law and Ricardo. (Inspiration found here) Ricardo is my husband's grandma's husband. We don't say "step grandpa" we just say Ricardo (even though his name is Richard).
To make this card, I found a clipart of a watch I liked:
And then used my "Trace" feature in Silhouette Studio. (Sidenote, Silhouette users, what do you think of Silhouette Studio 3.0? It's taken a little getting used to, but I like it!)
I cut out the watch and then the words for each card. Slapped the watch on the card and some paper behind to fill in the background of the words and voila. I even made some simple envelopes to go with.
I've got more cards coming, one for my dad and two (hopefully) for my husband. It's his first Father's Day!

Posted by
Just Jaime
at
5:00 AM
No comments
:
 Labels:
Card
,
cards
,
Father's day
,
Father's Day Card
,
father's day ideas
,
Just Jaime
,
papercrafts
,
Silhouette Cameo

Fluffy Fringe Birthday Card
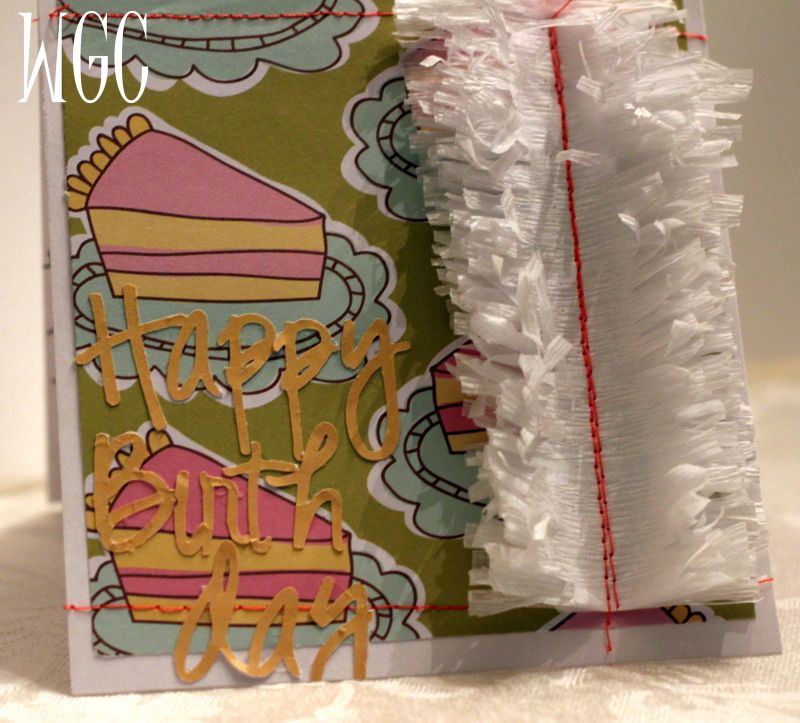
I'm not the best at sending out birthday cards. I'm at about 50% for the year thus far. But a few weeks ago I got a 3 day notice on my sister-in-law's birthday. So I whipped up a card using some inspiration from Pinterest.
Here's my card:
Here's my inspiration:
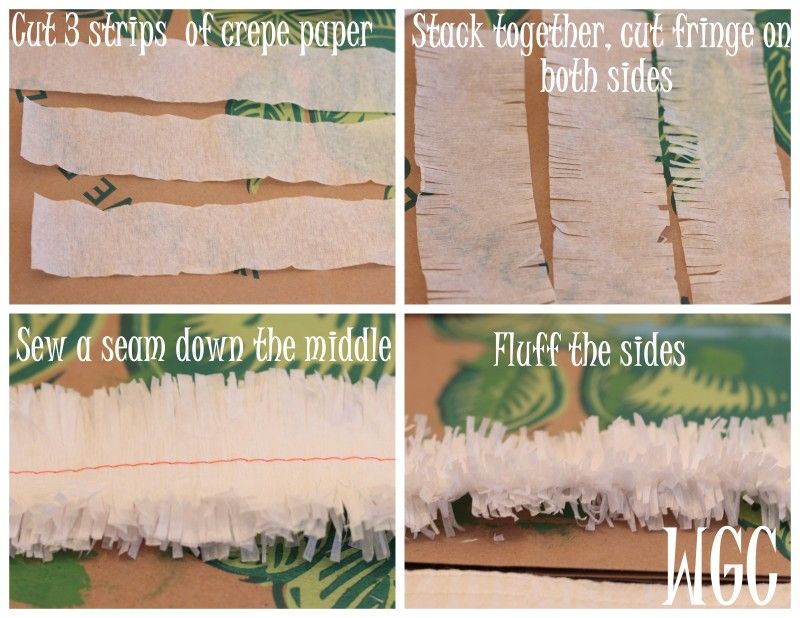
To make the fluffy fringe: I cut three equal lengths of crepe paper and stacked them on top of each other. Then I cut fringe on each side. Next, I fired up the sewing machine and sewed the crepe paper up the middle.
Here's my card:
Here's my inspiration:
To make the fluffy fringe: I cut three equal lengths of crepe paper and stacked them on top of each other. Then I cut fringe on each side. Next, I fired up the sewing machine and sewed the crepe paper up the middle.
For the rest of the card: I used some cake patterned scrapbook paper as the background and adhered it to white cardstock. I added some decorative stitches and then sewed the frill on. Finally, I used corresponding scrapbook paper for the sentiment, cut with my Silhouette Cameo. Sadly the scrapbook paper I used was really thin and tore a bit when coming off the cutting mat. Boo.
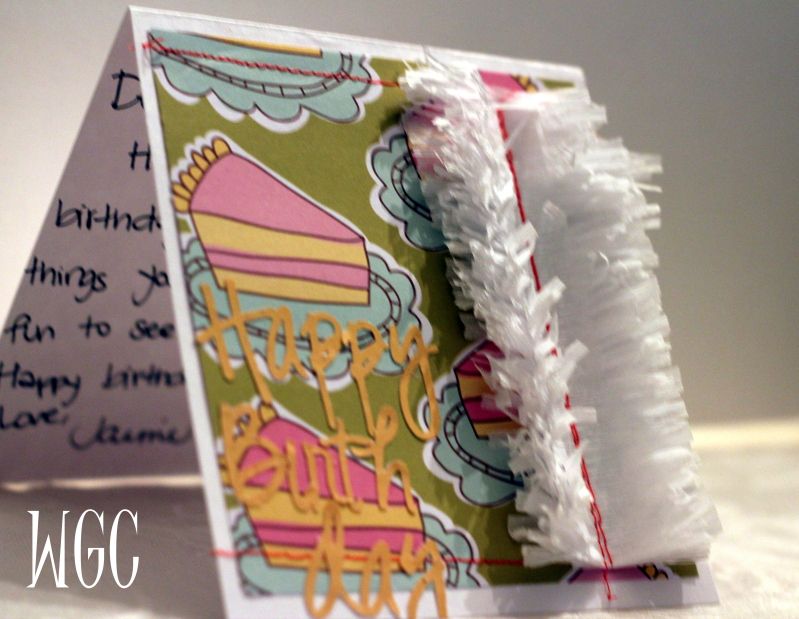 |
| Fringe in action |
When I wrote the message and gave it to my husband to sign (who else does this? Everyone?) He asked if I made the fluffy fringe. Then he said, "Niiiiice," Woohoo! Man compliment on my craft!

Posted by
Just Jaime
at
6:30 AM
8 comments
:
 Labels:
birthday
,
birthday card
,
Card
,
cards
,
Holidays and Entertaining
,
Just Jaime
,
paper crafts

Hunger Games Card made with Silhouette Cameo
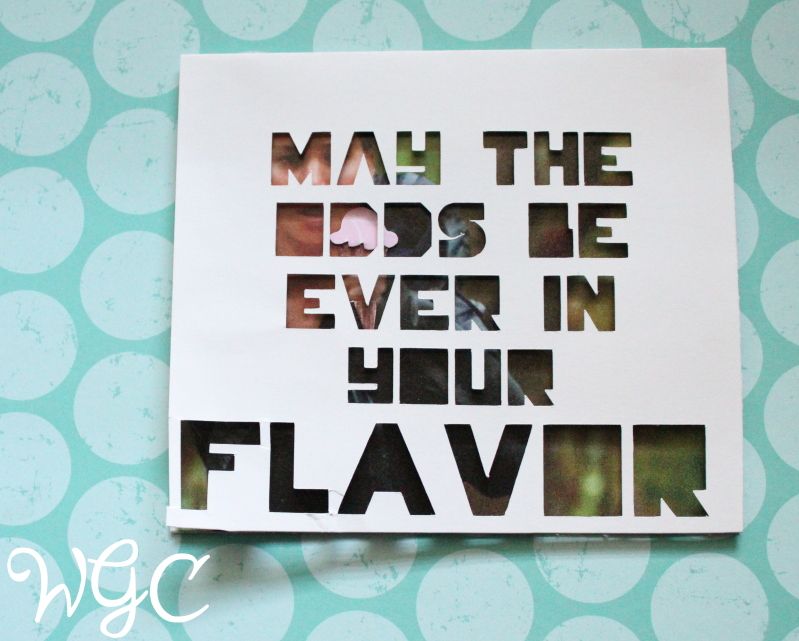
Last month I had an idea for a card for my little sister, Jasmine. Jasmine is a very lucky sister because she has me to introduce her to wonderful books like The Hunger Games. Using my Silhouette Cameo, I made her a little card to celebrate our love of the series and the first movie:
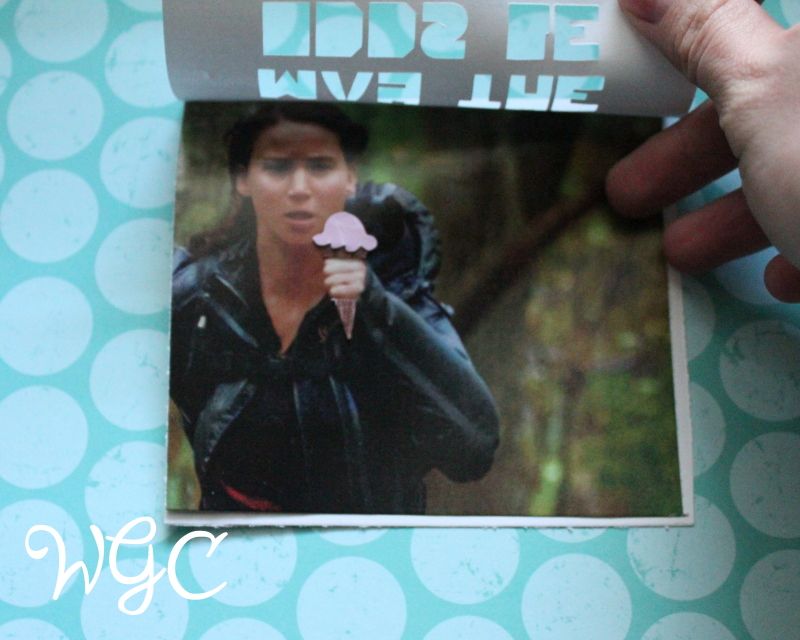
Inside the flap, Katniss with an ice cream cone
Font: Hunger Games Font Download for free here
One thing I love about the Silhouette is that I can download any font I want and use it in the program. This font worked really well with my Silhouette.
To make the ice cream cone, I cut a triangle out of brown paper and a little scoop of ice cream out of pink. I eyeballed both.
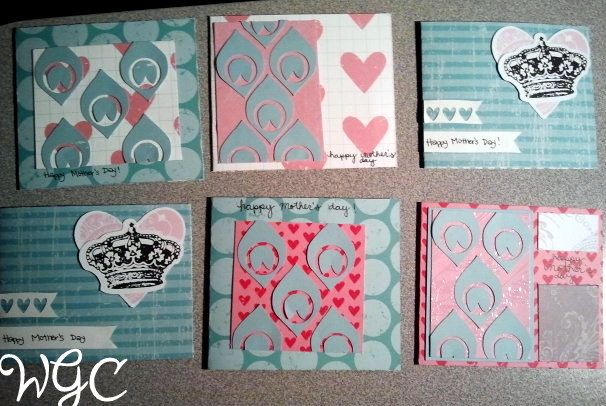
I also made some fun cards for Mother's Day. It was really fun to play around with my Silhouette and use some of the free shapes Silhouette gives away every week!
Shapes used: Mother's Day Card Sketch, Peacock Feather Background
Paper used: Heidi Swapp's "Carefree" collection, purchased at Tuesday Morning.
I am really loving my Cameo for card making!
I was not compensated or asked to promoto Silhouette Cameo
.
"May the odds be ever in your flavor"
Inside the flap, Katniss with an ice cream cone
Font: Hunger Games Font Download for free here
One thing I love about the Silhouette is that I can download any font I want and use it in the program. This font worked really well with my Silhouette.
To make the ice cream cone, I cut a triangle out of brown paper and a little scoop of ice cream out of pink. I eyeballed both.
I also made some fun cards for Mother's Day. It was really fun to play around with my Silhouette and use some of the free shapes Silhouette gives away every week!
Shapes used: Mother's Day Card Sketch, Peacock Feather Background
Paper used: Heidi Swapp's "Carefree" collection, purchased at Tuesday Morning.
I am really loving my Cameo for card making!
I was not compensated or asked to promoto Silhouette Cameo
.


Posted by
Just Jaime
at
6:00 AM
8 comments
:
 Labels:
Baby & Kids
,
cards
,
Holidays and Entertaining
,
Hunger Games
,
Just Jaime
,
Mother's Day
,
paper crafts
,
Silhouette Cameo

Christmas Card 2011
I know! I know! Enough already with Christmas. Actually, I think this is the Day of Epiphany and so I think we can still talk about Christmas.
Anyway... I have already confessed that I always make cards and feel like I have to live up to others' expectations. I also confessed that this year I was cutting myself some slack. SOOOO, this is the easy and inexpensive card I made this year.
Supplies:
 |
| This one is a little worse for wear. It was returned to sender after a couple weeks. |
12 X 12 cardstock. (I bought mine on sale at Joanne Fabric and Craft for 5 for $1.00)
A photo (You will need to trim the length of a 4 x 6 photo down to about 5.5".)
A coordinating sticker.
Directions:
On your computer, change the paper size in your page set up menu to something that is longer than 12". This will allow you to print all the way to the edges of the paper. Use landscape layout. You will need to experiment with placement. I used 12x12 paper I didn't like or taped together regular paper both cut to 8 x 12 to practice. You will make 2 copies of the card on each page.
For the outside, use the drawing tools to draw three parallel lines in red and green. I liked mine to touch each other. I later straightend the top green line. Once you get everything perfect, make a second copy on the page. I inserted text boxes everywhere I wanted text.
Decide on the the placement of your message and your return address. Practice! Practice! Practice! Maybe other people don't have to practice as much as I do. Don't tell me if you don't. I feel inadequate enough without any help!
Now... practice the inside. Use your practice pages to see where to fold your card. On the small flap on the listed the family members in the photo. Write your message on the right.
The more you practice the less paper you will waste.
Once I had printed all my 8 x 12 papers, I printed the cards on the leftover 4 x 12 strips. That way I got 3 cards from each sheet of cardstock.
For the sticker, I ran shiny gold paper through my sticker maker. Make sure it will keep the card closed. I only had repositionable adhesive stickers, so I ended up reinforcing the seal with glue.


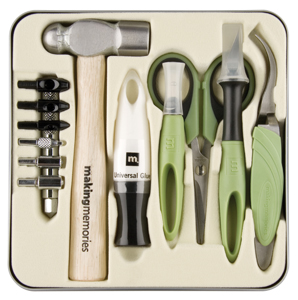
Brooke's Tools of the Trade!
As I was making some cards the other day I realized I almost always use some of my basic tools every time I do a craft. Once I started thinking about it I wanted to do a blog post about how I love use these.
 It is a Singer 5040 C which they don't make any more but this is about the same machine.
The first one has to be my eyelet setter. I have one that comes in a kit with a few tools. Jaime prefers her setter because it is not so LOUD :)
My second item also has to do with paper crafting. It is a corner rounder. I love the detail this adds to cards, bookmarks, and scrapbooking pages.
Here are the cards with an example of both of these.
Of course I also think this goes without saying but my sewing machine is very much a necessity! I recently inherited a sewing machine from someone who hadn't used it in a long time and no longer was going to use it. I cleaned it up and lubed it up and it works fantastic! It was great timing because mine was starting to wear and have a few problems. This is the machine I have:
 It is a Singer 5040 C which they don't make any more but this is about the same machine.
What is your favorite tool of the trade?
Click the product pictures to be taken to Scrapbook.com's superstore where you can purchase them! (disclosure: we're an affiliate of Scrapbook.com; we'd receive a few cents if you bought something from SB.com from the product links in these posts)

Posted by
Brave Brooke
at
2:37 PM
7 comments
:
 Labels:
Brave Brooke
,
cards
,
Corner Rounder
,
Eyelet Setter
,
sewing
,
sewing tips
,
tools
,
tools of the trade
,
tutorial

Mini envelopes with windows
 As Jasmine told you, we tried our hand at gum paste a couple nights ago. You may notice that my post is not labeled gum paste. My rose didn't turn out so well. I think the class will be fun, and I will get to add gum paste and fondant to my cake decorating skills.
I traced my pattern on to the back of the paper I selected for my first mini envelope. I chose a medium blue paper with snowflakes on it. Make sure to press hard with your pen or pencil when you are marking lines for folding. This will make your edges sharper. I like to use a straight edge just to make sure they are straight. I also cut out a rectangle in plain white for the card inside the envelope. Then I used a snowflake punch on the front of the envelope. I saved the snowflake and glued it on the card. I turned it so that the snowflake does not show through the window when sealed. To glue the flaps down, I use either a glue stick or double sided tape. I punched another snowflake from a shiny gold fold adhesive paper. I used this to seal the envelope shut.
Envelope two has a photo showing through the window. This would be great to use for a child's thank you notes. You could snap photos of the gifts and have it show in the window.
Finally, I made a third envelope with a pumpkin cutout. I glued a Halloween paper on the back of the cutout.
For the second two, I actually traced tiny cookie cutters and then cut them by hand.
There are many other ways you can use mini envelopes. I made a bunch of them without the top flap and put word sorting activities in them for school. The students enjoyed pulling the words out and using the words.

Posted by
Diana
at
5:54 PM
12 comments
:
 Labels:
Baby & Kids
,
Cake Decorating
,
cards
,
children's crafts
,
Holidays and Entertaining
,
mini envelopes
,
Mom (Diana)

Noel Cards
I have a rep for making my own Christmas cards. Seriously, one of my friends even mentioned my cards in the Christmas letter she sent out to all our friends! I am not bragging... I actually feel pressure to deliver. So far each year I have been fortunate enough to get an idea for the cards then work my fingers to the bone making them. (I am open to ideas for this year!)
This was last year's card.
Supplies:
Coordinating 12 x 12 Christmas paper. (I bought a tablet with a coupon so it was pretty inexpensive.)
Photos of your family. 3 1/2" square
Gluesticks
Time
For each card
This was last year's card.
Supplies:
Coordinating 12 x 12 Christmas paper. (I bought a tablet with a coupon so it was pretty inexpensive.)
Photos of your family. 3 1/2" square
Gluesticks
Time
For each card
Cut a 4" square from each of the four corners of the 12 x 12 paper. It will look kind of like this. Save the squares you cut. The inside of the card will be the plain side of the paper. The words will be glued to the printed side and the pictures will be on the plain side.
Decide on what you want your card to say. I selected the word "Noel".
Writing.
Each square began with a letter in the word Noel. I downloaded some free Christmas fonts. I set up a table in a word processing program with 3 1/2" cells. I put one large capital letter in each square with the writing underneath it. Cut these out.
Stack everything (words and pictures) up so you can create an assembly line.
Put on a favorite Christmas movie and get to work.
With the flaps all folded in on the card, glue the N to the top flap. On the inside of that flap, glue the corresponding picture. (I had my pictures color copied. You could also use actual photographs.) Continue with each letter and each flap.
On the center of my card, I added an extra flap. Tape a square from a coordinating paper and put your message on that flap. Put a family photo under the flap. (Put the tape on the back of the flap so it doesn't show.)
I used scraps from all of the cards to decorate the back center of the card. The one shown is pretty simple (it was a leftover one,) but some of my others were pretty intricate with ribbons and mosaics.
When you fold your card for mailing, make sure you spell the word right. Don't make it say LEON!

Posted by
Diana
at
8:14 AM
8 comments
:
 Labels:
cards
,
Christmas in July
,
Holidays and Entertaining
,
Mom (Diana)

Mother's Day Cards for Kids, 2 pop-up cards for children to make.
Here are 2 more cards for children to make for Mother's Day--- or any other day!
Close the care and apply glue on the outside of the card, both top and bottom. Fold the remaining piece of paper in half and put it over the first card. (It will be a cover.)
First, you will need two pieces of paper the same size. They can be the same color or coordinating colors. You will also need scraps of printed paper, markers, and scissors.
First: Fold one of the pieces of paper in half hamburger style. Fold in one corner on the fold as shown below..
Write your message on the inside of the card. Then, cut out a shape that you like. (The heart is shown below.) Carefully tape or glue it on the center foldline. You will want to make sure it will lie flat when you close the card. You may need to reposition it. (I did several times.)
Close the care and apply glue on the outside of the card, both top and bottom. Fold the remaining piece of paper in half and put it over the first card. (It will be a cover.)
PopUp Card 2
(I learned this on EnchantedLearning.com and used it in my classroom, too.)
First, you will need two pieces of paper the same size. They can be the same color or coordinating colors. You will also need scraps of printed paper, markers, and scissors.
First: Fold one of the pieces of paper in half hamburger style. Make two cuts (about 1 1/2" long) on the folded edge of the card.
I have darkened the lines for easier viewing.I have also drawn dotted lines to show where to fold, but you don't need to draw lines. Fold down the two cut sides. Open the card and push the folded flaps to the inside.
Study the photo above to see which flaps come forward and which go back. (I learn better from photos than words.)
Now it is time to decorate your card. For this garden motif, cut flowers and stems and glue them as shown,. I thought animals or jewels might also be nice.
Finally, you are going to glue the second piece of paper on the outside, just like card 1.
Enjoy!

Posted by
Diana
at
8:56 AM
4 comments
:
 Labels:
Baby & Kids
,
cards
,
children's crafts
,
easy
,
fast
,
Holidays and Entertaining
,
Mother's Day
Subscribe to:
Posts
(
Atom
)


