With Christmas quickly approaching, I thought I’d do a tutorial of one of my favorite quick crafts that make an excellent gift – bookmarks (or book thongs if you like the sauciness). In fact I’m already planning to make one for each of the ladies in my book club for Christmas this year. (Shh don’t tell!)
And since I needed to make a few bookmarks for breast cancer and ovarian cancer awareness, I’m going to take you through the steps while I make them. First of all you need your supplies - scissors, beads, charms, and hemp twine (I like to use the dyed hemp twine, but you can also use thin ribbon or cord). And of course if you have jewelry making supplies you can use headpins to attach extra beads or charms if you like.

When choosing beads, I like to put three beads on each end, depending on the size of the beads, because I like a simpler look. But if you want more – add more! For these bookmarks I wanted to keep them very classic, so I just chose two different beads and pulled out three of each, so that my finished bookmarks will have an alternating pattern on each end. In this case I chose pink for one and teal for the other.

Next you want to pick your twine (or ribbon or cord) and cut it to about 24” this will give you plenty of room for knotting, etc.

Then choose your charm. I always choose the charm and the beads together and lay them out on the table until I get the look I want. In this case I’m using awareness ribbon charms for these. Tie your charm onto one end of the twine, leaving enough extra twine at the end to weave through the first bead. I usually just do a double knot here. (Sorry this photo is so blurry. And of course I only took one of this step. Oh well.)

Add half of your beads, in whatever order you like, over the charm. And as I said you’ll want to weave the extra end of the twine through the first bead and then snip off the excess – I think it gives it a cleaner look. Then knot the twine close over the last bead, again a double knot is all you need.

Measure about 12” up from the top knot and make another double knot.

Add the remainder of the beads. Then finish it off with a final double knot and snip the excess twine.

And that’s it. Easy peasy, right? And pretty cute too, I think.


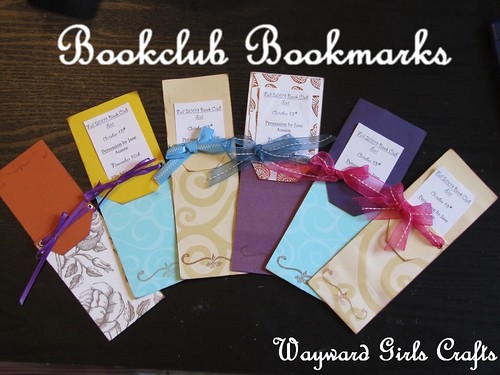
By the way if you haven’t read Garden Spells by Sarah Addison Allen yet – I highly recommend. Anyway here are a few other bookmarks I’ve made recently to give you more ideas of things you can do.

Well thanks for letting me visit you here at Wayward Girls Crafts with my rambling instructions and blurry photos. Hope to see you soon!
Thanks so much Heather for the great tutorial! We LOVE ideas for homemade things for Christmas!