Showing posts with label buttons. Show all posts

Vintage Button Bracelet

The reason I decided to dabble again in jewelry making was a vintage button bracelet. I saw this example and wanted to try for myself as Christmas present for my mother-in-law. But where was I going to find vintage buttons? I started showing my friends pictures of this bracelet and letting them know I was on the hunt for vintage buttons. My friend stumbled upon the motherload of buttons and I got started. The bracelet wasn't done in time for Christmas, but I got it done by the time for my mother-in-law's birthday.

I started with a plain bracelet, pre made and purchased at Joann.

Photobucket

 Then I laid out the buttons the way I liked. Using jump rings I attached the buttons

Photobucket

 After the first round, I added a bunch more buttons to make it look fuller.

Photobucket

My mother in law loved it! What do you think?

Headboard Redo

In case you missed it, last week I recovered buttons. I didn't just do that for fun. I redid my headboard for my bed and added the buttons to it. My mom found this fabric shop that sells fabric for around $7 a yard in wide bolts. We went all over the store looking for a color that would match. Initially I didn't want a patterned fabric but when I saw this fabric I loved it. We got 4 yards which was a whole lot more than we needed but better safe than sorry.

First, start out by adding batting to the front of the board. Since we recovered the headboard we didn't need to add a thick layer. I wanted it a little bit thicker so that's why we added more batting. 
Roll the fabric over the batting. You can do this by laying the fabric down first then laying the board over it or roll the fabric on the top, tack it down with pins and flip it over. Be careful if you tack it down with pins, they might stick through to the back. My mom and I worked opposite of each other to keep the fabric taut.
If the fabric is too long it might be hard to fold the corners. I aimed the pins to go parallel with the edge of the board. The pins should stay if they aren't aimed so the fabric can easily come out. At the corners, keep folding the fabric until there are no more wrinkles.

Now to add the buttons. On the back of the board, mark where you would like to place the buttons. Measure how tall the bed is and where the pillows hit so you don't place the buttons where they can't be seen. Space the buttons evenly on the same level. Attach the buttons with string through the back. We tied a toothpick on the string on the back of the headboard so the string doesn't come out.You can also hot glue the string or toothpick down.

And now you have a quick, easy, and inexpensive headboard. Plus, it looks pretty good! We'll use the extra fabric for the curtains.


Recovering Buttons

Project redo my room is still a work in progress. My mom and I made buttons to add to the headboard we are also redoing. It has been quite a busy week after Christmas so far! Because the half-ball cover buttons were expensive, we just bought shank buttons the size we wanted and fabric that matched the new paint job.


To cover the buttons, cut a circle of fabric about 1/2-1 inch larger than the diameter of the button. Next, sew a running stitch around the edge at about 1/4". Don't back stitch and leave the end of the threads long enough to pull.


Now, pull the threads tight encasing the button. If there are wrinkles in the fabric pull it tighter or hand stitch it some. Tie the ends all together. Make sure it's all tight. Since you really don't need that much fabric (depending on how many buttons your probably only need 1/8 of a yard or a scrap if you have one) and the buttons could be ugly and cheap, it's an inexpensive and quick way to make matching buttons!


Flat Buttons

Buttons can be a little tricky and I know you all wanted me to show off my Paint skills again. Two hole flat buttons (buttons without a shank) are fairly easy to sew but you have to give it some room because there isn't a shank or the space under the button to sew. To make room for a fake shank (no I didn't rhyme that much on purpose) all you need is a toothpick. Take your button and place a toothpick between the two holes. You will want to double your thread by tying both ends in a knot just to save time and add strength. Start to sew from the back of the garment. Sew through the holes 3 or 4 times. Once you have sewn that, remove the toothpick. Now come from the back of the fabric and go through to the front but do not go through the button hole again. With your thread, wrap around the backside of the button 3 or 4 times. This is the make shift shank. This allows you to have room for the fabric to go under the button once you buttoned the garment. Now sew to the back and tie the thread off. Your knots will all be in the back. And ta da now you have sewn a flat button!


Shirt Redo- Buttons and Resizing

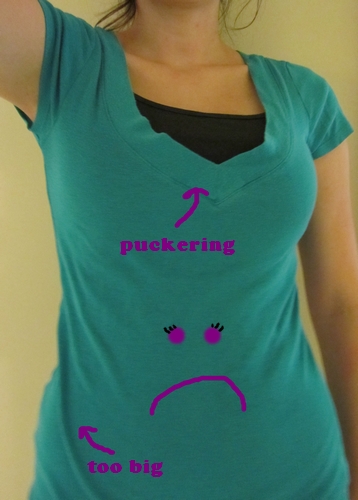
I have this shirt. We had a love/hate relationship. It was a tad bit too big but it was so versatile at the same time. The v-neck was a little too wide an pooched out. I saw this tutorial (obviously I'm inspired by the things I see on the internet since my crafts recently have all sparked from ideas on the web-yes I love pinterest) and thought I could apply it to my sad shirt. See here it is being sad:

shirtredo 002


So here is my tutorial for resizing and adding buttons:


What you will need:
Buttons
Shirt you want to redo
Scrap of fabric (not pictured) (1.5" x length of the shirt)
General Sewing Supplies


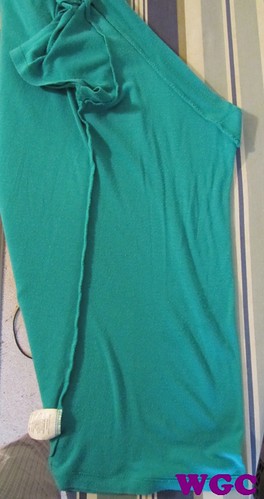
Step 1: Turn shirt inside out and find the center of the front. My shirt was a v-neck so I just folded it in half at that line. Cut the shirt length wise.

shirtredo 006

Step 2: Line the scrap of fabric up on the backside of the left edge and fold 1.5". Overlap the right side and pin in place.

Step 3: Sew the edge of the left piece the length of the shirt. I also sewed the far side. (See last picture)

Step 4: Sew on buttons. I arranged my assorted buttons, measured the length of the shirt, and divided the length by the number of buttons. My buttons were 1 1/8" apart. I sewed on the first button and measured from the middle of that button 1 1/8" and marked with a fabric pencil. Well, I tried but the pencil wouldn't work so I just tried to juggle the tape measure in one hand while I started the needle in the right spot.

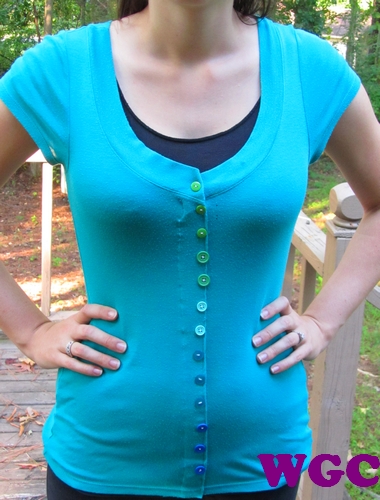
Step 5: Have a now happy shirt!

shirtredo 012

Got any good tshirt redos?

Handmade Sculpey Buttons

Hello and welcome to Wayward Girls' Crafts! I'm so excited you are here. Here's a little bit about myself:

I began scrapbooking in 2006 with a mini album for my husband. Now I have scrapped over 200 layouts. My work is defined with hand-cut embellishments, bright colors, and witty titles. I've found so much inspiration from crafting blogs and want to put it to work! I'm interested in thrifting, decorating, cooking solutions, photography, and papercrafting.


Now on to my craft:

Who didn't love to play with Play-Doh as a kid? All the Wayward Girls certainly did:


Me and Brooke, circa 1991


And I'll let you in on a little secret, I love to play with Play-Doh with my nephew now!

I equate Sculpey to an adult's version of Play-Doh. It was so fun to mess around with for an hour. I decided a few years ago I wanted to make my own buttons and bought some Sculpey for the project. I brought it with me across the country and finally, 2.5 years later, I made some buttons:


For my first time making buttons, I think they turned out great! They may have been a little overcooked so next time I will check them more often. I experimented with a bunch of different household items to cut the circles for the buttons, including a tablespoon measuring spoon, the lid to my facial soap, and the my toothpaste lid. (I ran all of that stuff through the dishwasher and then put it back on) I'd recommend putting paper (not newspaper) on your work area otherwise you'll end up with a colored table, and I'm not sure how easy that is to clean up. Also, try mixing the colors together. I loved the effect I got.

Here's how they look in action:

Isn't my nephew cute?

So now you have some buttons, now what? You can use them on home decor items, scrapbook pages and other papercrafts, accessories and clothing. Go crazy!

This giveaway has ended. The winner is announced here.
Do you want some of your own buttons without actually having to make them? You can win them! You can enter for this giveaway too! It is separate from yesterday's so if you became a follower yesterday, you can enter for that today (or anything else on the list).

You get:
  • One entry for commenting on this blog post.
  • One entry for becoming a follower of our blog, and commenting on this blog post to tell me about it.
  • One entry for following us on Twitter, and commenting on this blog post to tell me about it. (even if you started following us yesterday, you can comment today for an entry)
  • One entry for Liking us on Facebook, and commenting on this blog post to tell me about it. (Even if you liked us yesterday, you can comment today for an entry)
  • One entry for blogging about our new blog, and commenting on this blog post to tell me about it (with a link to your post!).
  • One entry for asking us a question about ourselves, new blog, crazy dreams, whatever.
Keep checking back to meet the rest of my sisters and my mom, to see what else we're giving away, and to see if you're a winner! The sculpey button winner will be announced next Tuesday!

Also, we're linking up to Tip Me Tuesday:
Tip Junkie handmade projects
Related Posts Plugin for WordPress, Blogger...