Showing posts with label home. Show all posts

Dollar Store Craft: custom geometric vases

A few months ago, I found some great glass vases at the Dollar Store. I filled them with free seasonal decor. When we moved, I had to find a new place for my vases, and the best place was in the living room. But I needed five more vases.

Rather than filling them all again, I decided I wanted to paint them to match our new living room decor. I picked up some acrylic paint and masking tape ($2 and $1, respectively) and sat down to make some awesome designs with the tape. 

I turned this into a kids' craft, too, because I laid out the newspaper and let my kids loose with the foam brushes!


Some tips on getting this right:
  • Use (at least) two coats of paint, and allow the paint to dry fully between coats.
  • Apply the second coat carefully and quickly, and lay it on thick. Try not to paint an area more than once. If you don't, the paint will ripple and pull off!
  • You can use the acrylic enamel made for glass--it'll be dishwasher safe and it might work better, but I don't know how well it works with masking tape.
  • Be careful when pulling off the tape! The acrylic doesn't want to adhere, especially at the point of diamonds or triangles. If I did it over again, I wouldn't do those shapes. A razor blade can be helpful in holding down the paint while you pull off the tape. (Or you can do what I did and use your fingernails. Wayward!).


I still have three plain vases. What should I do? I was going to leave them blank, but my husband thinks they look . . . well, blank. My two ideas would be to borrow a page from Jaime's book and do a glitter vase, or to fill them with something cool. Glass beads? Autumn leaves? Colored water? (Ha--asking for trouble with four kids 8 & under!)

What do you think??

How Do You Save Money?

We've talked a lot about how to save money on groceries but I want to hear some feed back from our readers!

Here are some of the sources I look to for saving money:

Blogs:
Totally Target- I think I may be slightly addicted to Target
My Litter- she has general information about saving around the web. Sometimes it's a bit too much info though. I really like her coupon database
Southern Savers- this has a lot of deals on it but not as much extra stuff as MyLitter
Baby Cheapskate- I love that they frequently post the current deals for diapers (even cloth!), wipes, kids clothes, etc

Websites:
The Grocery Game: I subscribe to two stores (Kroger and Harris Teeter) so it is $15 every 6 weeks. I love that the price has never gone up and they have a super convenient format and it is easy to use.
Target.com- for Target store coupons

Apps:
Target Cartwheel- Can you tell I really like Target? Seriously though, we get their diapers and frequently I will have a coupon and a cartwheel. So even though their diapers begin being cheaper than name brand diapers, they get even cheaper with coupons! At Target you can you one Manufacturer's, one Target, and one Cartwheel coupon per item. That is three coupons on one item. I just love it! To use the Cartwheel app (or you can use it on the computer) you load deals on your cartwheel and at checkout the cashier scans one barcode, either on your phone or from a printout.
Ibotta: I've never used this one but I've heard good things about it - Have any of you used it?
Checkout 51: Again I've never used this one. I just read a post on Southern Savers about is. What do y'all think?

Stores:
Kroger: So I used to do 90% of my grocery shopping at Kroger but they changed their customer loyalty program and took away their doubling coupons all within 5 months. They said they were replacing them with lower prices. Not only have I found their prices have increased but also the deals obviously aren't as numerous. I have cut back my shopping at Kroger to about 30%
Aldi: I have to drive almost 20 minutes to Aldi but I make the trek once a month to get their great deals. They are building one less than 10 minutes away though :)
Harris Teeter: I love their double coupon policy (under a dollar doubles). Super doubles and triples are awesome as well!

We would love to hear from you! Please fill out our survey!


Create your free online surveys with SurveyMonkey , the world's leading questionnaire tool.

>

Adding Privacy to Front Door Sidelights

Note: Please forgive the horrible pictures in this post it is really hard to take a picture of windows. 

Our front door has sidelights on the two sides and across the top. This adds a lot of light but also leaves a lot of windows for little neighborhood children eyes to peek in. Can you see them now with their hands cupped around the sides of their eyes peeking in the windows?
Ahhh! I spelled SiDelights wrong! Sorry you'll have to forgive me!
I saw this pin and thought it was a great solution. She gets her tutorial from this post. (original tutorial)
Both posts are great! Here are some additional tips that I found while I was doing this tutorial:
  • After cutting out the shapes they will curl up. I put mine inside of a big book to help flatten them.
  • Use small scissors.
  • These shapes are a tessellation. They will fit together as you cut. The pattern found in the original tutorial is not quite perfect. To get your shapes to fit together a little better, before you start, make sure the top and bottom are the same. I wish I had done this.
  • It's not going to be perfect. If you look close at any of the pictures you can tell the area in between is not uniform. You and I are the only ones that will look that close.
  • When peeling the backing off the paper bend the shape curved with the paper on the inside of the curve (see picture) to help from creasing the contact paper while peeling. 
  • Enlist some help because seriously cutting 76 of these bad boys was time consuming! 
  • I cut a strip of paper 1/2" wide to help with spacing after a while I just eyeballed it. 


I kept mine the original size of the pattern unlike one of the tutorials. 

What do you think? 

Pintesting: alcohol for a microfiber couch

Right before we found out I was pregnant with my first baby, we bought a house. To furnish said house, we bought a microfiber couch and loveseat.

In off-white.

Yeeeeah.

Allegedly the couches were treated with some sort of protectant that meant you could only use water on the seats. But using water to clean your cushions leads to watermarks, which look even worse than the stains themselves:


The spot-cleaning with water solution is pretty much worse than the problem here.

Naturally, even though I'm not much of a deep cleaner, I had to repin this cleaning idea.


The basic idea: use rubbing alcohol instead of water.


Alcohol dries faster than water (the technical term for this chemical property is "volatility." Now you know), so the alcohol won't leave those big watermarks. Once it's dry, you take a scrub brush to the fabric to lift the fibers again.

Results!


A lot better, but obviously not perfect. I might have been able to get better results with more alcohol and more scrubbing, but it's very hard to tell how much scrubbing you still need to do when the entire cushion is wet! And if you're getting the entire cushion wet . . . hm.

Verdict:

My other solution to this problem was to liberally wet the entire couch top of the cushion: no edges, no watermarks, right?

Frankly, my solution was a bit easier. Both methods require considerable elbow grease, but my hands got tired from working the sprayer (a very wet rag is sufficient to clean the couches with water). Plus alcohol fumes are NOT fun. Alcohol does dry a lot faster (the above pictures were taken about an hour after the before shots, and the couch was dry enough that we put the cushions back on).

Also, neither method is effective on stains like pen, candy or permanent marker, and neither really helped with the very dirty arms of the couch.

And of course, a year later, the couch is just as bad—worse in places where my youngest has decided to express her artistic side. :\

Pintesting success:

I don't want to be all bad news. I tried this pin this weekend, and as you'd probably expect, the results were perfect:
Source: Laura on Pinterest

Line a bowl with foil before draining meat for easy cleanup! My husband thought this was so clever, he had to tell me twice!

Wayward Tiling

Life is crazy at our house! As a part of getting ready for the wedding and Christmas, we decided to tile our kitchen floor. The husband laid the underflooring on Friday and then was too sore to tile on Saturday. So guess who got to do it? That's right, me.
It wasn't so hard, but it was very messy. It took a long time, and at the end I could hardly stand. The last box of tile was all broken so we couldn't even finish the room. We wrapped up our work at around 11:30 Saturday night, and then the three of us sat in the family room and ate cake!
It is now 1 week later, and we are still not done. Jasmine and I are about to grout because Ben has to work late.
The floor looks ok-- but some of my joints aren't straight. (The joints in the floor, not in my body.) Now I am looking at tiling everywhere I go to see if anyone else has wayward tiles like we do. Hopefully we will get finished tonight so we can move our major appliances out of the living room and dining room.

More kitchen makeovers!

So my husband went out of town for a couple days last week with our church youth group, and I took advantage of that time to add something else to our recent kitchen ceiling makeover: new cabinets!


I used Rustoleum Cabinet Transformations, and I was really excited by the initial results. I loved that the grain is supposed to show through with oak cabinets.

But now that I see them up close, I'm not quite as thrilled.


Yeeeah, I wasn't so much going for the "antiquey" look as my cousin generously described it.

Did I mention my husband was out of town? And I have three kids 6 and under? Yeeeah. I'm insane.


My kids spent a bunch of time in front of the TV while I was working on these (don't worry, we also hit the splash pad, the dentist and the store, so they weren't totally neglected). I really did work around the clock: the first night I was up until 3 AM, the second night I was up until 2, then woke up before 6 to put the final coat of protective cover on.


I got two doors up before DH got home, but was too discouraged & exhausted to finish at that point. When he got home, he helped tighten the hinge screws and hang the other 15 doors. It was a lot easier with his help!

I also bought new handles, which w love (but then found cheaper at Home Depot. CURSES), and spray painted the old hinges (probably should have just sprung for new ones).


The approximate numbers:
Cabinet kit: $75
Miscellaneous supplies (drop cloth, brushes, spray paint, etc): $35
New hardware: $100 (for all 50 cabinets)
Time from start to finish: ~48 hrs

I'll try another coat of the "bond coat" for touch up, but right now I kind of feel like this:


My tips? Paint in a VERY well lit area and paint THOROUGHLY.

It's a miracle! I have a ceiling!

Oh, my kitchen. I love it and I hate it. We've got tons of storage, lots of counter space and an oven I love, but pretty much everything in there looks like it was last updated in 1987 (because it was).

This probably doesn't look like much to you, but to me, it's pretty much a miracle.


Here's what it looked like when we moved in (picture taken facing the other direction) :

The ceiling became the most urgent issue over a year ago. It was a (yucky) drop ceiling with "cracked ice" light covers. The fluorescent bulbs began to flicker. After replacing several of them, we realized the fixtures themselves were failing.

It only took EVERY SINGLE LIGHT FAILING and then another month or two of working in the dark to finally tear out the drop ceiling and old fixtures and get our recessed lighting installed. (DH did a great job!)

Picture taken from yet another angle.
When you're really unhappy with your kitchen, you avoid photographing it!
But our redo was just starting. The textured plaster underneath the light fixtures was filthy, cracking and peeling off in places, and riddled with holes. Taking out the drop ceiling revealed unfinished walls on every side of the kitchen, including faux sheetrock walls forming the doorways into two other rooms.

Can you say overwhelmed?

It took us almost a year to make progress from there—it took my dad.

Dad (the Original Wayward) has done pretty much every home improvement ever. When he and Mom came to visit this month, we put them both to work.


It took pretty much their entire visit (with time off for fun, of course), but Dad and DH got the ceiling completely finished and redid the walls. All we've had to do this week is final patching, sanding and painting!


Miracle!

Not to be outdone, Mom reorganized both of my kids' rooms and closets, as well as my living and dining room.


My girls love their closet! Before not only could you not see the floor in there, but it was overflowing with a mix of too-big and too-small clothes. Now all the too-small clothes are sorted and out of the way, and the clothes they're growing into are boxed by size and waiting!

The living room just looks clean now, but the space between the couch and the end table had become a collection point for things without homes: a case of flour, a box of dried fruit, all our tote bags, etc., etc.

THANK YOU, MOM & DAD!

How NOT to Paint Your Front Door Black

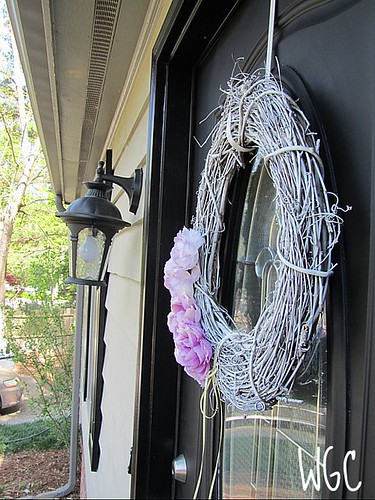
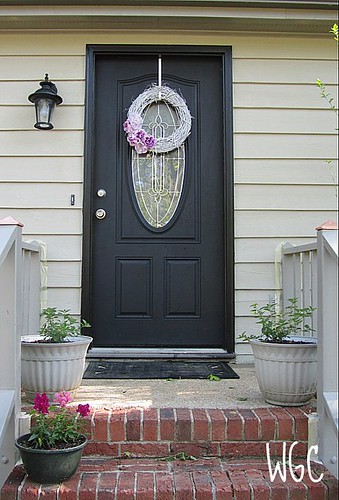
This was so wayward that I wished that I could just throw it away but I couldn't because it was my front door. It took me three long days to finish and I was so grateful to be done! Here is what not to do:

IMG_2320
Day1: I painted two coats of  regular latex paint on the door. It is black paint. It got hot in the sun. We live in the humid south. It never cured.

Day 2: I could scrap the paint off with my finger. So I got my husband to take it back off the hinges and I tried to strip the paint off. I ran out of paint stripper and motivation but I had no front door on my house. My husband had left for work. I called my sister-in-law who comes to my rescue with left over primer. She can't stay long because it's her ANNIVERSARY which I had totally spaced. We open the primer and it is dried up with no saving it. I go to the store to buy spray paint. She took her kids and PB and went to her house while I spray painted my door with this but had not scraped all the latex off.

Day 3: Unhappy with unevenness of the gloss and you could see the old latex. Scraped all the latex off, sanded with steel wool and painted it with this and FINALLY I was happy.  I did about 7 coats and did it in the shade. My wrist ached for days because of all the scraping, sanding, and painting.

IMG_2317

The before can be seen in this post. It was just plain white from the factory. Now I can't believe I let it go naked for so long!
IMG_2321

Wreath tutorial to come next week!

Under Construction

I'm sorry. You will have to excuse me for today. My life is under construction. We decided on Monday to tear apart our master bathroom and of course with that goes our whole lives.We are redoing the walls and the floors. I attempted a craft midst the mess and it went horrible. Instead I will give you a sneak preview as to what is coming up in our house. We are trying to do the whole bathroom for less than $200. Yes, we're crazy. Here are some pictures. Stay tuned for the update.

Before we moved in


 After putting in double sinks, linoleum flooring, new toilet and paint.

kinda blah
We've ripped out the walls that had tile on them and started to tile the floor. Wainscoting will go up on the walls.

Got any big projects going on?
Don't forget to enter the giveaway!

$2 Flower Wreath

I share this tutorial on Maggie's blog, Chica Es Artistica , last week. 

I've never really made a wreath before. I've seen lots of people share them on blogs and Pinterest  so I thought I'd give it a go myself. I give you, the $2 Flower Wreath!


Materials:


Floral wreath from the Dollar Tree
White acrylic paint
Paint Brush
Glue gun
Cardstock (I used Core'dinations Glitter Silk, Opulent Opal)
I thought about adding a pink flower I'd already made, but I decided to leave it off 

Let's get started!


First paint that green wreath! Paint it whatever color of cardstock you're using. Make sure to paint both sides. Give the first side time to dry before you flip it over. It doesn't have to be perfect but it will show through, so it needs to be fully covered. 

Next punch out a BUNCH of hydrangeas. I used one and half full pages of cardstock to cover my wreath. Give the flowers a little shape by slightly folding up the petals as seen below: 


Use your glue gun to adhere the flowers all over. Try not to burn your fingers too badly.


And you're done. A cute wreath for just $2!  I got the idea from the pomander flower spheres we made for Brooke's shower.

What crafts have you made that have inspired other crafts?  

100 Rosette Sphere

I'm SO excited to have so many followers!! I'm glad you are here and that we get to share our Wayward Craftiness with you.


To celebrate 100 + followers, I made this Rosette Sphere. I had seen examples here and here and decided to give it a whirl myself. I didn't have a Styrofoam sphere handy so I used what I had: a small toy basketball. I originally bought it to give to a friend's little boy...but decided not to since they were moving out of the country. Anyways, first I painted the ball white with acrylic paint.


Next I made 100 (or thereabouts) rosettes. See the above links for tips. Mine ended up really small so I had to do a LOT of them. I'd recommend making them bigger.


About halfway done.
Completed. It only took 4 hours and burns on all of my finger tips. I put it on an up-side-down candlestick holder which keeps it stable and cute. This sphere has made its home on my mantle, but it's great for party decor too.


DON'T FORGET to enter Jordan's giveaway. Comment on her entry below!
Related Posts Plugin for WordPress, Blogger...