Showing posts with label pies. Show all posts

Give the gift of pie!

Last year, my husband’s coworker gave out quart jars of homemade apple pie filling as her Christmas gift. I think that’s a fantastic idea. A one quart jar will fill an 8″ or 9″ pie for a fast, homemade dessert—but the possibilities go way beyond that. My favorite use was as a topping for pancakes. Just heat in a pan until thick, hot and bubbly and voila! Give the gift of pie!

It only takes one county extension class to have the importance of using a tested recipe in home canning. Seriously. They’re tested to make sure that the food quality is as good as it can be while still reaching the temperature to kill of the botulism that may be lurking in the middle of your jars. Botulism, in case you can’t tell, does NOT make a good neighbor gift.

Fortunately, other cooks, like the awesome people behind Our Best Bites, understand the importance of tested recipes. She used a recipe from the National Center for Home Food Preservation. And here it is:
Quantities of Ingredients Needed For
1 Quart7 Quarts
Blanched, sliced fresh apples3-1/2 cups6 quarts
Granulated sugar3/4 cup + 2 tbsp5-1/2 cups
Clear Jel®*1/4 cup1-1/2 cup
Cinnamon1/2 tsp1 tbsp
Cold Water1/2 cup2-1/2 cups
Apple juice3/4 cup5 cups
Bottled lemon juice2 tbsp3/4 cup
Nutmeg (optional)1/8 tsp1 tsp
Yellow food coloring (optional)1 drop7 drops

A note about ClearJel: it’s a modified cornstarch that stands up to heat, freezing and/or acid from fruit, unlike plain old cornstarch or other thickeners. The NCHFP says (emphasis mine):
Before assembling the other ingredients, including fresh fruits, to make the pie fillings in Extension canning recommendations, check to see if you will be able to get ClearJel®. There is no substitution for ClearJel® that can be made in these recipes. This means do not use other corn starch, flour, tapioca, or other thickener in our recipes. You also must use ClearJel® and not Instant ClearJel®, ClearJel A®, any other form of ClearJel®, or any other modified corn starch.

However, Sara at Our Best Bites contacted her local extension office and they said that Ultra Gel is the same product and it’s a bit easier to find than ClearJel. (But still—call ahead.)

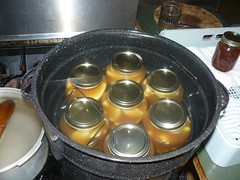
And as with any home canning, double check the steps, especially the processing time for your altitude. If you don’t have a lovely water bath canner like the one above (and I don’t either), I’ve canned a few things without expensive equipment. I have to use pint jars and at least one site I looked at said to leave the processing time the same. Of course, this might affect the food quality, but I do believe in being safe rather than sorry.

Once your pie filling is done, tie it up with a bow and give the gift of pie!

What do you like to give your friends and neighbors?
Photos by Kurt and Sybilla

Batching to perfect your pie recipes

With summer coming up, it's time to perfect that peach, apple or other favorite pie recipe. But how can you possibly try out all the variations you want to—and most importantly, get rid of all of those pies without gaining too much weight?

The answer is two-fold: mini-pies and batching. We’ve already talked about adapting a pie recipe to a miniature pie pan. You can go as small as muffin tins for your mini pies. I’m told a 9″ pie recipe will fill 12 regular muffin cups (but I think the sample size might be a bit too small to tell what tastes best to you). I used my 5″ mini pie plates to batch the chess, buttermilk chesstransparent and vinegar pies.

In this case, batching your pies means starting with a set base of the individual recipes’ common ingredients—such as your basic apple mixture—dividing that base into several dishes and mixing in the different ingredients.

I went about it an analytic way: I set up a spreadsheet and listed the ingredients and amounts for the four recipes I wanted to try out. Then I highlighted the ingredient amounts that were the same or nearly so. I took that amount and multiplied it by 3/4 to get the amount for four 5″ mini pies. That became my base (highlighted in yellow below).


After that, I added the extra columns between the recipes to multiply the non-common ingredients by 3/16, the adjustment for one individual pan.

In this case, the base was 1 cup + 2 Tbsp sugar, 2.25 eggs (or 2 eggs + 1 Tbsp beaten egg), and 3/4 tsp vanilla. Since eggs are roughly 1/4 cup in volume, I figured the total volume of my base was 1 1/2 cup + 3 Tbsp = 27 Tbsp. Dividing that up for four pies yields a little less than 7 Tbsp (8 Tbsp = 1/2 c).

Since this base isn’t complete, we don’t want to pour the plain base right into our prebaked pie crust! No, first we pour the individual mini pie amount of base into a bowl. Then for each pie we mix in the non-common ingredients. Then pour the pie into the crust and bake.

As you’re mixing, pouring, baking and tasting, it’s vital to keep your pies straight. For me, a dry erase marker was invaluable. I used my cooktop as an operations base and labeled each burner with a letter for the pie as I was mixing. Then I labeled the oven door and put the pies in the oven matching their labels. When they were done, they went back on their still-labeled burners.

I even photographed the pies with the letters visible so I could identify them later: I took a picture of the pie on the burner with the letter in the background, then sliced the pie (photo), took out a piece (photo) and sampled it (photo). If you’re good, you’ll take notes (I learned this eventually). And soon you’ll be able to narrow down your favorites and taste them head to head.

Batching pies is a little bit of work—and sometimes more than a little bit of math!—but to find the perfect pie, it’s a step you won’t want to skip!

Don’t forget to check out my mini-pie article for more tips!

Have you ever used batching to perfect a recipe?

Vinegar Pie vs. Transparent Pie: smackdown!

As I hunted for a chess pie recipe to try, I found some interesting distinctions. Some believed vinegar was a key ingredient in chess pie, but others opined that vinegar automatically made a pie a vinegar pie. I can say that adding vinegar made a pie pretty delicious . . . okay, I don’t think the vinegar made that big a difference, but it was a little bit tastier that way.

Another pie I came across during my recipe hunt was a similar pie called transparent pie. The Kentucky area claims it, so you can sometimes find transparent pie and chess pie at the same event. The biggest difference is that transparent pie is thickened with flour rather than cornmeal. It’s also purported to be a short step away from a nut-less pecan pie—but no corn syrup here.

Like chess pie, both transparent pie and vinegar pie are basic egg-based sweet custard pies. When I made my chess pie and buttermilk pie, I also made this week’s transparent and vinegar pies. In fact, I batched them—and more about how to do that next week. For the pictures in this post, the pictures on the left-hand side are vinegar pies, and the ones on the right are transparent.

Vinegar Pie vs. Transparent Pie: Smackdown!

I found my transparent pie recipe on Boonie Foodie, and my “vinegar” pie recipe is Martha Stewart’s chess pie recipe. I modified both slightly: I lowered the amounts of egg and sugar in the transparent pie to match the other pies for better comparison, taking it from the equivalent of four eggs and two cups of sugar to three eggs and one and a half cups of sugar. I tripled the vinegar in the vinegar pie—but don’t worry, the flavor didn’t carry through to the final version.

Both pies (modified) use the same amount of sugar, eggs, vanilla and butter. The transparent pie also added the flour thickener and cream. Since the vinegar pie features neither corn meal or flour, this pie is thickened solely by eggs.

As with the chess and buttermilk pies, the top of these pies had a delicious sugar crunch like a very thin meringue, and the centers are simply sweet without tasting exactly like sugar. Obviously, without the corn meal, neither of these pies were at all gritty, but surprisingly, I didn’t find them noticeably smoother than the corn meal-based pies.

Personally, of these two, I preferred the vinegar pie. It had a beautiful golden color and the butter and sugar combined for a wonderful caramel flavor. The transparent pie was also good, in a straight-up sweet way.

The winner overall, from all four pies, was the buttermilk chess pie. The notes of buttercream in its filling just edged out the caramel flavors in the vinegar pie. But really, all of these are good pies!

Scores:
Vinegar Pie, Martha Stewart
Transparent Pie, Boonie Foodie
Taste:3.5 stars3 stars
Texture:3 stars2.5 stars
Easy to make:4 stars4 stars
Durability:5 stars—the crunchy meringue-like upper crust actually held up on the counter, instead of getting soft like a meringue does5 stars—same
Wow factor:2.75 stars2.5 stars

Recipes
These recipes have been adapted for 5″ pie pans.

Vinegar Pie
adapted from the Martha Stewart
  • 1/4 cup plus 1.5 tsp granulated white sugar
  • 2 1/4 Tbsp liquid egg product or beaten eggs (just over half an egg)
  • 1 tsp apple cider vinegar
  • 1/8 tsp vanilla (if you have a “pinch” measuring spoon, it’s actually 3 pinches)
  • 1 1/2 Tbsp melted butter
  • 1 unbaked 5″ pie crust
Transparent Pie
adapted from Boonie Foodie
  • 1/4 cup plus 1.5 tsp granulated white sugar
  • 2 1/4 Tbsp liquid egg product or beaten eggs (just over half an egg)
  • 1/8 tsp vanilla (if you have a “pinch” measuring spoon, it’s actually 3 pinches)
  • 1 1/2 Tbsp melted butter
  • 1 tsp flour
  • 2 1/2 Tbsp cream
  • 1 unbaked 5″ pie crust
Directions for both pies
Preheat oven to 350 F. Combine dry ingredients and wet ingredients in separate bowls, then add wet to dry. Pour into pie crust. Although most recipes will tell you to lower the temperature at about 20% of the total baking time, I left my oven on 350 and baked them for about 25 minutes. (The vinegar pie did take slightly longer.) Check your pies often—I considered them done once the top crust was fully set, and might crack but wouldn’t collapse if I tapped it.

What's your favorite kind of pie?

Chess vs. buttermilk pie: the smackdown

Last year, I went on a quest to make unusual pies, and this is where I began. When Sky Magazine asked Martha Stewart what the most underrated pie was, she said, “Chess pie.”

Apparently chess pie is a Southern classic. I was born and raised in the South and not only had I never eaten it, I’m not even sure I’d ever heard of it. I knew this had to be remedied, and I had to find the perfect chess pie.

So what’s with the name? It conjures images of board games of strategy or Alice in Wonderland (especially in chess tart versions). But really, no one knows exactly how it got the name. Equally specious theories include that originated in Chester, England, or that a Southern woman (who apparently had developed a Southern accent before the US was even its own country) told her husband she was serving “jes’ pie.” (Should I spell that “pah”?) Possibly the most likely is that because the pie kept well in a pie chest, it was originally “chest pie,” and the t and the p elided.

There are probably hundreds of variations on chess pie, the most basic sweet custard pie you’ll find. All recipes use an egg-based custard, sweetened with sugar. Corn meal is often used as a thickener. Some people say that’s what makes a chess pie a chess pie, but not all the recipes I found used it. Some recipes even include a little vinegar to cut the sweetness with a little acid, but many believe that including vinegar moves the pie into a whole ‘nother category: Vinegar Pie (next time, pie fans!). The Merry Gourmet’s chess pie recipe includes some vinegar, but I omitted it so I could compare the pies with and without it.


I picked four recipes to make in my new mini pie pans. This week, we’ll cover a chess pie recipe from the Merry Gourmet, and a buttermilk (chess) pie recipe from About.com. (The parentheses are because they call it buttermilk chess, but I just call it buttermilk for short, though a true buttermilk pie is slightly different.) For the pictures in this post, the pictures on the left-hand side are chess pies, and the ones on the right are buttermilk.


Chess Pie vs. Buttermilk (Chess) Pie: Smackdown!

Both of these recipes use egg, sugar, and cornmeal (as a thickener). This particular buttermilk pie actually calls for double the vanilla of the chess pie, but I made them the same. The chess pie uses a little milk, while the buttermilk, naturally, uses buttermilk. The buttermilk pie also calls for a little butter and a small amount of salt.

I was almost afraid to try these cornmeal confections. I have a texture hangup with hard bits in something that’s supposed to be smooth and soft (ice cream, yogurt). What if the cornmeal didn’t get any softer? Would I be able to choke them down?

Results
The top of both pies has a delicious sugar crunch like a very thin meringue, and the center is simply sweet without tasting exactly like sugar. Surprisingly, the pies didn’t seem gritty between the crunch of the sugar crust and the regular pie crust (though after swallowing, I did find a few bits of lingering meal). The best part is the little bit along the edge of the pie—combined with the side of the crust, the custard takes on a chewiness that’s an awesome surprise. After discovering this, I made my husband sample a piece of the edge, and he agreed.

Personally, I preferred the buttermilk (chess) pie, even though it turned out . . . less than beautiful, comparatively speaking. The texture was a little more substantial, slightly chewier (in a good way), and the flavor had a fantastic hint of the butter included. I should note that the Merry Gourmet’s recipe, from her grandmother, actually called for three times the butter used in the buttermilk version, but she forgot it and said the pie tasted perfect without it, so I omitted it as well. I made two other pie varieties at the same time as these which did use the full amount of butter, and I still preferred the butter taste in the buttermilk version.


Scores:
Chess Pie, Merry GourmetButtermilk (Chess) Pie, About.com
Taste:3 stars3.5 stars
Texture:2.5 stars4 stars
Easy to make:4 stars4 stars
Durability:5 stars, For both, the crunchy meringue-like upper crust actually held up on the counter, instead of getting soft like a meringue does5 stars
Wow factor:2 stars. It’s not underrated for nothing.3 stars.

Recipes
These recipes have been adapted for 5″ pie pans.

Chess Pie
adapted from the Merry Gourmet
  • 1/4 cup plus 1.5 tsp granulated white sugar
  • 1 tsp cornmeal
  • 2 1/4 Tbsp liquid egg product or beaten eggs (just over half an egg)
  • 3/4 Tbsp milk
  • 1/8 tsp vanilla (if you have a “pinch” measuring spoon, it’s actually 3 pinches)
  • 1 unbaked 5″ pie crust

Buttermilk Chess Pie
adapted from About.com
  • 1/4 cup plus 1.5 tsp granulated white sugar
  • 1 tsp cornmeal
  • 2 1/4 Tbsp liquid egg product or beaten eggs (just over half an egg)
  • 1 Tbsp buttermilk
  • 1/4 tsp vanilla
  • 1/2 Tbsp butter, melted
  • 1 unbaked 5″ pie crust

Directions for both pies
Preheat oven to 350 F. Combine dry ingredients and wet ingredients in separate bowls, then add wet to dry. Pour into pie crust. Although most recipes will tell you to lower the temperature at about 20% of the total baking time, I left my oven on 350 and baked them for about 25 minutes. Check your pies often—I considered them done once the top crust was fully set, and might crack but wouldn’t collapse if I tapped it.

Have you ever had chess pie? What did you like (or dislike) about it?

Pear Pie

Happy October! It's a great time to celebrate the harvest, and one of those harvest fruits today: I love pears! This week there was an article on pears in our newspaper with several recipes. When I saw Bartletts on sale at the grocery store, I grabbed enough to make the pie listed in the article, because I'd never had a pear pie before.


Unfortunately, the newspaper editor apparently thought the attribution for the recipe was a waste of space, so I don't know where this recipe comes from. Some important little steps are missing as well, so I'm adding corrections and extra information here to ensure your pear pie results are fantastic. My additions are in blue.

Pear Pie
  • Double-crust pie pastry
  • 5 cups firm, ripe Bartlett pears (about 6 or 7), peeled, cored and sliced 
Yeah, you'd think they'd include that information. Unless this is the intended result:


Note: Bartletts work all right, but the results would most likely be a little better with a firmer-fleshed variety like Bosc or d'Anjou/Anjou. Or at least you'd be able to find fruit that is both firm and ripe.
  • 4 Tbsp apricot preserves
  • 1/3 c granulated sugar
  • 1/3 c brown sugar
  • 1/4 tsp nutmeg
  • 1/4 tsp cardamom
  • 2 1/2 - 3 Tbsp quick-cooking tapioca (or tapioca flour)
  • 3 Tbsp butter

1. Preheat oven to 350 F. Line pie pan with bottom crust. You can layer the pear slices in the crust now, or combine them with the filling ingredients before pouring them in.

2. Melt apricot preserves in the microwave or on the stovetop. I just don't see this:
mixing with whole pears and sugar really well.

3. Add the sugars, spices and tapioca to the melted preserves and stir until combined. If you haven't already placed the pear pieces in the crust, mix them in with the filling and pour into the crust. Otherwise, pour the filling mixture over the pears in the crust. 


It's okay if it doesn't get everywhere right now. It will.

4. Dot the pears and filling with small bits of butter. Cover with the top crust, seal and cut steam vents. Bake for 40 - 50 or 60 minutes.


I had to look on the Internet to make sure the pears needed to be peeled before making this pie, and I came across a couple pear pie recipes that "taste just like apple pie!"


This pie does NOT taste like apple pie--and that's a good thing. It keeps the natural sweetness, flavor and texture of the pears. They become softer but don't break down so much that you can't pick them up with a fork. It's definitely a pear pie, and the filling complements the pears perfect.


What's your favorite way to eat pears?

My favorite way to eat pears is actually dried, like our grandma made them. I've tried drying some but I haven't been able to replicate her wonderful, chewy results yet.

How to freeze pies

We're coming up on Fall and the holidays. It's pie time!


Sorry, no advice on fitting them  inside!
For any holiday where pies are the traditional dessert, it can take a lot of prep time—time you probably want to spend making sure that turkey doesn’t turn the texture of sawdust. Freezing pies in advance is one way to cut down on the stress of Thanksgiving.


Not all pies can be frozen, of course. Cooked custard pies don’t freeze well. Fruit pies, however, like the perennial favorite apple, are great to freeze. So prep them now and you can simply pop them in the oven the day of: don’t thaw.

Here are a few tips and baking time adjustments to make sure your pies taste just as amazing as they would if you’d slaved all morning peeling, pitting and chopping.

Freezing unbaked pies
Some say that freezing an unbaked pie makes the crust soggy between the moisture of the freezer and the fruit. Others, however, report success with freezing unbaked pies.

Purdue University says you can freeze raw pumpkin pies: don’t bake the crust, pour in the cold custard filling, wrap well with plastic wrap and freeze. Make double sure it’s level in the freezer! When you’re ready, take off the plastic, pop it in the oven without thawing at 400°F for 10 minutes. Then reduce to 325°F to finish baking. Remember that even unfrozen pumpkin pies can take an hour to bake, so watch it carefully.

For fruit pies,
  • If you’re using a fruit that browns (like apples), don’t forget to include lemon juice in your filling to prevent too much discoloration.
  • Wrap well in plastic wrap before placing in the freezer.
  • Purdue says to add an extra Tbsp thickener to the filling and don’t cut steam vents before freezing.
  • Again from Purdue: when you’re ready to bake, do not thaw. Unwrap, cut the steam vents and put the pan on a cookie sheet (always a good idea!). Bake at 450°F for 15 to 20 minutes, then 375°F for 20 to 30 minutes, or until the top crust is brown.
  • You might also consider just making the filling in advance and freezing it. Thaw just until you can get it in the crust and it’s ready to use!
Freezing baked pies
Again, don’t freeze a baked custard pie, like a pumpkin pie. The texture just doesn’t hold up in the freezer.
When you’re freezing a pie you’ve already baked, make sure you:
  • Cool the pie completely before freezing.
  • Wrap well with plastic wrap.
  • To reheat them, Purdue recommends unwrapping the pies to let them stand at room temperature for 15 minutes. Then bake at 350°F until warm, approximately 30 minutes.
All frozen pies keep about 4 months in the freezer. Purdue also recommends using a crust with a higher fat content if you’re going to be freezing it.

My recommendation? Freeze unbaked pies. It’s less work than essentially baking them twice, and the after-freezer baking time is almost exactly the same whether you baked it first or not. Plus, your risk of a crust made soggy by trapped condensation from the first baking is a lot lower.

What do you think? Do you freeze pies? Baked or unbaked?

One Peach, Two Peach, Simply Peach Pie

Last week, Jasmine was visiting me and she bought us some peaches. And like a dufus, I let them get a bit mushy. What tastes more like summer than peaches?

I only had two worth saving, and what I really wanted was a peach pie. So I dug out one of my mini pie pans and figure out a peach pie for one large peach or two small.


I wanted the peach flavor to be front and center, so I didn't add any other spices. Feel free to customize that!

Simply Peach Pie
Double crust for a 5" pie pan:
1/2 c + 1 Tbsp flour
1/4 tsp salt
3 Tbsp shortening
~3 Tbsp ice water

pie filling:
2 small or one large peach, pealed & sliced
2 Tbsp brown sugar
1 Tbsp white sugar
1 tsp cornstarch
1 tsp butter (1/3 Tbsp), cut into pieces
splash lemon juice and/or spices as desired

Milk & sugar to sprinkle on crust

Preheat oven to 350F.

For crust:
an adaptation of a pie crust recipe from the Better Homes and Gardens New Cook Book

Mix the flour and the salt in a medium bowl. Using a food processor, two knives or forks, a pastry cutter or your fingertips, cut the shortening into the flour until the mixture resembles coarse pea-sized crumbs. Add the water, one tablespoon at a time, to the flour, gently combining it, until the dough sticks together. Divide in two equal balls. Chill if desired. Roll out each piece to 1/8″ on waxed paper or a floured board. If necessary, carefully use a spatula or pancake flipper to get it off the board. Transfer one crust to pie pan.

For filling:
Combine dry ingredients, then stir in peaches (and lemon juice, if using). Pour into prepared pie crust, piling higher in center. Dot with butter.


Place second crust over top and seal edges. (I used a fork to make the decorative edges.)


Cut 2-3 1" steam vents in top crust with a sharp knife. Brush on milk and sprinkle with sugar.


Bake at 350 for 40 minutes or until done. Cool on a wire rack and enjoy!


What's your favorite taste of summer?
Related Posts Plugin for WordPress, Blogger...