Showing posts with label pie tips. Show all posts

Give the gift of pie!

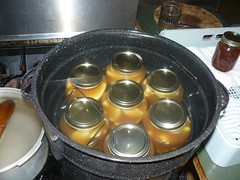
Last year, my husband’s coworker gave out quart jars of homemade apple pie filling as her Christmas gift. I think that’s a fantastic idea. A one quart jar will fill an 8″ or 9″ pie for a fast, homemade dessert—but the possibilities go way beyond that. My favorite use was as a topping for pancakes. Just heat in a pan until thick, hot and bubbly and voila! Give the gift of pie!

It only takes one county extension class to have the importance of using a tested recipe in home canning. Seriously. They’re tested to make sure that the food quality is as good as it can be while still reaching the temperature to kill of the botulism that may be lurking in the middle of your jars. Botulism, in case you can’t tell, does NOT make a good neighbor gift.

Fortunately, other cooks, like the awesome people behind Our Best Bites, understand the importance of tested recipes. She used a recipe from the National Center for Home Food Preservation. And here it is:
Quantities of Ingredients Needed For
1 Quart7 Quarts
Blanched, sliced fresh apples3-1/2 cups6 quarts
Granulated sugar3/4 cup + 2 tbsp5-1/2 cups
Clear Jel®*1/4 cup1-1/2 cup
Cinnamon1/2 tsp1 tbsp
Cold Water1/2 cup2-1/2 cups
Apple juice3/4 cup5 cups
Bottled lemon juice2 tbsp3/4 cup
Nutmeg (optional)1/8 tsp1 tsp
Yellow food coloring (optional)1 drop7 drops

A note about ClearJel: it’s a modified cornstarch that stands up to heat, freezing and/or acid from fruit, unlike plain old cornstarch or other thickeners. The NCHFP says (emphasis mine):
Before assembling the other ingredients, including fresh fruits, to make the pie fillings in Extension canning recommendations, check to see if you will be able to get ClearJel®. There is no substitution for ClearJel® that can be made in these recipes. This means do not use other corn starch, flour, tapioca, or other thickener in our recipes. You also must use ClearJel® and not Instant ClearJel®, ClearJel A®, any other form of ClearJel®, or any other modified corn starch.

However, Sara at Our Best Bites contacted her local extension office and they said that Ultra Gel is the same product and it’s a bit easier to find than ClearJel. (But still—call ahead.)

And as with any home canning, double check the steps, especially the processing time for your altitude. If you don’t have a lovely water bath canner like the one above (and I don’t either), I’ve canned a few things without expensive equipment. I have to use pint jars and at least one site I looked at said to leave the processing time the same. Of course, this might affect the food quality, but I do believe in being safe rather than sorry.

Once your pie filling is done, tie it up with a bow and give the gift of pie!

What do you like to give your friends and neighbors?
Photos by Kurt and Sybilla

Batching to perfect your pie recipes

With summer coming up, it's time to perfect that peach, apple or other favorite pie recipe. But how can you possibly try out all the variations you want to—and most importantly, get rid of all of those pies without gaining too much weight?

The answer is two-fold: mini-pies and batching. We’ve already talked about adapting a pie recipe to a miniature pie pan. You can go as small as muffin tins for your mini pies. I’m told a 9″ pie recipe will fill 12 regular muffin cups (but I think the sample size might be a bit too small to tell what tastes best to you). I used my 5″ mini pie plates to batch the chess, buttermilk chesstransparent and vinegar pies.

In this case, batching your pies means starting with a set base of the individual recipes’ common ingredients—such as your basic apple mixture—dividing that base into several dishes and mixing in the different ingredients.

I went about it an analytic way: I set up a spreadsheet and listed the ingredients and amounts for the four recipes I wanted to try out. Then I highlighted the ingredient amounts that were the same or nearly so. I took that amount and multiplied it by 3/4 to get the amount for four 5″ mini pies. That became my base (highlighted in yellow below).


After that, I added the extra columns between the recipes to multiply the non-common ingredients by 3/16, the adjustment for one individual pan.

In this case, the base was 1 cup + 2 Tbsp sugar, 2.25 eggs (or 2 eggs + 1 Tbsp beaten egg), and 3/4 tsp vanilla. Since eggs are roughly 1/4 cup in volume, I figured the total volume of my base was 1 1/2 cup + 3 Tbsp = 27 Tbsp. Dividing that up for four pies yields a little less than 7 Tbsp (8 Tbsp = 1/2 c).

Since this base isn’t complete, we don’t want to pour the plain base right into our prebaked pie crust! No, first we pour the individual mini pie amount of base into a bowl. Then for each pie we mix in the non-common ingredients. Then pour the pie into the crust and bake.

As you’re mixing, pouring, baking and tasting, it’s vital to keep your pies straight. For me, a dry erase marker was invaluable. I used my cooktop as an operations base and labeled each burner with a letter for the pie as I was mixing. Then I labeled the oven door and put the pies in the oven matching their labels. When they were done, they went back on their still-labeled burners.

I even photographed the pies with the letters visible so I could identify them later: I took a picture of the pie on the burner with the letter in the background, then sliced the pie (photo), took out a piece (photo) and sampled it (photo). If you’re good, you’ll take notes (I learned this eventually). And soon you’ll be able to narrow down your favorites and taste them head to head.

Batching pies is a little bit of work—and sometimes more than a little bit of math!—but to find the perfect pie, it’s a step you won’t want to skip!

Don’t forget to check out my mini-pie article for more tips!

Have you ever used batching to perfect a recipe?

Pumpkin Caramel Custard Pie

Just in time for Thanksgiving, this elegant twist on the Thanksgiving classic pumpkin pie was my first original pie recipe! I’ve had pumpkin pie lovers and haters try this—and we all liked it!

The difference is subtle: it’s slightly sweeter with a more caramel flavor, and since it’s based on a pumpkin-caramel custard recipe, that’s not super surprising. (You can read more about the original 1964 recipe here!)

When I made it, I had enough for a 9″ pie and two 5″ pies. I modified a few of the amounts to try to make it fit into just a 9″ pie better, and Jasmine graciously tested the recipe. The filling worked out perfectly for her!

Recipe
Ingredients
  • 1 unbaked 9″ single pie crust
  • 3/4 c sugar, divided
  • 3 Tbsp water
  • 1 1/4 c canned pumpkin (not pumpkin pie filling)
  • 1/4 c brown sugar
  • 1 Tbsp molasses
  • 2 eggs
  • 3/4 tsp cinnamon
  • 3/4 tsp
  • dash nutmeg
  • 1 c cream (light or heavy)
1. Prick the pie crust with a fork. Lay a double layer of foil over the crust (I also weighted mine with rice) and bake according to recipe directions for a pre-baked pie.

2. Turn the oven to 325.

3. Once the crust is done, in a small sauce pan, combine 1/4 c + 2 Tbsp white sugar (half of the total amount) with 3 T water. Heat over medium high heat, stirring until the sugar is dissolved. Let boil until it turns the color of brown sugar. Promptly remove from the heat and pour into the baked pie crust. You only have a few seconds before this stiffens up, so spread it around the bottom and sides quickly (I used a pastry brush, but be sure your brush is rated for high heat!). (This step can be considered optional, but if you skip it, add the sugar to the pie filling.)

4. Combine the rest of the white sugar, pumpkin, brown sugar, molasses and spices. Mix until well combined. Stir in cream. The batter will be thin. It’s okay.

5. Place the prepared pie crust on the oven rack and pour the filling into the crust. You may want to cover the edges of the crust with foil*, but mine didn’t burn.

6. Bake for about 1 hour, or until a knife inserted about 1″ from the center comes out clean.

7. Cool on a wire rack.

For the adventurous, you can take this to the next level by making it a more of a pumpkin “crème brûlée” pie with an optional sugar crust (option B pictured above, option A pictured below):

either A. sprinkle enough white sugar onto the top of the pie to coat it well. Cover the edges of the crust with foil*. Place under the broiler, watching constantly, until sugar bubbles and browns (or use a kitchen torch).

OR B. In a small sauce pan, combine 1/4 c sugar and 2 Tbsp water. As in step 3 above, heat over medium high heat, stirring until the sugar is dissolved. Let boil until it turns the color of brown sugar. Promptly remove from the heat and pour over the cooled pie, keeping the pan moving constantly so it doesn’t pool too much in one place. (I recommend pouring in circles. When you cut the pie, crack the sugar crust first by tapping it with a sharp knife.)

Option A gives a subtle crunch to the top of the pie. Option B gives a solid sugar crust with significant crunch. I liked A better. Or you could do what I did: cover half (or you could do 3/4s) of the pie with foil, then sprinkle with sugar and broil (and you could do another quarter with the solid crust, if you want). All optional.

Happy Thanksgiving!

*Need to cover your crust with foil? Try this trick from the Better Homes and Gardens Cookbook: take a sheet of foil large enough to cover your pie. Fold it in quarters, then cut a circle from the middle of the foil sheet. Open and voila! Easy to apply crust protection!

What's your favorite Thanksgiving pie?
Related Posts Plugin for WordPress, Blogger...