Last 3 Nursery Tutorials

I'm sorry this is a little wordy today. 

Here is the second part of the nursery tutorials. Click here to see the first part of the tutorials. I don't have a lot of pictures for the tutorials so I used my artistic abilities. I'm sure you guys will be really impressed.

Gathered Cornice Boards

For this project we bought one 1inch x 10 inch x 8 ft board and we had just enough for our windows. I had to employ the help of my husband for the cutting, assembly, and installation but I did the creative part in the middle.  Here is what you will need.

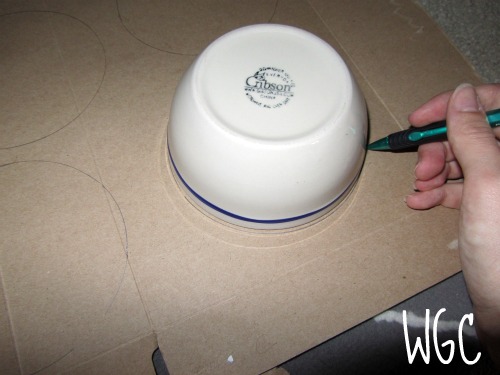
1 10 inch x 8 ft long board cut into 6 sections (see picture)
Mounting "L" brackets
Fabric to cover the cornice boards 1.5 yards should be enough but it depends on your windows. Our windows are 32.5 inches wide. Width wise I could fit 2 on the fabric.
Batting
Spray Adhesive 
Staple Gun and Staples

1. Cut the wood, glue and nail it together. At this point we clamped the cornices and let the glue dry. A tip for measuring the width make sure you add an inch on each side for the width of the feet.

2. I sprayed the adhesive on the front and sides of the cornice boards and put the batting on it.

3. I measured and cut the fabric. I had about an extra foot for each board. I then stapled the ends of the fabric onto the inside edge of the feet of the board. I pulled the fabric covering the feet tight and stapled it. Lots of staples. Then I put one staple on each side, top and bottom, of the middle. Then I found about the middle of each side left and right and put a staple on the top and bottom there. I continued that until there were excess that I bunched and stapled.

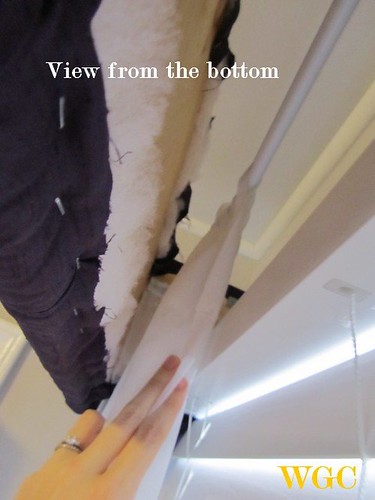
4. I installed a curtain rod facing the wall (backwards of what you usually would) behind the back of the board. I threaded the sheers on and put rubber bands on the corners so it wouldn't look strange.


5. Nail the edge of the L brackets into the wall and cornice boards and then into the wall.

Fall2011 109


Iron-On Wall Decals

I got this idea here. At the end of the post she said that it did not leave residue which is what I was worried about.

She gives a great tutorial but here are a few tips I found:
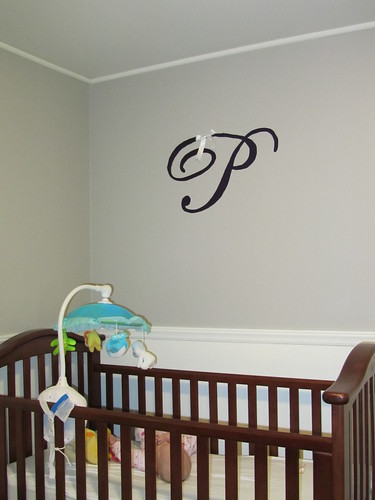
1. Yup my letter looks really fancy but I would not suggest using such a thin and curly letter because it frayed and I had to use an craft knife to cut the edges once it was on the wall. This made it come back off the wall and I had to keep ironing it back on.

2. Be careful with the humidifier. It made the letter come off the wall a bit but it irons back on.

3. Before you iron, tape the edges so the weight won't pull the rest of the letter off while you go.

Fall2011 049


Recovering A Swing Cushion

I was VERY VERY nervous about doing this. First of all this is the swing my sister-in-law let me borrow. Second I consider myself very much a novice at sewing and I didn't know if I could pull it off. I got inspiration here. She gives GREAT instruction. This is how I did mine. As I started to deconstruct the swing I chickened out a few times before I started cutting. I did not take pictures because of this nervousness so I will have to try to illustrate what it was like.


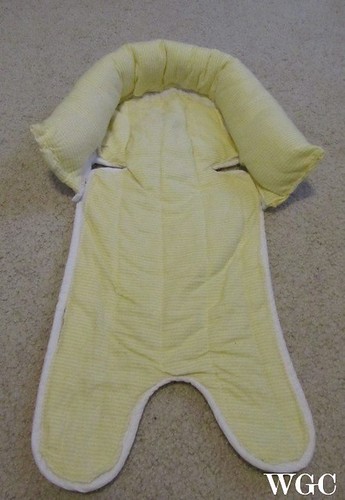
  • I first tried picking the seams but it was too hard so I just cut it as close the the edge as I could. The edge had  piping that had a small rope inside that filled it. There was batting inside of the cushion that was in two pieces behind A/C and B.
  • I measured the pipping and made my own out of the gray fabric I used. I cut it and pressed it in half and then each side in half again which mimicked the old piping. I started from the inside and worked my way our. I used the old fabric as a pattern. I cut the new fabric SLIGHTLY larger than the old fabric. I did not include seam allowance because this will be sewn right along the edge of the cushion with the piping. When I did leave extra to fold over the edge it distorted the shape.
  • I started with the hole in the middle of the B cushion. I traced the hole and cut an X through the middle. I then pinned and sewed the edge. I cut off the excess. I cut holes for the other three cut outs and sewed around the edge of those. 


    Fall2011 111
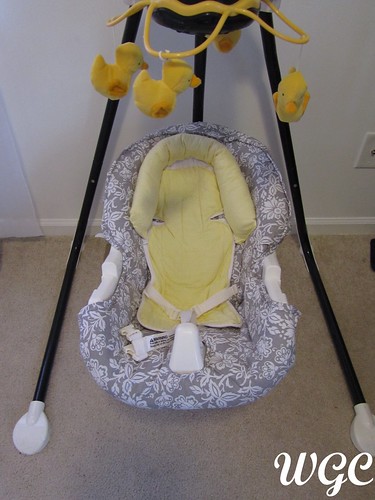
  • I sewed the top of B fabric to the B cushion. I sewed the bottom of A fabric to the A cushion. Then I sewed the stitching in the middle. I could still see on the back where it went so I used that as a guide.
  • I then sewed A to C with piping. I put the inner rope and pinned it before sewing.
  • Then I sewed A to B. I pinned and sewed around the edge with the rope inside the piping around the edge working on about a foot at a time.

Fall2011 113

nursery 016
I hope this has helped with everything. Also refer to the tutorial I listed above. Go slow and just try to mimic what the original is like. Now that I have the confidence of doing this I'm looking for some oilcloth to cover a hand-me-down high chair I got a couple weeks ago. Wish me luck! I'll show you the result when I finish it.


Gift Guide: Neighbor/Co Worker Edible Gifts

I’m not one for neighbor gifts (apartment dweller?) but I’ve given my fair share of co-worker gifts.  Here are some great ideas from the Wayward Girls:
Oreo Truffles
Decadent and impressive!

Caramel and Chocolate Drizzle Chex Mix
Sweet, but not TOO sweet

Homemade Marshmallows
An unexpected delight

Apple Braid
Easy on the eyes and taste buds

Or Apple Pie
A classic!

Bacon Wrap-ups
A different and savory treat

Christmas Cookies
Everyone loves them!

Holiday Hokey Pokey

Holiday Hokey Pokey isn't a dance—it's a great, quick gift. My in-laws were serving as missionaries in New Zealand when my husband and I met, and years before my husband had served a mission in Scotland. Both of these countries have a lot of the same foods, food customs, and candy.


If you've ever had a Crunchie bar or a Violet Crumble, the middle is what Kiwis call "hokey pokey." There, they even mix it into ice cream. (Other places call it "honeycomb," which is a pretty good description.) It's a little like toffee--caramelized sugar--with tons of tiny bubbles throughout for a fun, light texture.

My original plan was to make my grandma-in-law's famous toffee—but my thermometer display steamed up and I was afraid I'd ruined my first batch, so I decided everyone would get some hokey pokey. (It actually tastes pretty good, though.)

I used a recipe from Candy Addict and seriously thought about Sunday Hotpants's experiments. To make hokey pokey, you mix 1/4 c corn syrup with 1 cup sugar. Make sure the sugar dissolves completely, then boil for about 10 minutes, or until golden brown. Then sprinkle 2 tsp baking soda dissolved in 1 Tbsp water over the sugar mixture. It bubbles up:


Note that it does get darker when you add the water & baking soda, so you might want to add it a little sooner than I did. Stir it in quickly and pour into a pan lined with freezer paper.

Let it cool, then break in pieces. You can put it in ice cream, dip it in chocolate or just enjoy! If you keep it, be sure to store it in an airtight container at room temperature.

I used this as holiday gifts for my mother- and sisters-in-law this year. I got some cute holiday tins at Wal-Mart and lined them with oiled waxed paper (yes, both—it stuck to the waxed paper). Since I had to prepare it a few days in advance, once the hokey pokey was cooled, I put the lid on each tin and wrapped the tin in several layers of plastic wrap. (Here's hoping it keeps!)

This idea came from Martha Stewart via Pinterest:

But the closest hammer we found on short notice was this:

We decided to skip that part ;) .

What do you like to give family and neighbors?

Organizing your Christmas list


Like many of you, I have been busy baking, eating, shopping, and being with the family and not crafting. Additionally, Jasmine and I are finally painting her room. So, instead of a craft today, I will share an idea that has evolved over time. Once all of my birth family was grown with families of our own, one of my brothers used to have us all fill out Christmas wishlists that he and his wife prepared. Then they were shared them with the whole family. (Note: we did not love filling these out! However, they were very helpful when shopping.) Now I have taken this a step further and gone to Google Docs. Instead of having pages and pages of lists, we have everything on one spreadsheet we can take with us when we go out shopping.

If you have lots of people on your list and need their input on what to give this year, you might try our way. Today when we pulled out the spreadsheet, the salesman was very impressed!

You will need to use Gmail. In  Gmail, click on Documents. Then click on a red box on the left side called Create. Under Create, select Form. Now you can create questions for your family to complete. The first question should be NAME so you know who is answering. Then I created a question for categories such as clothing, electronics, DVDS, jewelry, toys, games, books, etc. I also have a question for any online wishlists.

Once you have created your form, you can send the link to the family. They complete the form and submit it. Their responses appear in a spreadsheet. You can give access to your family to be able to view the spreadsheet or you can send them copies.

Have fun with it!


We hope all of you had a wonderful Thanksgiving.

Two Nursery Tutorials and a Thanksgiving Bow

After a huge response I have decided to just go ahead and post all of the tutorials for the nursery. Most of them will be simple because I don't think I was super genius in how I did things but I hope I can inspire you with what I have done. I am going to do two tutorials today and the rest next week including the recovering of the swing cushion which was voted the highest. Don't think I forgot about Thanksgiving being tomorrow though. At the end of the post I'll post an additional quick festive tutorial.

Hydrangea Pillow
Needed: 
Silk flower
Seed Beads
Green Ribbon
Old Pillow Case
Filler
1. I used an old pillow case and sewed a small pillow out of it. The dimensions of the pillow are 12" x 19.5".  At this point only cut the side wait to sew it. Take the petals off of the stem of the hydrangea.
I just had to sew the left side because I used the existing seams of the pillow.

2. With a fabric pencil I drew a circle and started sewing the petals around the perimeter. Start the the knot in the back and come up through the hole in the 2 petals stacked, lace on a bead, and come back through the hole. I did this three times per petal. Move toward the middle and fill in where needed.

3. I used a zig zag stitch to sew the stem on. Then I sewed up the side leaving a small opening to stuff it. I stuffed it and hand stitched the rest of the edge.


IMG_1540

Fabric Dividers
Needed:
Cardboard (I used a cereal box)
Scrapbooking Paper
Letters
Ribbon

1. I used some paper to draw a template using a cereal bowl. I used a smaller circle for the inner circle. I folded the paper into 4ths and cut out a section. I traced the cereal bowl onto the cardboard and used the template for the inner circle and cut out.

IMG_1337
2. I used the template and cut paper out just bigger. I cut out two for each divider. I had 0-3 Months, 3-6 Months, 6-12 Months, 12 Months, 18th Months, and 24 Months. There were six dividers so I cut out 12 paper circles.
3. I cut out the letters with my cricut and glued each one on along with a pretty little bow.
nursery 007


Thanksgiving Bow:
Needed:
Ribbons (I used pink, yellow, and orange. 3.5" of the pink and 12" of the orange and yellow)
Stiff Interfacing
Brown Fabric
Fabric Paint
Small orange felt beak

1. I cut out the shape of the turkey body out of interfacing. I cut the fabric just bigger than the body and glued it on the front. I then cut slits around the edge of the body so it would lay flat while I glued it around the edge.

IMG_1538


IMG_1545


2. I cut the ribbon in pink 1x 3.5" orange 2 x 3.5" and 2 x 2.5" and yellow 2 x 3.5" and 2 x 2.5" lengths. I looped them and hot glued them.

3. I glued them onto the back of the turkey with the small loops in the middle of the large loops.


IMG_1546


4. I glued on the small orange beak, made a waddle with red paint and the eyes with white and black paint. I made a loop with the interfacing on the back so it can be put on the interchangeable clip and onto a headband because she still doesn't have anything more than a fuzzy head :) After all this I smeared the eye so I put a bow on the Turkey because she's a girl.


Here is her whole Thanksgiving Day outfit: Isn't she a cutie!? Her onsie is courtesy of her Aunt Jaime.She was being a total stinker and wasn't smiling.

IMG_1570b
IMG_1574b
IMG_1552b

Countdown To Christmas

I made this little countdown a few years ago. It’s a fun way to gear up for the holidays.


Materials:
Christmas themed Cardstock
Chipboard letters (I used Thickers and other chipboard letters)
Plastic or chipboard numbers
Magnets
Embellishments
Picture frame

Directions:
First, design your background. I went with a pretty basic, linear design. Cut the papers down to the size of your frame. Use a thicker piece of paper/chipboard as your backing for your whole piece. Next, add your letters and embellishments. I used Glue Dots to secure all the letters in place. They haven’t fallen off yet!


Now, eyeball where you want your numbers to be. Adhere some strong magnets to the back of the paper. You can see I used some scrap chipboard as my backing. Place the whole thing in the frame. I didn’t even take the glass out of my frame and my paper just lays on top. it doesn’t come off and it works for me (I have no kids). You may want to put the paper behind glass or laminate it.


Add magnets to the back of the numbers and stick them up!


The final product:


Are you already counting down?

Pumpkin Caramel Custard Pie

UPDATE: Not long after I posted this, the LDW Magazine blog shut down. (I'm not sure when because I didn't notice until I tried to post another pie recipe!) The recipe has been unavailable—until now! I've posted the pumpkin caramel custard pie recipe here on Wayward Girls' Crafts!

For the last few months, I've been on a PieQuest over at the Latter-day Woman Magazine blog. Last week, I shared my first ever original pie recipe: a pumpkin caramel custard pie. My husband and I don't even like pumpkin pie all that much, but we liked this one!


 The story behind the pie
I like cookbooks. I can't resist them sometimes, especially at thrift stores. Vintage church cookbooks are especially exciting to me. I always hope to find some lost recipe gem—and this time I finally have! Unfortunately, it wasn't from the good sisters of the Coltman Ward Relief Society, who put the book together, but from the envelope in the back of the book:

Caramel-pumpkin custard from McCall's magazine. Do you see the date on the bottom? November 1964.

Unfortunately, the recipe only included the first two steps, because the clipping was actually of the pecan pie recipe on the back. So I looked at several other caramel custard recipes and decided to put it in a crust. Voila (with a little adaptation to fit in a pie crust): a pumpkin caramel custard pie.

The recipe includes steps to take it to the crème brûlée pumpkin pie level—oh yeah, I went there.

Add an elegant twist to the Thanksgiving classic for your house this year with a pumpkin caramel custard pie. Seriously. It's good.

"Tin" Ornaments for Children

When the girls were young, we wanted to make December a magical and fun month for them. I collected children's Christmas stories, activities, recipes, and crafts all year long. I made a notebook for all my ideas and consulted it often. Each year, I got a big calendar on which we tracked and planned our activities. I tried to have a craft or activity plus a Christmas story each night. We kept some of our treats and crafts we made; others we gave away as service to others.
Over the next 6 weeks, I am going to share some of the crafts that we did. They are usually very easy and inexpensive.
Today's craft- Faux Tin Ornaments.


Supplies-
Aluminum trays or pans.
Note: I bought a very inexpensive one that was really too thin. Try to get one trays that are heavier than heavy duty aluminum foil. Because my tray was so thin, the ornaments bent too easily when handled. This doesn't happen so easily with heavier foil. We still have many of the ornaments the girls made more than 10 years ago.

Cookie cutters or Christmas object shaped stencils.

Ball point pens, scissors, pen or nail

Ribbon


Trace shapes on the tray with a ball point pen. The ink will not show up. You can burnish out creases you may find in the tray.


Cut out the shape. Lay the shape on a magazine, stack of paper, or corregated cardboard. Use the ball point pen to draw shapes on the ornament. (This makes the lines softer and broader.) You can draw on both sides to add texture. This will make the ornaments look embossed.

Note that the lines on the wings, and the dots were drawn
on one side of the angel, and the heart was drawn on the
back.

The star has designs on both sides as well as small holes that will allow light to shine through.

If desired, an adult or older child can carefully punch holes through the ornament for a new look. You could also use permanent markers to add color to the ornament.

Finally, punch a hole for a ribbon or ornament hanger.

Thanksgiving Nails

I don't know how many of you have a Pinterest (if you don't then get on it!) but there's a lot of pins about nail art. I thought how perfect would it be to do something festive for Thanksgiving! And for my birthday, Brooke got me a nail art stylus (super inexpensive, find them anywhere, I think this one is by Loreal.) It's great. It's like using the pin but better since it has a smaller, more precise rounded tip.

(Like how all the lighting is different?? I'm a great photographer, I know.)
So here's how you make a turkey. Start with a base color. I tested out a bunch of different colors on a white piece of paper with a background and the gold I used for the body to see what looked good. You can also test out colors and practice designs on press on nail (also very inexpensive.) Start by doing the feathers. I did orange, burgundy, and red. I started from the base and moved to the narrower part of the feather. I didn't do perfect straight lines but oh well, feathers aren't straight right? I painted the head, neck and body in white first. This allows better opacity over the feathers and background. Also, it makes the gold (if you don't have brown) stand out better. Next, paint over the white with the brown or gold. Then paint the gobbler thing. First I did pink then I did red over the pink because I didn't like it. I put a small white dot then orange for the beak. Then I finished with 2 little legs. Apply a top coat and now you're done!

(P.S. I added another feather after this picture was taken)
Related Posts Plugin for WordPress, Blogger...