If you watched Monday's video on knitting cables without a cable needle, you already know the secret of what project I was working on.
I needed a fast gift for my son's teacher. She's been really great for him, and she's helped me a lot with a personal project, so I wanted to do something for her. My son said her favorite colors were yellow and green, and I'd seen a picture of her wearing a cabled headband a few years ago. I know she doesn't like hats, so I thought a yellow cabled headband would be a great, fast gift to make for her. (Plus I have a ton of yellow Aran weight yarn.)
If you haven't used Ravelry and its pattern search--you've gotta. I searched for headbands with cables with free patterns online, and I came up with the Evenstar Headband by Jaime Louise, designed to match the Evenstar Gloves by Audrey M. (Here's my project on Ravelry.)
It's a really cool cable pattern--but be sure to follow the pattern! I thought I knew what I was doing the first repetition through, but I messed up about 10 rows and had to frog them. However, even with that set back, it knitted up in one day, blocked
the next. Finally got a button yesterday, sewed it on today and sent it
off!
My camera was a big smudgy, but the most interesting and unique part of the pattern is the "uncable," where the two cables come close in the middle, and then you actually just wrap the yarn around all those stitches, bundling them together. I've never done that before, and the result works really well in this pattern!
How do you pick thoughtful gifts?

Showing posts with label gift ideas. Show all posts
Showing posts with label gift ideas. Show all posts

Cable project revealed!

Posted by
Jordan McCollum
at
2:29 PM
No comments
:
 Labels:
cables
,
gift ideas
,
headband
,
Jordan
,
knitting
,
quick
,
Ravelry

Give the gift of pie!
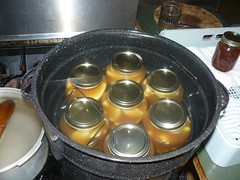
Last year, my husband’s coworker gave out quart jars of homemade apple pie filling as her Christmas gift. I think that’s a fantastic idea. A one quart jar will fill an 8″ or 9″ pie for a fast, homemade dessert—but the possibilities go way beyond that. My favorite use was as a topping for pancakes. Just heat in a pan until thick, hot and bubbly and voila! Give the gift of pie!
It only takes one county extension class to have the importance of using a tested recipe in home canning. Seriously. They’re tested to make sure that the food quality is as good as it can be while still reaching the temperature to kill of the botulism that may be lurking in the middle of your jars. Botulism, in case you can’t tell, does NOT make a good neighbor gift.
Fortunately, other cooks, like the awesome people behind Our Best Bites, understand the importance of tested recipes. She used a recipe from the National Center for Home Food Preservation. And here it is:
A note about ClearJel: it’s a modified cornstarch that stands up to heat, freezing and/or acid from fruit, unlike plain old cornstarch or other thickeners. The NCHFP says (emphasis mine):
However, Sara at Our Best Bites contacted her local extension office and they said that Ultra Gel is the same product and it’s a bit easier to find than ClearJel. (But still—call ahead.)
And as with any home canning, double check the steps, especially the processing time for your altitude. If you don’t have a lovely water bath canner like the one above (and I don’t either), I’ve canned a few things without expensive equipment. I have to use pint jars and at least one site I looked at said to leave the processing time the same. Of course, this might affect the food quality, but I do believe in being safe rather than sorry.
Once your pie filling is done, tie it up with a bow and give the gift of pie!
What do you like to give your friends and neighbors?
It only takes one county extension class to have the importance of using a tested recipe in home canning. Seriously. They’re tested to make sure that the food quality is as good as it can be while still reaching the temperature to kill of the botulism that may be lurking in the middle of your jars. Botulism, in case you can’t tell, does NOT make a good neighbor gift.
Fortunately, other cooks, like the awesome people behind Our Best Bites, understand the importance of tested recipes. She used a recipe from the National Center for Home Food Preservation. And here it is:
| Quantities of Ingredients Needed For | ||
| 1 Quart | 7 Quarts | |
| Blanched, sliced fresh apples | 3-1/2 cups | 6 quarts |
| Granulated sugar | 3/4 cup + 2 tbsp | 5-1/2 cups |
| Clear Jel®* | 1/4 cup | 1-1/2 cup |
| Cinnamon | 1/2 tsp | 1 tbsp |
| Cold Water | 1/2 cup | 2-1/2 cups |
| Apple juice | 3/4 cup | 5 cups |
| Bottled lemon juice | 2 tbsp | 3/4 cup |
| Nutmeg (optional) | 1/8 tsp | 1 tsp |
| Yellow food coloring (optional) | 1 drop | 7 drops |
A note about ClearJel: it’s a modified cornstarch that stands up to heat, freezing and/or acid from fruit, unlike plain old cornstarch or other thickeners. The NCHFP says (emphasis mine):
Before assembling the other ingredients, including fresh fruits, to make the pie fillings in Extension canning recommendations, check to see if you will be able to get ClearJel®. There is no substitution for ClearJel® that can be made in these recipes. This means do not use other corn starch, flour, tapioca, or other thickener in our recipes. You also must use ClearJel® and not Instant ClearJel®, ClearJel A®, any other form of ClearJel®, or any other modified corn starch.
However, Sara at Our Best Bites contacted her local extension office and they said that Ultra Gel is the same product and it’s a bit easier to find than ClearJel. (But still—call ahead.)
And as with any home canning, double check the steps, especially the processing time for your altitude. If you don’t have a lovely water bath canner like the one above (and I don’t either), I’ve canned a few things without expensive equipment. I have to use pint jars and at least one site I looked at said to leave the processing time the same. Of course, this might affect the food quality, but I do believe in being safe rather than sorry.
Once your pie filling is done, tie it up with a bow and give the gift of pie!
What do you like to give your friends and neighbors?
Photos by Kurt and Sybilla

Posted by
Jordan McCollum
at
8:00 AM
1 comment
:
 Labels:
baking
,
canning
,
Dessert
,
food
,
gift
,
gift ideas
,
gifts
,
Holidays and Entertaining
,
Jordan
,
neighbor gift
,
pie
,
pie tips
,
pies

Mother's day round up!
Mother's Day is coming up! Here are a few crafts for kids to make for Mother's Day that we've shared over the years:
Mother's Day Stacker & and Book-style card kids can make
This craft is one of the most popular on our blog!
To date, it's received hundreds of pins and over 30,000 views!
This craft is one of the most popular on our blog!
To date, it's received hundreds of pins and over 30,000 views!
Also, we have several Father's Day ideas that could work for Mom, too:
Father's Day Coupon Books, a play on Mom's stacker card

Posted by
Jordan McCollum
at
2:08 PM
No comments
:
 Labels:
Baby & Kids
,
gift ideas
,
gifts
,
Holidays and Entertaining
,
Mother's Day
,
roundup

New Mom Gift Ideas!
So, if you missed it, I had a baby almost two weeks ago. Most of the gifts you get when you have a baby are for the baby (of course!). But sometimes I've had friends ask what they should get for a new mama friend. Here are a few suggestions for a New Mama Gift Basket (or a New Mom Survival Kit!).
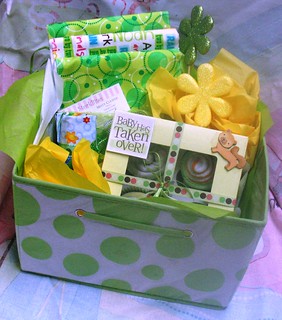 |
| Photo by storkbitesforyou |
- A book, especially one of short stories or essays. The shorter pieces are great to read while nursing, but novels are good too.
- Want a really awesome gift? If Mom doesn't already have a tablet or eReader, a Kindle or Nook is much easier to handle than a print book, and they start as low as $70. (Obviously you'd have to be a pretty great friend to splurge on this!)
- Mom not a reader? Try a small, handheld game--but make sure you can turn off any noises it might make (and play one handed!)
- Cute nursing tops, if Mom's nursing. Baby isn't the only one who needs clothing! I never had body image issues until I had a baby, and new moms often spent a lot of their time feeling pretty gross. Something to make a new mom feel pretty & normal again is great!
- Baby calendar & pen (archival quality!). Let's be honest: these things are mostly for moms, right?
- Along those lines, a journal, either blank or with baby prompts. All of these help remind us how far we've come in when the days can easily blend together.
- Small treats. With this baby, my husband's company sent a gift basket from a local bakery to the hospital, and we got to enjoy some delicious treats there and at home. (Keep in mind that Mom might be worried about getting back to her pre-birth weight, so don't go overboard here.)
- Meals! The traditional gift might feel cliche, but sometimes preparing dinner (even if Mom & Dad are the only ones eating) is just one thing too many for a new mom. Especially great: meals that can be frozen to use in the future.
- Too far away to send meals? Look for gift certificates to local restaurants--especially ones that offer delivery or pick-up/to-go options.
- Help. Most of the time, when someone says "What can I do to help?", a new mom will blank, or might be too afraid to ask for what she really needs. Try to be specific in an offer to help: "Can I clean your bathroom?" "Can I take your other kids to the park for you for an afternoon this week?" "When would you like me to watch the baby so you can shower/sleep?"
- Adult conversation. Although a new mom's schedule can be crazy, and it's hard for new moms to find time to reach out, call, email, text or IM to help give Mom a lifeline to the adult world when she feels isolated with a child who can't even make eye contact. But if it's not a good time for Mom, don't be offended, and try again later!
- Sanity! Especially if you've been there. Let Mom know that the first few weeks and months are often hard, and it's okay to feel overwhelmed but that things will get better. A handwritten note or an email can help. (NOTE: while feeling overwhelmed is normal, it can also be a symptom of postpartum depression or even postpartum psychosis. Never minimize a mother's feelings, and if ever you think a mental health professional might be necessary, please do get help!)
- A date night. A new baby can be especially hard on a marriage. After my first was born, I felt like I'd never be able to spend time with my husband ever again. (This isn't true, but it feels true.) A stay-at-home date can be best: a DVD, a dinner and a dessert.
- The healthcare basics: This might be a little too personal for some friends, but ibuprofen/acetaminophen, sanitary napkins (I've heard tampons are okay after C-sections), Tucks pads & Dermoplast spray (for vaginal delivery), ice packs (for C-section & nursing), a rice bag or heating pad, lanolin, nursing pads, and ear plugs for emergencies will all come in handy.
- Although we're teetotalers for religious reasons, I hear that after nine months of abstaining, wine or champagne is a welcome gift, and a good way to celebrate the new baby.
What do you think? What's in your new mom survival kit?

Posted by
Jordan McCollum
at
8:00 AM
2 comments
:
 Labels:
baby
,
Baby & Kids
,
baby gifts
,
gift ideas
,
gifts
,
Holidays and Entertaining
,
Jordan
What I Made for Christmas, Silhouette Edition!
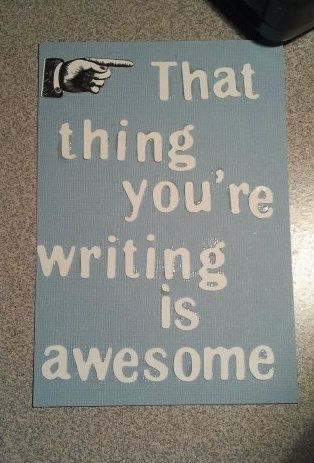
Amongst the Wayward Girl Sisters, we exchange families names for gift giving. I still like to do a little something for all my sisters. I made these two cards with my Silhouette:
Brooke's
Did you know Jordan's a writer? Here's her writing blog
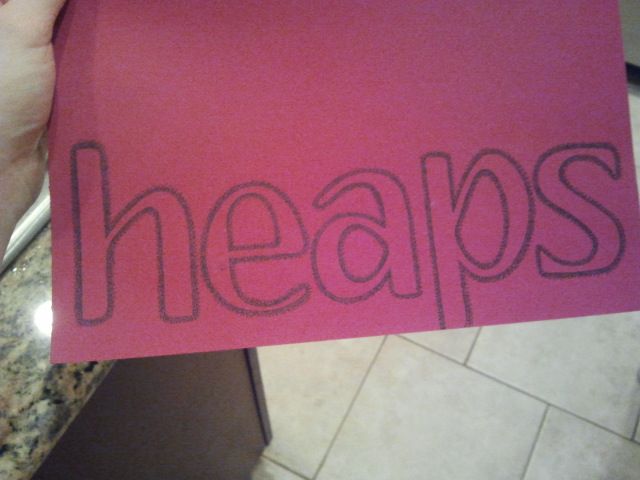
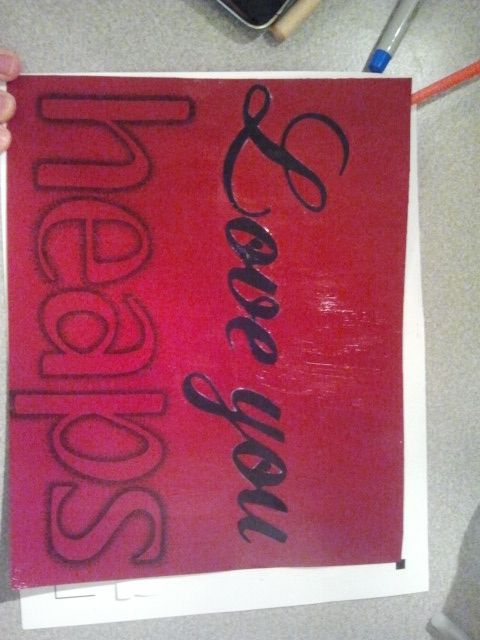
I had Jasmine's name this year so I made this beauty with my Silhouette and by hand. The "Love you" is cut with the Silhouette. I cut out the letters for "heaps" and hand stippled around them, and then removed the letters and voila. The phrase is one Jasmine and her husband, who went on an LDS mission to Australia, use. I framed this for them and I think it looks quite nice, but as Jasmine and her husband just got to their brand new apartment on Saturday night, I'm not going to request her to take a picture of it, so this crappy cell phone picture will have to do.
Because of the stupid glue I used showing up on the background of each of these, I had to Mod Podge over the top. It's not that noticeable in real life.
Brooke's
I ended up changing this one to say "Blue eyed boy meets a brown eyed girl."
Did you know Jordan's a writer? Here's her writing blog
Stippling In process
Finished
Because of the stupid glue I used showing up on the background of each of these, I had to Mod Podge over the top. It's not that noticeable in real life.

Posted by
Just Jaime
at
6:30 AM
1 comment
:
 Labels:
gift ideas
,
gifts
,
Holidays and Entertaining
,
Just Jaime
,
papercrafts
,
Silhouette Cameo

Last minute gift: $1 etched glass mugs
I had the best intentions of making gifts this Christmas, but a week of stomach flu and the general busy-ness of Christmas did not work in my favor. I was planning to make fabric car organizers for one side of our family, and I even got the fabric and notions and cut out all the pieces—but I ran out of time to sew them.
So instead, as we were carrying on the family tradition by having my small children shop at the Dollar Store for gifts for one another, I spotted some holiday glassware and was inspired.
A few years ago, I made Brooke etched glass plates with a monogram design, and I knew I still had the etching kit laying around. Etching glass creates a permanent frosted effect (and should always be done on the side of a dish that doesn't contact food!).
Also a few years ago, another member of the other side of the fam gave out Santa cookie plates. I figured Santa must be thirsty and pulled out the etching kit!
I didn't have the time to cut out five full stencils from vinyl contact paper like they recommend, so I decided to trace the design freehand (is that an oxymoron?). I made an insert to fit inside these nice glass mugs and drew out a pretty "Santa," inspired a bit by Jaime's friend's script.
I used a Q-tip to apply the etching cream. A combination of a smooth stroke and dabbing on a thick layer of the cream worked best.
When you use a stencil, as long as you cover the glass really well (well enough that it's very hard to see your stencil), you'll get good, solid results. With the Q-tip, in places the etching cream layer was too thin, and would dry about before it had a chance to etch the glass, so there were some broken and spotty sections. I applied another round of etching cream and redid them—but I learned to apply it even thicker than I initially thought, until the last glass I did required no retouching.
Once you've let the etching cream sit for about 5 minutes, rinse the glass thoroughly in warm water and let it dry. Very easy! Note that the "sit" time does vary depending on what kind of stencil you're using (the rub'n'etch kind can only take 1 minute of the caustic cream) and the thickness of the glass (thin glass, such as glass ornaments, might etch away completely!).
I really wanted to add a second line, "Don't stop believin'!" However, I didn't have quite enough etching cream and the lines from the Q-tip weren't quite narrow enough to be able to write something that long on one line.
 |
| L to R : A thick enough application (with "guide"), retouched (pre-rinse) and finished. |
MERRY CHRISTMAS FROM ALL THE WAYWARD GIRLS!

Posted by
Jordan McCollum
at
1:33 AM
No comments
:
 Labels:
diy christmas presents
,
etched glass
,
gift ideas
,
gifts
,
glass
,
Holidays and Entertaining
,
Jordan

Scrabble Board Present
Every year we draw names in November and exchange presents on Christmas Eve. These presents are usually homemade or personalized. We call this Gift From the Heart. This year, don't tell her, I got my grandma. She loves Scrabble. I saw something similar to this online somewhere and knew I could do something like this for my Grandma this year. I spelled out all 12 grandkids names in Scrabble letters. We were a few letters short but I thought I could figure out some good ways to connect names and such. I ended up having to add the word "love" (yes, I know "av" isn't a word, this is the only way it would work!) to get everyone to fit. And...if you look closely I made another "J" and "H" tile on the blank tiles with a sharpie. I'm sure you can buy some additional Scrabble tiles online but I figured why not just try. Using Tacky Glue, I very carefully glued on the tiles, making sure they were straight and aligned. What do you think? Be nice, this took me a couple of hard hours to do!
I also added "Grandma" to the top where the WGC logo is but forgot to take a picture!
I also added "Grandma" to the top where the WGC logo is but forgot to take a picture!

Posted by
Jasmine
at
9:31 PM
8 comments
:
 Labels:
Board Game
,
Christmas
,
gift ideas
,
gifts
,
Holidays and Entertaining
,
Jasmine
,
special gifts

Neighbor gift: the scents of Christmas (with printable tag!)
Oranges and Christmas have gone together (in the US at least) for over a hundred years--and a lot longer if you've ever head the traditional tale about the St. Nicholas, which is also a folkloric explanation of the tradition of Christmas stockings.
These days, gift boxes of oranges and bags of clementines and tangelos are on sale at Christmastime. I confess that we probably eat more Cuties in December than . . . wait, do they sell Cuties the rest of the year?
A few years ago, I started saving the peels from our Cuties early in December. Once it gets a little closer to Christmas, I put the peels in a pot, add some cinnamon sticks and water, and put it on to simmer for hours. Our whole house smells Christmas-y.
A couple months ago, a friend showed me an idea: putting these "aromatics" in jars. They'd make great neighbor gifts! The article has several other scent ideas, but the one I whipped up took these things:
Christmas Scent Jar
There are tons of options for what to do with the mix. I'll probably do the same thing I've done in years past: the stovetop method. But you can also use an open slow cooker, a fondue pot, a candle warmer, a mug warmer and more. (Though I should say my friend tried the candle warmer method and didn't smell anything.)
Want to share these with your neighbors? Here are some free printable tags to go along with them! They're 3"x4.5" (small enough to fit on an index card). Feel free to glue them on cute paper and sign the back.
And of course, you don't have to use oranges and cinnamon. You can use pine needles or small branches, your favorite herbs, a gingerbread spice blend with slices of ginger and cinnamon sticks), or anything else that says Christmas to you. Maybe your spent vanilla beans can find one last use (after you've scraped out the seeds and made vanilla sugar, naturally).
I can't wait to get this simmering on my stove today!
(And yes, that's snow, and that's my backyard. Trade you.)
What smells like Christmas to you?
These days, gift boxes of oranges and bags of clementines and tangelos are on sale at Christmastime. I confess that we probably eat more Cuties in December than . . . wait, do they sell Cuties the rest of the year?
A few years ago, I started saving the peels from our Cuties early in December. Once it gets a little closer to Christmas, I put the peels in a pot, add some cinnamon sticks and water, and put it on to simmer for hours. Our whole house smells Christmas-y.
A couple months ago, a friend showed me an idea: putting these "aromatics" in jars. They'd make great neighbor gifts! The article has several other scent ideas, but the one I whipped up took these things:
Christmas Scent Jar
- peels of 2 large Cuties
- ~1/2 navel orange, cut into crosswise slices (and then in half, but that's optional)
- 1 cinnamon stick (scored and broken into inch pieces, which is optional)
- 5-6 whole cloves
- 1 pint jar, ring & lid
- water
I put the peels in first, then used a knife to move the peels away from the sides of the jar to slide in the orange slices (to look pretty). I added the cinnamon pieces and cloves that way, too, then filled it with water. Screw on the lid and ring, and voila!
There are tons of options for what to do with the mix. I'll probably do the same thing I've done in years past: the stovetop method. But you can also use an open slow cooker, a fondue pot, a candle warmer, a mug warmer and more. (Though I should say my friend tried the candle warmer method and didn't smell anything.)
Want to share these with your neighbors? Here are some free printable tags to go along with them! They're 3"x4.5" (small enough to fit on an index card). Feel free to glue them on cute paper and sign the back.
And of course, you don't have to use oranges and cinnamon. You can use pine needles or small branches, your favorite herbs, a gingerbread spice blend with slices of ginger and cinnamon sticks), or anything else that says Christmas to you. Maybe your spent vanilla beans can find one last use (after you've scraped out the seeds and made vanilla sugar, naturally).
I can't wait to get this simmering on my stove today!
(And yes, that's snow, and that's my backyard. Trade you.)
What smells like Christmas to you?

Posted by
Jordan McCollum
at
4:00 AM
3 comments
:
 Labels:
Christmas
,
diy christmas presents
,
gift ideas
,
gifts
,
Holidays and Entertaining
,
Jordan
,
neighbor gift

What I'm making for Christmas
Unfortunately, most of the people I'm giving gifts to read (or write!) this blog, so I can't share some of my cool ideas. But a few people don't, so I can share some gift ideas of what I'm hoping to make for Christmas gifts.
My older daughter is taking a ballet class, and I worry about her getting cold on the drive, so I want to make her a set (and my younger daughter will surely want a set, too, so she can also be a "bahweena!") of these:
I think my older daughter's will be off-white and my younger daughter's will be lavender.
For my son, I've almost finished a red version of this Hallows Cardigan (based on a sweater Ron wears in one of the Harry Potter movies):
(My husband reads the blog, so, sweetheart, YOU GET NOTHING.)
And then for some other family members (who are NOT my sisters, though I love you all), I love finding useful little things that you'd never think of, but use constantly.
This is hard. But sometime last fall, I came across this:
It's an organizer that hangs on the back of a car seat. And yes, it's sewn, not knit. I could definitely use one of these, and I think most families could, too.
Of course, I can't forget me! I should ask for some yarn to indulge, right? Probably some time around Valentine's day, I might be ready to start a BIG project for myself:
This gorgeous Snowdrift Cardigan, either in winter white or "greige."
What are you making for Christmas gifts?
My older daughter is taking a ballet class, and I worry about her getting cold on the drive, so I want to make her a set (and my younger daughter will surely want a set, too, so she can also be a "bahweena!") of these:
Leg warmers (I'll probably add some poofy edging on the top) | Ballerina shrug (with no finishing!) |
For my son, I've almost finished a red version of this Hallows Cardigan (based on a sweater Ron wears in one of the Harry Potter movies):
(My husband reads the blog, so, sweetheart, YOU GET NOTHING.)
And then for some other family members (who are NOT my sisters, though I love you all), I love finding useful little things that you'd never think of, but use constantly.
This is hard. But sometime last fall, I came across this:
It's an organizer that hangs on the back of a car seat. And yes, it's sewn, not knit. I could definitely use one of these, and I think most families could, too.
Of course, I can't forget me! I should ask for some yarn to indulge, right? Probably some time around Valentine's day, I might be ready to start a BIG project for myself:
This gorgeous Snowdrift Cardigan, either in winter white or "greige."
What are you making for Christmas gifts?

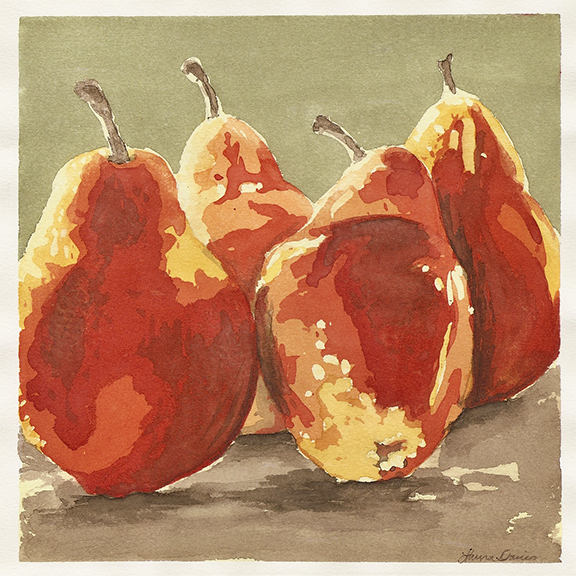
Gift Idea: Watercolor Artwork by My Sweet Rose
This weekend my husband and celebrated six years of marriage! And six years ago we moved into an LDS ward (congregation) where I met the lovely Laura. She is a woman of many talents and has opened an Etsy shop, My Sweet Rose, to offer those talents to you!
I asked her a few questions about her work and here's what she had to say:
When did you start painting? I started painting when I was in high school. Back then, I used acrylics and loved painting huge flowers like Georgia O’Keeffe. Then when I got to college I took a drawing class and a watercolor class and I changed mediums. From then on I’ve mostly worked with watercolors, although I occasionally do some larger works in acrylic and oil paint.
How do you find time to paint with two little ones? Painting can be hard some days with my two busy sons (ages 3 and 1 yrs) but I usually get little breaks here and there throughout the day. They may be brief 10 minute increments but I know there’s always bedtime to really focus in and get things done. Most of my painting happens between 8 pm and 10 pm. I also try to get the housework done during the day, with the help of my boys, so I don’t have to worry about finishing it up after they go to bed. And if worse comes to worse I find a baby sitter and get to work!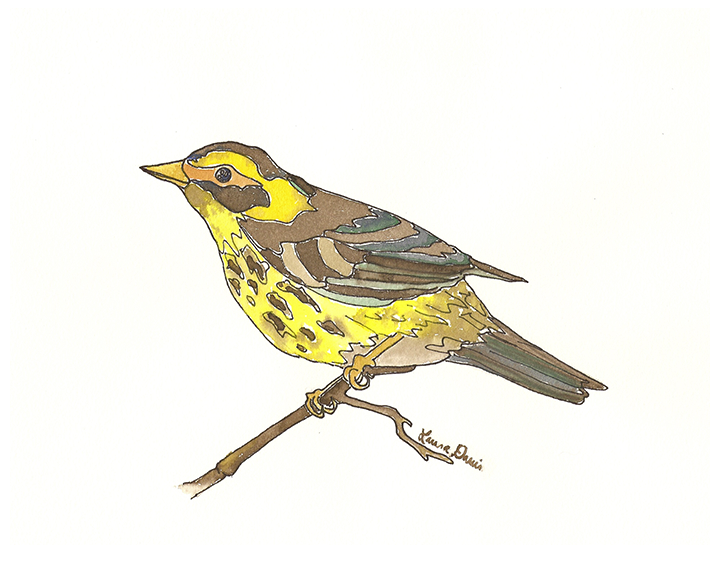
Here she is:
Yes, she's beautiful in addition to being an artist, photographer and awesome momma.
I asked her a few questions about her work and here's what she had to say:
When did you start painting? I started painting when I was in high school. Back then, I used acrylics and loved painting huge flowers like Georgia O’Keeffe. Then when I got to college I took a drawing class and a watercolor class and I changed mediums. From then on I’ve mostly worked with watercolors, although I occasionally do some larger works in acrylic and oil paint.
Where do you get your inspiration? My
inspiration comes from nature. I’m always attracted to the simple beauty found
there, from feathers, to fruit, to my potted plants around my house. I also
love to peruse Pinterest and draw inspiration from all the beautiful things
there.
How do you find time to paint with two little ones? Painting can be hard some days with my two busy sons (ages 3 and 1 yrs) but I usually get little breaks here and there throughout the day. They may be brief 10 minute increments but I know there’s always bedtime to really focus in and get things done. Most of my painting happens between 8 pm and 10 pm. I also try to get the housework done during the day, with the help of my boys, so I don’t have to worry about finishing it up after they go to bed. And if worse comes to worse I find a baby sitter and get to work!

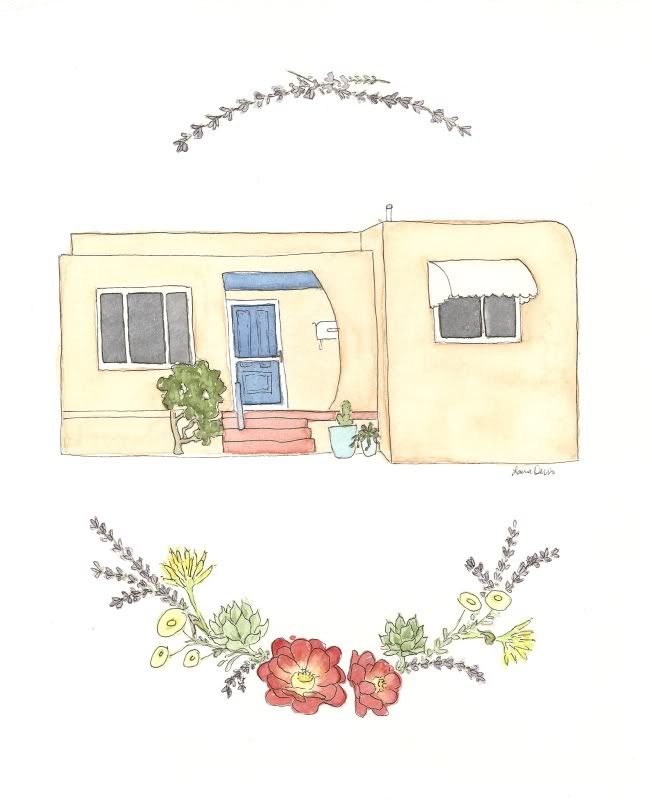
So talented right? She also does custom work like these home portraits! Which would be perfect for someone like Brooke, who just bought a new home!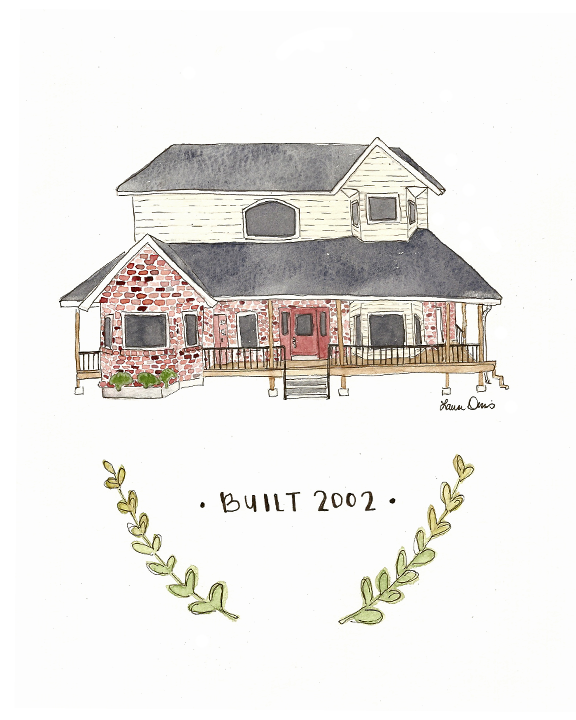

Please visit Laura's shop to see all her beautiful work: My Sweet Rose!

Posted by
Just Jaime
at
6:30 AM
1 comment
:
 Labels:
art
,
artwork
,
Etsy Shop
,
gift ideas
,
gifts
,
Holidays and Entertaining
,
Just Jaime
,
painting
,
presents
,
tutorial

Scatter Sunshine! Gift Baskets and Seed Packets
This month for my visiting teaching sisters I am going to give them dressed up seed packets in celebration of the month of May. For my VTing sisters I decided to get forget-me-not flowers. While at the store though I also decided to bring joy into the lives of more people around me and I picked up an addition 9 seed packets of various flowers. To dress them up I made a cover for the packets. I wanted them to look bright, cheery, and simple.
scissors and/ paper cutter
glue
ruler
corner rounder punch
The seed packets I used are 3.25" x 4.5". To create the basic shape start with rectangle 6" x 7.25". From each side (left and right) draw a line 2" in. From the top and bottom draw a line 3/4" from the edge.
Cut the rectangles drawn in the corners. Fold the right and left sides in and glue up the middle.
Round the corners and glue the top or bottom. Slip the seed packet inside.
I glued a cute "Happy May" piece on each packet and left the top unglued. Deliver!
jelly beans
ribbon
Fill one corner of the baggie. Gather and twist the baggie.
Securely tie the ribbon and cut off the seal at the top. Round off any edges that poke up.
A magazine
Candy (gourmet jelly beans, caramels, all reds starbursts, turtles, mnms, blow pops)
A book
Seed packets :)
An exotic smelling candle
nail polish and files
Dressed Up Seed Packets
paper (12x12 sheets fit 2)scissors and/ paper cutter
glue
ruler
corner rounder punch
The seed packets I used are 3.25" x 4.5". To create the basic shape start with rectangle 6" x 7.25". From each side (left and right) draw a line 2" in. From the top and bottom draw a line 3/4" from the edge.
Cut the rectangles drawn in the corners. Fold the right and left sides in and glue up the middle.
Round the corners and glue the top or bottom. Slip the seed packet inside.
I glued a cute "Happy May" piece on each packet and left the top unglued. Deliver!
Easy Jelly Bean Cones:
No cellophane bags needed!
Sandwich baggiejelly beans
ribbon
Fill one corner of the baggie. Gather and twist the baggie.
Securely tie the ribbon and cut off the seal at the top. Round off any edges that poke up.
 |
| (see finished result in basket below) |
Smile Gift Baskets
Don't we all know someone going through a hard time? Well I have two close friends/family members that have especially been on my mind lately. One of them has had her SECOND back surgery in 6 months and the other has always lived close to her parents and they had to move :( I put together a few things today to give them and here they are:A magazine
Candy (gourmet jelly beans, caramels, all reds starbursts, turtles, mnms, blow pops)
A book
Seed packets :)
An exotic smelling candle
nail polish and files
Jaime wrote me an email last night filled with lovely compliments. How cute is she? Have you done something to help someone smile today?

Posted by
Brave Brooke
at
11:06 AM
3 comments
:
 Labels:
Brave Brooke
,
candy
,
gift bags
,
gift baskets
,
gift ideas
,
gifts
,
Holidays and Entertaining
,
paper crafts
,
spring
Subscribe to:
Posts
(
Atom
)


