Showing posts with label fall decor. Show all posts

Fall Leaves Monogram

Happy Fall, Y'all! I wrote this post as a guest post two years ago but never shared it on our blog. So to get in the spirit of the season, here is my  Fall Leaves Monogram. I started by grabbing some fall patterned paper scraps from my scrapbook stash.

Photobucket

Using my Silhouette, I cut out a bunch of leaves from these scraps. Then I cut out my monogram also using my Silhouette. If you don't have a Silhouette, you could get some leaves like these and then hand cut your monogram. For this craft, you want a simple monogram because it ends up being really busy--straight lines are best!

Photobucket

I covered the "W" in adhesive and then stuck my first layer of leaves on.

Photobucket

Then I added more glue and filled in the holes.

Photobucket

I let the leaves staggered the leaves to create more visual interest and then trimmed down the sides.

Photobucket

Then I used some 3-D pop adhesives to give it a little dimension and backed it on a coordinating piece of cardstock.

Photobucket

Last, I popped it in a frame and called it good. Here's the finished product!

Photobucket

Here it is with my fall table scape:

Photobucket

(kinda weird to see this--I've moved two times since I wrote this post!)


Fall Initial for the Front Door

Recently I was Skyping one of my best friends and she was showing me her new house. As she walked in her front door I saw we both had A's on our front door (we happen to share the same last name). So basically what I'm trying to say is all the cool kids are doing it. Her A was painted turquoise and on a super cute burlap wreath.

Here is how I made mine:

I used 2MM Jute cording, a 12" A I got on sale for a great price, and two 2 stems of fall flowers.


 Tips for wrapping:
1: I started out by gluing the jute close to the bottom with hot glue
2: I wrapped it around one time and then I put glue (this is hard to see in the picture) on the bottom edge so you can't see any white. If I could do this again I probably would have painted the letter before hand.
3: I continued to wrap and put glue along the edge as I went.
4: I wrapped up the bottom of the A, cut and glued down the jute, and wrapped the jute around the cross of the A.
 For the flowers I wanted to be able to change them out so I glued them close together on a piece of stiff dark stiff felt. I glued the leaves onto the side.
 I glued a piece of jute on the back of the felt and tied it into the A. 


Isn't it cute?!

After I put up my fall decor I added the A to my wreath but I can change it out at any time. I think when it hangs alone I need to add a beefier bow at the top.

Have you tried adding jute to anything this fall?

Fall Decor

For the past three year I have shared with you guys my fall mantle (both can be seen here) and I feel like each year it gets better. This year I decided to add a bit more of that lovely fall feel to my autumn decorations with some burlap.

I've had this burlap for quite some time. They sell burlap in many different shades. I'm not sure what you're supposed to do with burlap but it's very stinky so when I got it home I washed it delicately in a bucket with some soap and then rinsed it. A good amount of dye came out (but I don't feel like it changed the color of the fabric) and so did the majority of the smell.


I added the burlap in two places. I used some vases and cut pieces about 4" wide x the circumference. I glued them on the back and wrapped some twine around about 10 times. I made a bow and glued it onto the side.


I also added the burlap as a table runner on both surfaces. I love the texture and richness the burlap adds.

How are you decorating for fall? 

Happy Fall, Y'all!

We moved 5 weeks ago and doubled our house size and I have since (of course) changed how I want every single room decorated. I'm changing color schemes and decor from our last house. Please forgive me as I will post mostly about house projects. I will need your opinions/advice on tons of things, so thanks in advance!!

In the south the chill has only started to creep in within the last few weeks. After it did of course I got the itch to have deep oranges, yellows, and reds adorn all level surfaces in my home. I bought extra pumpkins to autumn-ify our kitchen with a centerpiece and broke out the decorations I bought last year.


Since moving my husband has been working on a special project for me. It turned out beautiful and I am so lucky to have such a handy guy. I will post the tutorial for this next week. It is the awesome backdrop to my mantle.

 Last Friday I determined I was going to need a ton more stuff for my mantle so I went over to Michael's. This is a great time to get stuff because all of their Fall/Halloween stuff is 70% off and it isn't too picked through yet. I have three simple tips for decorating your mantle:

1. Invest in items that can be used in any season. Two examples are the green crazy tall thing that adds height and the large glass hurricanes.
2. Get one or two more things than you think you need.
3. Use varying heights, textures, and color to add visual interest.


There are mini pumpkins inside the hurricanes.

I also got this super cute table from my amazing friend who recently moved away. I think I am going to do something like this to it. I'm so grateful she gave it to me because it fits perfect in this space.
More of the decorations were on the table but little hands got to throwing the glass things on the floor and so they were put up higher :)


Happy Fall, Y'all!!

Fall Decor Round Up

Are you in full fall mode yet? If not, we've got some great fall decor ideas to help you get that way!

Brooke made this beautiful fall wreath and has tons of great tips for making wreaths.


Jordan has a great harvest printable. We love this quote!


Mom made these table runners for fall. The second one looks great on Jaime's tablescape!


Jasmine made these fun Mod Podge Halloween vases. So cute!


Jaime made this fall leaves canvas. Can you believe it was only $1?!


 Now are we ready to decorate?! Get to it!

Ready for Fall Fun Decor

Last year I shared my fall decor on a budget:

Photobucket 

This year I changed it up, adding a few things I snagged at the end of the season last year and incorporating a few items I already had.


Photobucket

From Left to Right:

-BOMA Owl from Canada. A souvenir from the many trips my dad took there when he worked for a Canadian based company when I was a kid.

Photobucket

-Glitter Vase by me, filled with some clippings care of my apartment complex's dying bushes (free!)

Photobucket

-Candle from Hobby Lobby, purchased at the end of the season for 90% off
-Harry Potter and the Half-Blood Prince from my personal library. Thought it went well with the theme and loved the pop of color.
-Metal gourd from Hobby Lobby, 90% off

Photobucket

-Frame from last year's display (Goodwill), still got Kristen Duke's freebie in it
-Candle from HL, same sale
-Candle from Dollar Tree
-Beautiful quilted Fall Table Runner, by my mom, Diana. I love it!

How have you started decorating yet?

Autumn Orange Glitter Vase

Last year I made this glitter vase for my fall decor. It has held up great in storage and looks awesome still. This was originally shared on Craft Junkie Too last year. 

On Monday I headed to my local Goodwill. I love that place, even if it is dirty and was especially smelly on Monday. Anyways, I spotted this beauty:

Photobucket

I loved the orange stripes and the price, 99 cents! The problem was that the paint came off really easily. As in, I rubbed it with my finger and off it came. I wanted to keep the color but had to fill in a bunch of scratches. I recruited a friend to help me figure out a way to salvage the color. We brainstormed forever but couldn't find a solution. Finally, I decided on glitter.I got way too much orange glitter at Hobby Lobby, but now I've started my glitter collection I guess. Then I got to work.

Materials:
Vase
Glitter
Modge Podge
Container for Modge Podge mixture
Newspaper to prevent messes


Photobucket

Tools:
Paint Brush

After prepping your area with newspaper, pour some Modge Podge into your container

Photobucket

Step 2 is to pour in a LOT of glitter

Photobucket

Step 3: swirl the mixture around until it’s the thickness you want. I waited to use my paint brush to mix it until I had a lot of glitter in there. A LOT.

Photobucket

Finally, paint that sucker. Like I said, I wanted it to be really thick. And it was really thick.

Photobucket

Here it is drying. It took several hours to dry. Once the white disappeared, I saw a few places I needed to fill in. Easily done!

Photobucket


I LOVE the statement that it makes. Very bold. Very orange. Very bling. Perfect for fall. I love a piece that isn't just Halloween and can stay out until Thanksgiving.

Photobucket

Here's how I styled it for 2011.


On the table:

Photobucket

And 2012:

Photobucket

Tune in next week to see the whole tablescape! 

Mod Podge Halloween Decorations Giveaway

First and foremost, it is Brooke's birthday! If you want to wish her a happy birthday, feel free to leave her a nice little comment on her post.  
So in case you all didn't know, Brooke, my mom and I had birthdays this month. To celebrate, the Wayward girls have or are going to have a give away each week. This week is my week! 


This week's giveaway is 2 Halloween themed vases!  Last week I posted about mod podge and meant to not tell what I was doing. But I forgot I had put it in the title and totally gave the surprise away. Silly me! 


And I know by next week Halloween will be over :( But there's always next year!
There are four different ways to enter:

  • One entry for becoming a follower of our blog, and commenting on this blog post to tell me about it.
  • One entry for following us on Twitter, and commenting on this blog post to tell me about it.
  • One entry for tweeting this post, and commenting on this blog post to tell me about it (with a link directly to your Tweet).
  • One entry for Liking us on Facebook, and commenting on this blog post to tell me about it.


Each of these should be in its own SEPARATE comment! So if you like us on FB, follow us on Twitter, tweet about this giveaway and or are a follower of WGC, each of these should be it’s own separate entry.

CONTEST NOW OVER!
PS my birthday was on the 11th and none of you wished me a happy birthday, how rude...I guess I can forgive you all... :)

My Fall Décor on a Budget

I’ve been busy this weekend getting ready for two guest spots on Monday. First, I was at the Artsy Girl Connection (Thanks for having me, Marilyn!). Then I was at Craft Junkie Too (Thanks for having me, Tracy!).  Both crafts I used on my dining room table fall display, since I don’t have a mantle.  I decorate for fall, so this transitions well into Thanksgiving décor.


So here’s a breakdown of how much this cost me.
Tray: $2.99, Goodwill
Candle: Tutorial here, made from two candles from Dollar Tree and leaves from Dollar Tree. Cost about $2.20
Frame: $0.99, Goodwill, photo by Kristen Duke Photography—one of her Friday Freebies
Pumpkin: Ok, this one I’m not sure about. I got it at Robert’s when I used to live in Utah. I know I got it for 40% off though. I’d guess at most I paid $6
Basket: Target, $2.50
Apples: My fridge =)
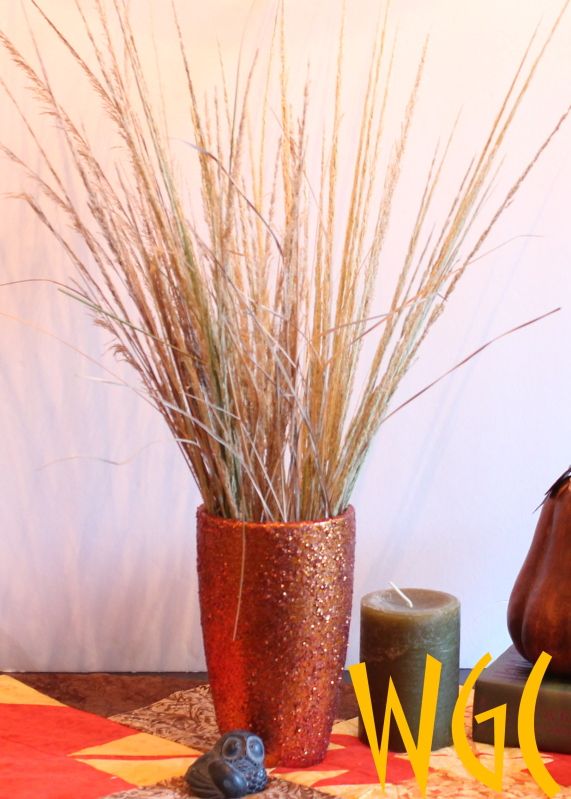
Glitter vase: Tutorial here, vase was $0.99. Glitter, I probably used about $0.50 worth
Leaf sticks: Sticks, outside. Leaves, Dollar Tree. There are 50 in a pack, so it cost about $0.16
Homemade apothecary jar: Jar, $1.99, Goodwill. Candlestick holder (you can’t see it), $1, Dollar Tree. Mini gourds, $1, Dollar Tree

Total cost:  $20.32! Not bad!!
Related Posts Plugin for WordPress, Blogger...