Accent Pillow

Last year, when I was redecorating my bedroom, I saw a picture of an accent pillow in a pattern book. Of course, instead of even considering purchasing the pattern, I said to myself, "I can do that!" I took a picture of it, and gave it a whirl.
Since this is the WAYWARD girls' craft blog, I'll bet you think it didn't turn out. But guess what! It did. Of course I learned a few things that I would do differently should I ever make one again, but all in all, I think it turned out well.


You need a square pillow or pillow form or poly-fill, enough fabric to cover the pillow, contrasting fabric, cording to go around the edges plus create the tie, and tassels. You will need to measure your pillow to figure out your exact yardages.

Start by cutting a front and a back to fit the pillow. Be sure to leave a seam allowance. Sew on the cording to one side. (If you have never sewn piping on a pillow, check here.  (You can use the overlapping method they show, or you can just sew in the finished product as I did.)

Measure the edge of your top pillow fabric. They should all be the same. Subtract 3 inches from the length, and then multiply by 2.

For example, if the length of the edge was 16 inches, subtract 3 to get 13, then multiply by 2 to get 26 inches.
You should cut a rectangle that is 26" x 16" from the contrast fabric.

Double this fabric. Stitch and turn right side out. Press with the seam in the center of the back of the square.
Loosely gather the both raw edges of the fabric of the contrast piece. Center it on the front of the pillow fabric. Baste in place.

Then, place both pillow top and bottom right sides together and sew around the edges, leaving enough open room to fit in your pillow. Don't leave the edges with the contrasting fabric open. You will need to be careful with the cording. Turn right side out. Put your pillow inside (or stuff it with poly-fill), then handstitch closed.

The cording I got was attached to webbing so that it could been sewn in. I used it with the webbing for outlining the pillow, but then carefully snipped the webbing off to create the tie. By using a combination of a little craft glue and some careful sewing, I attached the tassels to the ends of the cording. I wrapped thead around the place where the cording joings the tassel as you can see below.
Loop the cording around the contrast fabric and voila! Done!


Calender Artwork

Last week, I made this and took pictures all the way through and was so excited to show you all. And then, to my great disappointment, I accidentally deleted all the pictures...So now I'll just have to give you the details instead of show them.
I wanted to do something with the months of the year and not just the seasons. I knew I had a lot of popsicle sticks so why not use them! I taped 12 (one for each month) popsicle sticks together with masking tape.Then I glued a popsicle stick at the top and one at the bottom with a hot glue gun and removed the masking tape. On the other side, I sketched a tree lightly with a pencil making sure the tree extended to all 12 sticks. The first coat of paint I did was the sky. Then I painted on the tree using a narrow brush for the skinny branches. Next I did the green leaves and grass by tapping the paint on. Then I layered on some "flowers" with different colored dots on the grass and tree. I used the end of a small brush handle to make the dots. I used the same technique of dots for the fall leaves. Then I added some snow on to the branches and ground again with a narrow brush. To make it look like it was snowing, I got a cheap brush, dabbed it in white, and on a scratch piece of paper I hit the brush a couple of times until the bristles fanned out. Usually, cheap paint brushes end up looking like that already from being smashed by little kids so I didn't feel bad doing that to this paint brush. Fan brushes are great for doing snow but since this was so small, I didn't use one. After it all dried, I painted the first initial of each of the months on the sticks. And just like that, you have a cute and easy picture of the months of the year!
*You can also use tongue depressors or paint mixing sticks if you wanted to do it on a bigger scale.

Wreath Making Tips


As the air is getting cooler (kinda-the forecast here for today is 85 degrees) I have started to decorate for fall and put out my lovely fall wreath. It was really complicated making it-NOT! I decided instead of a useless tutorial I would just give you some tips I have found while making different wreaths.

1. Make sure your wreath an stand up to the weather.


2. Make it interesting! Use an interesting pattern, embellishments, or color variation.


3. Don't spend a ton of money. I almost always shop at Michael's mostly because of location but there are always coupons. There are always sales on stems. This wreath the flowers were 50% off and I used a coupon for the grapevine wreath. I paid less than $10 for the whole wreath. The picture below is a great alternative to buying a wreath form.
http://www.thepennyparlor.com/2010/09/coffee-filter-wreath.html


4. Make sure things are secure! Use LOTS of glue.

5. Do a little at a time and hold it back to make sure you can see where things need to be added or taken away.


 For this wreath all I did was get the stems and pull the heads off the flowers. I glued them in place. I took some leaves from the stems and glue them at the edge of the flowers. There is a thin ribbon bow at the bottom you can't see in the picture. Mostly that is because you could see me in in the reflection in the glass. My neighbors already had to see me in my pjs no one else has to :)


Remember the fun summer wreath I made at J&M's?

Do you have any other wreath tips?! Happy Fall!

Two Quick Accessories


Lately I’ve been feeling that my wardrobe is kinda blah. I wanted to update it with some accessories. Inspiration found here

First off, I made a t-shirt scarf with my huge XL t-shirt. I’m happy one of my misfit projects could find a home.

This is what I started with:


 It's huge! I needed to show you how huge:


 That's my shirt on top of it. I'm no extra small, either!


 So this how I made my t shirt scarf. First I measured 1 inch-ish lines across the whole thing. I know I needed the lines because I can't sew, cut, draw, swim or drive straight. As you can see, my lines weren't always straight anyways. At least I tried.


I cut straight across both layers of the shirt so I ended up with loops of fabric. Next I gently stretched out the loops. It was then I was grateful my shirt was already large and stretchy. You can kind of see the white logo on the shirt in these photos.

This is how it turned out:


 I cut one loop and tied it around them all. 


 This is how it looks twisted


This is how it looks on =)


I didn't stop there! Next I made a simple brooch. I've been reading Yellow Blackbird for a while. She has some fun challenges for fashion. Aubree challenged us to wear a brooch this week. I don't own one, so I decided to make one.

Materials: Two scrapbook flowers, one clip on name tag


First, tear off that clip!


Next, glue the stacked flowers together:


Glue the clip to the back of the stacked flowers:


Tada! 

(ok, this is the same picture as above, don't hate!)

This is how it looks worn:


What accessories have you made?

Cookie dough cupcakes

Quick note:  as of last Thursday, I'm an official guest blogger for Latter-day Woman Magazine! Come join me on a PieQuest—this week will be Hershey's S'mores Pie, so be sure to subscribe to my free updates, or the whole magazine blog!

I definitely didn't see anything in my son's Wednesday Folder about a bake sale to accompany his school's carnival (*cue my mom and sisters swooning that our baby could be SO BIG*). But I couldn't miss the purple slip of paper advising us that they hadn't gotten a lot of donations, and we could bring them to the carnival if need be.

When you're wayward and crafty, you'd better plan on bringing them to the carnival. Late.

Anyway, I just finished a book called Always the Baker, Never the Bride, and the eponymous baker heroine had won awards with her Crème Brûlée Wedding Cake. So my first thought was Crème Brûlée Cupcakes. Though I found (and pinned!) some really awesome recipes, I realized we didn't have nearly enough time, since the carnival was starting in . . . about three hours. Awesome.

On one of the websites with a crème brûlée cupcake recipe, though, was another tempting treat: Cookie Dough Cupcakes (from How to Eat a Cupcake).


The recipe for the cupcakes themselves came from the Cake Mix Doctor, but How to Eat a Cupcake's link to the CMD's site didn't work, and a search of her site didn't show the recipe, either.

But I wasn't giving up that easily. In a past life, I was an Internet marketing professional, so I pulled out my toolbox and found an online archival copy of the recipe (it takes a few minutes to load).

The recipe is also found on pages 124-125 of Cupcakes: From the Cake Mix Doctor. (The book also happens to have a recipe for making mini crème brûlées in cupcake tins on pages 294-295.)

The basics: they're yellow cake mix a little dressed up, but I don't know that all the dressing was necessary—the extra oil made the cake a bit greasy.

Then you need frozen cookie dough. The Cake Mix/Cupcake Doctor says:
If you use the 18-ounce logs of refrigerated chocolate chip cookie dough (instead of the 1-pound packages of frozen dough), cut them into 24 equal pieces and freeze them before using them in this recipe. It's important to use frozen dough, because you don't want it to bake completely and become a cookie. You want the center to be gooey when you bite into it.
 We went to/called four local grocery stores and not one carried frozen cookie dough. And, as I mentioned, we were on a time crunch, so I'd initially rejected the idea of a refrigerator cookie dough, but I had no other choice. My mother-in-law was visiting, and we opened the 1 lb. package and put the 24 cookie dough cubes into plastic baggies and stuffed them in the coldest places in the freezer.

After about 40 minutes, they were pretty firm, so I mixed up the cake. Then my mother-in-law and I poured them into the cupcake liners. Now, here is the tricky and hard part: getting a gooey nugget of raw cookie dough (come on, you know you love it) in the middle of a cooked cake. See if you can pick up on our technique:


Yeah. Just stick 'em on top.


The batter swallows them up in the oven.

Unfortunately, sometimes they cave in pretty badly:


But if you get them browned, they're a bit more stable (ignore the cheap, ugly muffin tins):


I happened to have some canned vanilla frosting on hand, and I added about 2 Tbsp of cocoa, which actually tasted pretty good. We also had come Cookie Crisp, so that became our decoration.


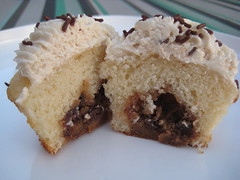
Now, of course, I totally spaced on taking a picture of the most important part: the cookie dough in the middle! Here's the idea (notice the void left by the cookie dough—be careful when taking the cupcakes out of the pan!) but our cookie dough spread out a bit more and didn't quite get all the way to the bottom:

Flickr photo by Kristin Ausk of Meringue Bake Shop

I think they'd be better chilled than room temp, and I'd reduce the oil in the recipe. (In fact, I'd probably just make a regular cake mix and follow their directions.)

The worst part: we didn't label our cupcake tray for the bake sale, so nobody knew what they were getting when they bought these. I wonder if they liked the surprise (or knew what it was!) . . .

What do you think? What's the most unusual cupcake you've ever had or made?

Pieced Fall Table Runner, take 2

Last week when I posted the Fall Table Runner using 4 fat quarters, I already had this table runner planned. This one uses all 6 of the fall pallet fat quarters that I bought. Last week, the quilt went together quickly and without problems. This week, not so much! I should have just stopped when I realized the quilting gods were not smiling on me this time around.
If I could calculate wrong, I did.
If I could measure wrong, I did.
If I could cut wrong, I did.
If I could sew it wrong, I did that, too.


Nevertheless, I pressed on! (Literally. Pressing is a key part of quilting.)
I will spare you all the frustrating details, and just show the final product.

My camera doesn't do the colors justice. Here are close ups of the squares:


You can make this with 6 fat quarters, or with scraps.
(See last Friday's post for more details.)

For one large leaf blocks.  You need 2. (finished block size 10 1/2")

Leaf fabric: Cut 1 4" x 12" rectangle, then cut that into 3  4" squares
*Cut 1 4 1/2" x 9" rectangle
Cut 1  1" x 6" strip

For leaf background fabric
*Cut 1 4 1/2" x 9" rectangle
Cut 1 4" square
Cut 1 4 1/2" square    then cut into 2 triangles. Use these with the 1 x 6 strip to make stem.

*Make speedy triangles with these pieces. Mark them like this,
and then sew seams 1/4" on both side of diagonal lines. Cut on all lines. You will have 4 squares. Trim to 4" See  here for sewing details.

For medium background fabric (swirly brown)

Cut 1 11 1/2" square-- Then cut into 4  5 3/4" squares

Dark
Cut 1 13" square, Cut into 4 right triangles.

For each small leaf squares (Finished block size 5 3/4")

Leaf fabric cut 3     2 1/2" squares
Cut 1   3/4" x 5" strip
*Cut 1    2  3/4"  x 5 1/2"  rectangle

Leaf Background (to make 4 leaves)
Cut 4   2 1/4" blocks
Cut 4  2 3/4" block  then cut each into right triangles. Use these to create stem block with 3/4" x 5" strip.
*Cut 4   2  3/4" x 5 1/2" rectangles (1 for each leaf)
*Make speedy triangles with these pieces. See  above or here for details.

For small squares, follow directions from last week. Trim each block to 2 1/4 inches. Sew together following the same directions as last week.
Sew 4 small leaves together to create center block. Try the leaves in a variety of positions to see your favorite.

I referred to these books to help design this runner: Your First Quilt Book by Carol Doak and Quick Country Quilting by Debbie Mumm

Here are small blocks 1 and 2 that didn't work. Waywardness!


Movie Theater Ticket Stubs Scrapbook Page

I like to save my movie ticket stubs. I usually save them in my wallet. I didn't know what I could do with them until one day when I was at Brooke's house she suggested we craft. We decided it would be fun to scrapbook the tickets.
I had collected many tickets stubs and some of them had faded. I decided to cut small rectangular strips of paper all the same size and write the title of each stub whether they had faded or not, the date and the state where I saw them. We used Brooke's handy dandy Cricut to cut out a title for the layout. I cut out a "popcorn bag" using red and white striped paper and zig zag cutter.
To make the popcorn, Brooke and I cut out small circles out of yellow paper and layered 2 or 3 of them to look like popcorn. With playful placement, a fun and easy scrapbook layout was made!


Dressed Up Canvas Tote

A while ago I got a plain canvas bag to carry my things to church in. I had plans to do something to make it great and just never did anything with it. Then I got a big ink stain on it and I conceded to doing something with it. I used some left over fabric that I had and a flower to embellish it.

What I used:
Canvas Tote
Fabric ( I used two contrasting fabrics)
A flower with rhinestone (got to have some sparkle!)


1. The fabric I used for the bottom was thin so you could see the ink spot through it so I lined the yellow fabric. I decided how high up the bag I wanted the yellow fabric to be. I laid the bag inside out flat and to determine the width to cut the fabric. I added an 1" for seam allowance. I then cut the lining fabric the same dimensions


2. I sewed the sides (it was one piece so the bottom did not need a seam) with the yellow and lining fabric together with the lining on the outside. I sewed the top edge of the yellow and lining together. To mimic the shape of the canvas bag I sewed the corners of the lining and yellow so the bottom will lay flat.

3. I turned the new bottom right side out and sewed it on to the outside of the bag with a seam on the top edge. I had orange fabric that I measured it out to be double the width of the bag and 4 inches wide. With right sides together I sewed it in half length wise, turned it inside out, and pressed it.

4. I sewed it onto the top edge of the yellow sewing the top and bottom edge. I added the flower to embellish it.

5. I used the computer to print and cut out letters for my initials. I ironed on heat transfer paper to the orange fabric and traced the letters BACKWARDS onto them. I cut them out and ironed them to the bag.

then I waited over a year to the point where they were falling off before I did the last step. Oops!

6. Using a zig zag stitch I sewed around all the edges.

bag 004


Jaime's Land of Misfit Projects

I have always been an idea person. I'm great with coming up with ideas. They're not always GOOD ideas, but at least I have one. So here's my problem: I go to the thrift store with an idea (or I get an idea there) and then I purchase an item to alter. And then I don't. I lose the excitement of the idea and I move on to something else. So now, I give you, Jaime's Land of Misfit Projects:


One of the first items I bought to redo, this chair. It was $6.99 from Goodwill. I'm still looking for the perfect fabric to cover the cushion with. Will I ever find it?


I didn't get this from a thrift store, I got this free from work. We just got all new furniture in our offices and they were getting rid of our old stuff. I love that this table is a folding table and it fits in my car. I want to set it up for crafting, but I haven't gotten around to it yet. Lazy, or what?


This beauty I won at a thrift store silent auction. I need to clean it up and find a place to display it. Yep, still hunting for the perfect table for it. I only have my attempts at "artsy" pictures of it on my computer and I'm not getting it out of storage right now. Did I mention I have no idea how to clean it?


On the right we have a vintage sheet I got at the thrift store. On the left, a big roll of fabric I got at Wal Mart for $3. Haven't made a thing with either one.


A pumpkin from a trip to Dollar Tree. No plans for it as I really hate the line across it. 


Finally a size XL stretchy t shirt from the thrift store. I thought about making it into a bag, a skirt and a bunch of other things, but nothing has come to fruition. Any ideas?

This is just a sample, by the way. I have more. This coming from the girl who told you to free yourself from your crafting stash!

Any ideas for my misfit projects?

Fall harvest printable

I like graphic design and typography (though I don't claim to be great at either), so printables are one of my favorite "computer crafts." Going along with the harvest challenge theme, I found a quote about harvest and used a fall-color chevron pattern (from here) as a background. The brown is my favorite shade of brown (which we use here on this blog), the dark red and orange are defaults in my graphics program, and the yellow actually came from a photograph of yellow poplar leaves. Add in lots of fonts from my graphics program, and some clip art, and voila!

We've got the chevron pattern in the letters:
And in the background:

You might want to open the image in a new tab or window. Make sure that the image is full-size: it should be bigger than your screen. If it isn't full size, click on it to blow it up. then, from the menu of your browser, select print preview. The image is designed to print at about 8" square, so just click print (I hope!).

If you're just joining us on WGC, here are some of our other fall-themed crafts:
Fall table runner made from 4 fat quarters
$1 Fall leaves canvas art

Which printable do you like better? What's your favorite fall or harvest quote?
Related Posts Plugin for WordPress, Blogger...