Some people's favorite part of Thanksgiving is the leftovers! I can't help it--I love to try new things. I'm going for a turkey banh mi this year. Here are some more great ideas on what to do with your turkey:
Turkey Banh Mi
Turkey Stroganoff
Turkey Empanadas
Peanutty Turkey Salad Wraps
White Turkey Chili

Showing posts with label Thanksgiving. Show all posts
Showing posts with label Thanksgiving. Show all posts

13 Fun Ways for Kids to Show Gratitude!
Thanksgiving is here at last!
I'm definitely looking for ways to help my kids to learn and show gratitude this week, and here are 13 fun ideas I found!
1. Topical gratitude challenge
You can use these categories to go around the Thanksgiving table, too.
2. Gratitude garland
Great for decorating for Thanksgiving, too!
3. Family gratitude journal
3. Family gratitude journal
Also a fun family activity.
4. Gratitude poster
4. Gratitude poster
Beautiful, creative and grateful.
5. Gratitude tree
5. Gratitude tree
Another fun way to decorate for Thanksgiving and fall.
6. Gratitude cards
Rainbow colored cards that include prompts, ideas and tasks.
7. Gratitude banner
So many ways to use this one! Here, they've got pockets for each family member and other family members can leave notes telling why they're grateful for them.
8. Gratitude rolls
Fast, easy and fun to share at Thanksgiving dinner!
9. Gratitude at the Thanksgiving table
Prompts and papers for Thanksgiving dinner gratitude. Fun alternative to simply making rounds of the table.
10. Gratitude pinboard (literally!)
A real-life pin board to fill with things you're grateful for.
11. Gratitude alphabet
What you're thankful for, from A to Z
12. Donate food (or clothes/time/service) to those in need
I like to help my children weed out toys they don't play with anymore and donate them at Christmas time, and we'll definitely be donating food this year. (Side note: check with your food bank first. Donating food is a great gesture to involve your children, but sometimes food banks get a better deal than we do, so giving them the same amount of money can go a lot further, and you can find other ways to involve your children.)
13. Collect thank you notes and treats for our troops
You can make care packages for anyone who might need a little extra love during this season: elderly neighbors, far-off family members, our troops.
How do you help your kids remember to be grateful?

No comments
:
 Labels:
Baby & Kids
,
Family Life
,
gratitude
,
Holidays and Entertaining
,
Jordan
,
Thanksgiving
Labels:
Baby & Kids
,
Family Life
,
gratitude
,
Holidays and Entertaining
,
Jordan
,
Thanksgiving
Labels:
Baby & Kids
,
Family Life
,
gratitude
,
Holidays and Entertaining
,
Jordan
,
Thanksgiving
Pumpkin recipe roundup!
Last night after we finished trick-or-treating, my 5-year-old looked up at me and asked, "What's fun in the next year [month]?"
What's NOT fun? Fall is in full swing, the leaves are falling all around, and pumpkin recipes are helping us all get ready for Thanksgiving!


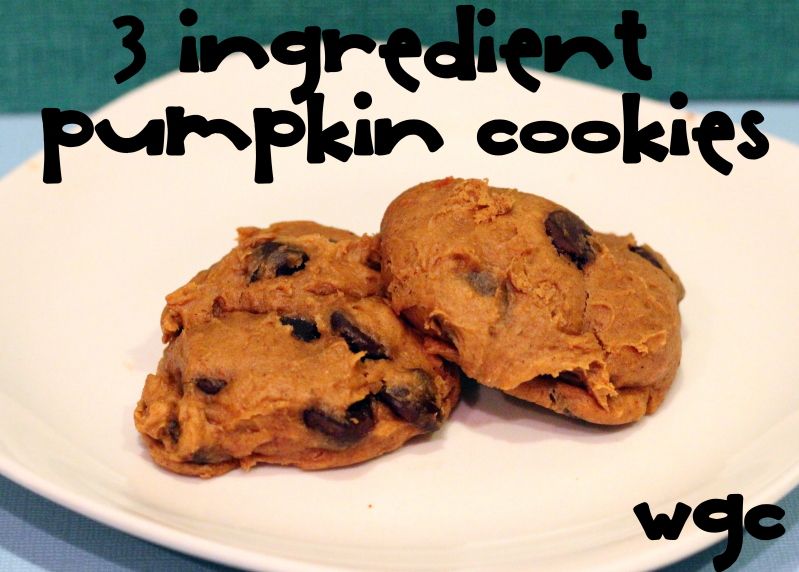

What's NOT fun? Fall is in full swing, the leaves are falling all around, and pumpkin recipes are helping us all get ready for Thanksgiving!

What are your favorite pumpkin recipes?
Share links!
No comments
:
Labels:
fall
,
fall baking
,
food
,
Holidays and Entertaining
,
Jordan
,
pumpkin
,
roundup
,
Thanksgiving
Labels:
fall
,
fall baking
,
food
,
Holidays and Entertaining
,
Jordan
,
pumpkin
,
roundup
,
Thanksgiving


Turkey Bow
Hey guys! I'm over at Mashed Potatoes and Crafts sharing my turkey bow from last year! Go check it out and give Rachelle some love!


13 Fun Ways for Kids to Learn and Show Gratitude
Can you believe it? Thanksgiving's already here! November 22nd is the earliest Thanksgiving ever comes and it certainly feels like it!
I'm definitely looking for ways to help my kids to learn and show gratitude this week, and here are 13 fun ideas I found!
1. Topical gratitude challenge

You can use these categories to go around the Thanksgiving table, too.
2. Gratitude garland

Great for decorating for Thanksgiving, too!
3. Family gratitude journal
3. Family gratitude journal

Also a fun family activity.
4. Gratitude poster
4. Gratitude poster

Beautiful, creative and grateful.
5. Gratitude tree
5. Gratitude tree

Another fun way to decorate for Thanksgiving and fall.
6. Gratitude cards

Rainbow colored cards that include prompts, ideas and tasks.
7. Gratitude banner

So many ways to use this one! Here, they've got pockets for each family member and other family members can leave notes telling why they're grateful for them.
8. Gratitude rolls

Fast, easy and fun to share at Thanksgiving dinner!
9. Gratitude at the Thanksgiving table

Prompts and papers for Thanksgiving dinner gratitude. Fun alternative to simply making rounds of the table.
10. Gratitude pinboard (literally!)

A real-life pin board to fill with things you're grateful for.
11. Gratitude alphabet

What you're thankful for, from A to Z
12. Donate food (or clothes/time/service) to those in need

I like to help my children weed out toys they don't play with anymore and donate them at Christmas time, and we'll definitely be donating food this year. (Side note: check with your food bank first. Donating food is a great gesture to involve your children, but sometimes food banks get a better deal than we do, so giving them the same amount of money can go a lot further, and you can find other ways to involve your children.)
13. Collect thank you notes and treats for our troops

You can make care packages for anyone who might need a little extra love during this season: elderly neighbors, far-off family members, our troops.
How do you help your kids remember to be grateful?
1 comment
:
Labels:
Baby & Kids
,
gratitude
,
Holidays and Entertaining
,
Jordan
,
kids
,
kids activities
,
Thanksgiving
Labels:
Baby & Kids
,
gratitude
,
Holidays and Entertaining
,
Jordan
,
kids
,
kids activities
,
Thanksgiving
Two Nursery Tutorials and a Thanksgiving Bow
After a huge response I have decided to just go ahead and post all of the tutorials for the nursery. Most of them will be simple because I don't think I was super genius in how I did things but I hope I can inspire you with what I have done. I am going to do two tutorials today and the rest next week including the recovering of the swing cushion which was voted the highest. Don't think I forgot about Thanksgiving being tomorrow though. At the end of the post I'll post an additional quick festive tutorial.
I just had to sew the left side because I used the existing seams of the pillow.
2. With a fabric pencil I drew a circle and started sewing the petals around the perimeter. Start the the knot in the back and come up through the hole in the 2 petals stacked, lace on a bead, and come back through the hole. I did this three times per petal. Move toward the middle and fill in where needed.
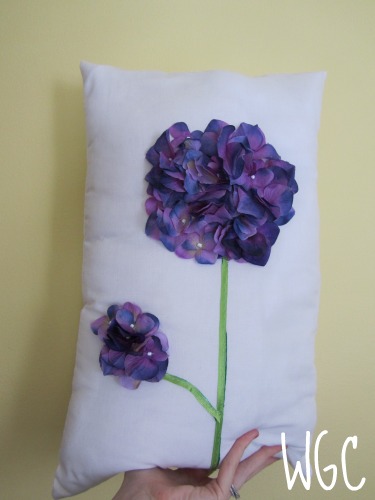
 3. I used a zig zag stitch to sew the stem on. Then I sewed up the side leaving a small opening to stuff it. I stuffed it and hand stitched the rest of the edge.
1. I used some paper to draw a template using a cereal bowl. I used a smaller circle for the inner circle. I folded the paper into 4ths and cut out a section. I traced the cereal bowl onto the cardboard and used the template for the inner circle and cut out.
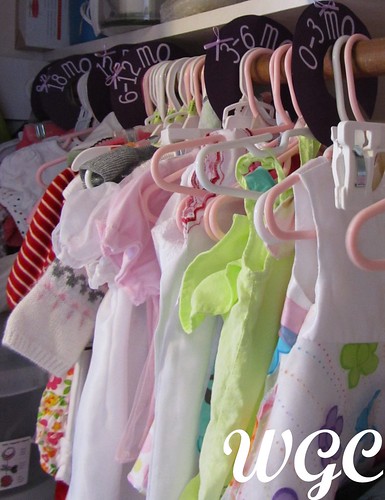
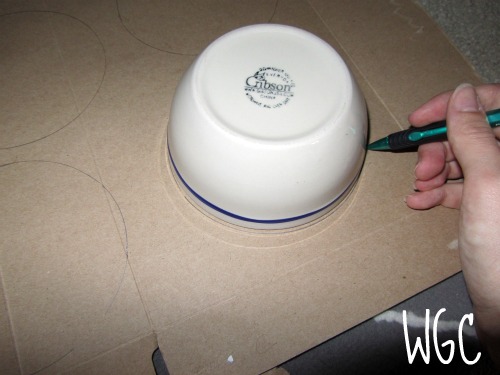 2. I used the template and cut paper out just bigger. I cut out two for each divider. I had 0-3 Months, 3-6 Months, 6-12 Months, 12 Months, 18th Months, and 24 Months. There were six dividers so I cut out 12 paper circles.
3. I cut out the letters with my cricut and glued each one on along with a pretty little bow.
Thanksgiving Bow:
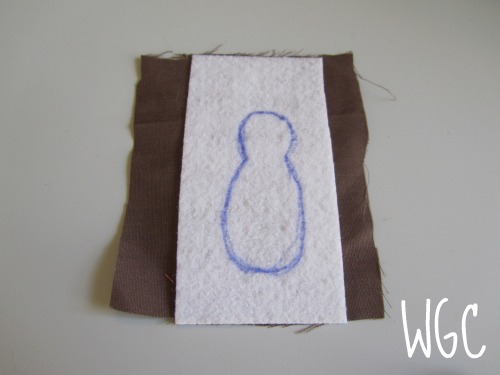
1. I cut out the shape of the turkey body out of interfacing. I cut the fabric just bigger than the body and glued it on the front. I then cut slits around the edge of the body so it would lay flat while I glued it around the edge.


2. I cut the ribbon in pink 1x 3.5" orange 2 x 3.5" and 2 x 2.5" and yellow 2 x 3.5" and 2 x 2.5" lengths. I looped them and hot glued them.
3. I glued them onto the back of the turkey with the small loops in the middle of the large loops.
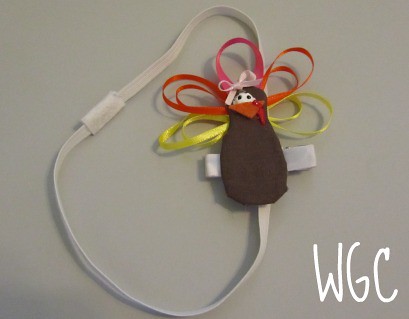
4. I glued on the small orange beak, made a waddle with red paint and the eyes with white and black paint. I made a loop with the interfacing on the back so it can be put on the interchangeable clip and onto a headband because she still doesn't have anything more than a fuzzy head :) After all this I smeared the eye so I put a bow on the Turkey because she's a girl.
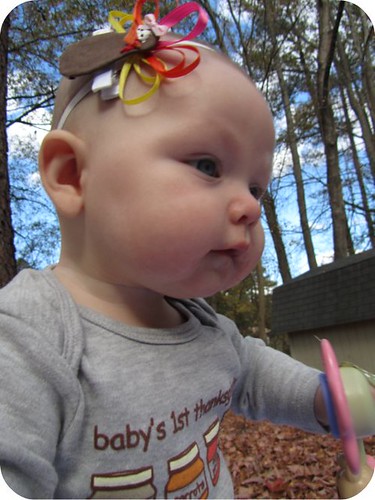
Here is her whole Thanksgiving Day outfit: Isn't she a cutie!? Her onsie is courtesy of her Aunt Jaime.She was being a total stinker and wasn't smiling.

Hydrangea Pillow
Needed:
Silk flower
Seed Beads
Green Ribbon
Old Pillow Case
Filler
1. I used an old pillow case and sewed a small pillow out of it. The dimensions of the pillow are 12" x 19.5". At this point only cut the side wait to sew it. Take the petals off of the stem of the hydrangea.I just had to sew the left side because I used the existing seams of the pillow.
2. With a fabric pencil I drew a circle and started sewing the petals around the perimeter. Start the the knot in the back and come up through the hole in the 2 petals stacked, lace on a bead, and come back through the hole. I did this three times per petal. Move toward the middle and fill in where needed.

Fabric Dividers
Needed:
Cardboard (I used a cereal box)
Scrapbooking Paper
Letters
Ribbon
1. I used some paper to draw a template using a cereal bowl. I used a smaller circle for the inner circle. I folded the paper into 4ths and cut out a section. I traced the cereal bowl onto the cardboard and used the template for the inner circle and cut out.
3. I cut out the letters with my cricut and glued each one on along with a pretty little bow.
Thanksgiving Bow:
Needed:
Ribbons (I used pink, yellow, and orange. 3.5" of the pink and 12" of the orange and yellow)
Stiff Interfacing
Brown Fabric
Fabric Paint
Small orange felt beak
1. I cut out the shape of the turkey body out of interfacing. I cut the fabric just bigger than the body and glued it on the front. I then cut slits around the edge of the body so it would lay flat while I glued it around the edge.

2. I cut the ribbon in pink 1x 3.5" orange 2 x 3.5" and 2 x 2.5" and yellow 2 x 3.5" and 2 x 2.5" lengths. I looped them and hot glued them.
3. I glued them onto the back of the turkey with the small loops in the middle of the large loops.
4. I glued on the small orange beak, made a waddle with red paint and the eyes with white and black paint. I made a loop with the interfacing on the back so it can be put on the interchangeable clip and onto a headband because she still doesn't have anything more than a fuzzy head :) After all this I smeared the eye so I put a bow on the Turkey because she's a girl.
Here is her whole Thanksgiving Day outfit: Isn't she a cutie!? Her onsie is courtesy of her Aunt Jaime.She was being a total stinker and wasn't smiling.

Thanksgiving Nails
I don't know how many of you have a Pinterest (if you don't then get on it!) but there's a lot of pins about nail art. I thought how perfect would it be to do something festive for Thanksgiving! And for my birthday, Brooke got me a nail art stylus (super inexpensive, find them anywhere, I think this one is by Loreal.) It's great. It's like using the pin but better since it has a smaller, more precise rounded tip.


(Like how all the lighting is different?? I'm a great photographer, I know.)
So here's how you make a turkey. Start with a base color. I tested out a bunch of different colors on a white piece of paper with a background and the gold I used for the body to see what looked good. You can also test out colors and practice designs on press on nail (also very inexpensive.) Start by doing the feathers. I did orange, burgundy, and red. I started from the base and moved to the narrower part of the feather. I didn't do perfect straight lines but oh well, feathers aren't straight right? I painted the head, neck and body in white first. This allows better opacity over the feathers and background. Also, it makes the gold (if you don't have brown) stand out better. Next, paint over the white with the brown or gold. Then paint the gobbler thing. First I did pink then I did red over the pink because I didn't like it. I put a small white dot then orange for the beak. Then I finished with 2 little legs. Apply a top coat and now you're done!
(P.S. I added another feather after this picture was taken)

Subscribe to:
Posts
(
Atom
)
