

So here is my tutorial for resizing and adding buttons:

What you will need:
Buttons
Shirt you want to redo
Scrap of fabric (not pictured) (1.5" x length of the shirt)
General Sewing Supplies
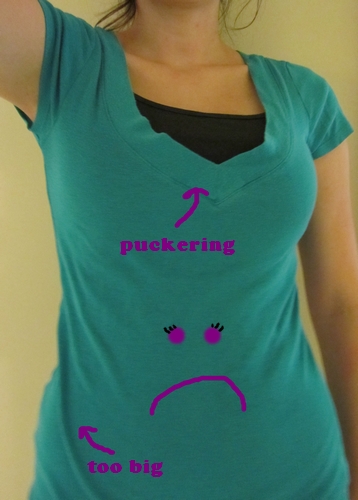
Step 1: Turn shirt inside out and find the center of the front. My shirt was a v-neck so I just folded it in half at that line. Cut the shirt length wise.
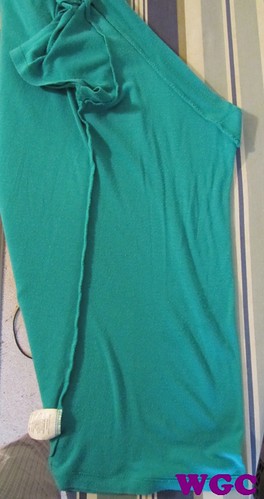
Step 2: Line the scrap of fabric up on the backside of the left edge and fold 1.5". Overlap the right side and pin in place.

Step 3: Sew the edge of the left piece the length of the shirt. I also sewed the far side. (See last picture)
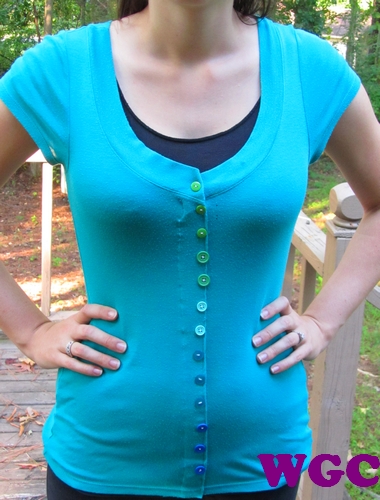
Step 4: Sew on buttons. I arranged my assorted buttons, measured the length of the shirt, and divided the length by the number of buttons. My buttons were 1 1/8" apart. I sewed on the first button and measured from the middle of that button 1 1/8" and marked with a fabric pencil. Well, I tried but the pencil wouldn't work so I just tried to juggle the tape measure in one hand while I started the needle in the right spot.
Step 5: Have a now happy shirt!
Got any good tshirt redos?

20 comments :
Can you believe she just had a baby in June people? And she has to take her clothes IN! Amazing! Great redo!
Don't you love making over old tshirts into something you love! Thanks for linking up with us at Show & Share!
Marie
mylilpinkpocket.blogspot.com
The shirt looks great--good idea. I love the button colors!!
great job! thanks for sharing:) i love the shirt color too!
wow, this is awesome. it looks so great on you! i'll have to keep this in mind when i'm about to throw away an old shirt!
i would love for you to come link up this or any other amazing project at my creativity party going on right now!
letbirdzfly.blogspot.com
thanks so much for sharing!
I love all of the buttons. Your redo turned out really cool!
This is an awesome idea.
I love it.
Your shirt can be fitting yet doesn't open inbetween the buttons :)
Great idea!
That is a fantastic idea! You are so smart!! :)
I love the varied colors of buttons.
Great job! Love it! Thanks for linking up to Things I've Done Thursday!
Melanie
bearrabbitbear.blogspot.com
Never thought to slice a shirt down the front and add buttons. Thanks for linking up with DIY under $5!
what a cute idea, love it!Hugs and wishes for a weekend filled with happy!
Cute idea! turned out great!tfs!
Such a great idea! Thanks for responding to my invite!
It looks very good! I like the buttons idea, it turns the whole shirt into a colorful and trendy piece of clothing. I myself like very much buttons :) I have a real passion for button and watches so I guess I will definetely try your idea. Thanks!
http://replicarating.com
Great idea for that shirt! Love all the different shaded buttons you used!
Thanks for linking to a Round Tuit! Remember the voting is now open – if you want to head over and vote for your project! The most voted link will get a full post feature/promotion next week!
Hope you have a great week!
Jill @ Creating my way to Success
Round Tuit 67 voting
Really cute--love the colored buttons!
That is awesome! You did a great job!
Glad to have found your blog via Ma Nouvelle Mode's link party :)
This turned out so cute! Definitely on my list "for when I learn to sew"! Pinned you, thanks for playing along with Paper Catnip & Cupcakes Pinterest Project Show-Offs :)
Post a Comment