Guest Post: Homemade Caramel Sauce

First off, thank you girls for having me today!  When Brooke asked if I would do a guest post for the day, I was thrilled to share a little bit of me with you. I blog over at Owen's Olivia, which is under some construction right now, so excuse the mess.  I blog about design, fabric, and DIY stuff.  I started my blog in July, and I love it!  I got bored being a stay-at-home mom (not complaining), so I decided to share with people what I do at home.  But in all seriousness, my blog is a modge podge of crafts, interior design, and DIY, which is quite odd since most people only blog about one thing. Brooke and I actually live near each other, and we go to the same church.  So if you want any dirty news on me, just ask Brooke.  Like do I really look like this pretty all the time?  Nope.  Does my home look anything like the awesome interior photos I post on my blog or Pinterest?  Nope.  Do I like to laugh at myself?  Yep.
Brooke was interested in knowing some of my popular posts, and I am thinking this one is going to be near the top because this caramel sauce is to die for!  Goodbye Smucker's!  Some of my popular posts include Reversible Toddler Pants, Olivia's Snack Bags, and my DIY Painted Curtains to name a few. Today, I am sharing with you a caramel recipe that I found via Better Homes & Gardens. It's a great recipe, and I have not made any changes to it.  It's just perfect. Tastes perfect.  Looks perfect.  Cooks perfectly.  Caramel is great this time of year because it reminds me of the fall.  This caramel would be a perfect gift for a friend or family member, open house, get well, welcome baby home present, thank you, or kept hidden in the back of your fridge. :)  Seriously, this stuff will get eaten too quickly! 
*The felt acorns wrapped around the canning jar can be found here.* 
  Homemade Caramel Sauce   
3/4 cup heavy whipping cream
2 TB water 
1/2 cup water 
1 cup sugar
1/4 tsp salt
1 tsp pure vanilla extract

In a small saucepan, heat on low the cream and 2 TB of water.  Do not boil the cream.  Pour the water in a 2 qt pan, and pour the sugar and salt in.  DO NOT STIR IT.  Make sure all the sugar is absorbed into the water though.  Turn the heat on medium.  Cover with lid.  Let water boil, and once all the sugar is dissolved, remove the lid.  Do not stir.  Continue to boil until the sugar syrup turns amber (light golden color).  I use a skewer and a white plate to test the color of the syrup.
This process will take about 12-15 minutes, so do not get distracted and leave the stove.  In the meantime, occasionally stir the cream.  You should see steam rising from the top by the time the syrup is ready.  Take the syrup pan off the heat, and while wearing an oven mitt, slowly add the cream to the syrup and stir.  You will see LOTS of steam, so please wear your mitt!  Return back to heat and stir for 1-2 minutes.  Add 1 tsp of vanilla.  You can serve this after it cools for a little bit, and store it in the refrigerator up to one month.  I like to use this sauce on desserts, in hot chocolate or hot tea, dip apples, marshmallows, or pretzels, or eat it by the spoonful.  **WARNING**  making this might result in this -


Thanks so much for guest posting, Nancy! Everyone else-don't forget to stop by her blog and stay tuned next week for some nursery tutorials! 

Skirt into Infinity Scarf

I’m a little bit obsessed with scarves lately. Last weekend I made two! I’m sharing the scarf I made out of a skirt.

For Halloween, I bought a skirt for $3.99 at a thrift store as part of my costume as Professor Trelawney from Harry Potter.


My husband was Professor Snape. Striking resemblance, isn’t it?

Anyways, I knew I’d never wear that skirt again. But I loved the yellow in it. So, I made it into a scarf.


Here’s what I started with.


I tried to rip out the stitches around the elastic, but it wasn't working. Instead, I just chopped the top off. In hindsight, I should have made the cut a little straighter.


 Then I chopped off the bottom. What I was left with was one big loop. I had no idea how long it'd be. But I love the length!


Then I hemmed up each side. This is where I wish my cut had been straighter. Good thing it's a scarf and it's ok if it's a little big wonky.

My final product:

I love it!

From skirt to scarf:

It's one of my favorite refashions!
Slouchy Moebius cowl

Have you ever made a Moebius strip? You take a strip of paper, turn one end 180 degrees so there's a twist in the middle and tape the ends together. If you put a pen on the strip and draw a line, the twist makes it so you actually draw on both sides of the paper and come back to where you started! (Okay, so I guess that means there only one "side.")

I love the idea of knitting with a twist, so when I came across this slouchy cowl pattern on Ravelry, I knew I wanted to give it a try.

It's a very quick and easy knit: it's in seed stitch, which is like a one-stitch checkerboard of knit and purl stitches. You use two strands of a bulky yarn and large needles to knit up a long rectangle, then twist and sew the ends together. The twist goes in the front (Ignore how tired I look ;):


The yarn I used was a bulky wool yarn called Filo from Roberts Arts & Crafts in Very Violet. My page for this project on Ravelry gives a few more technical details.

I love the colors of this, and it's nice and warm, but I have to admit I think I might have over-blocked this by stretching the fabric too much during the blocking process. I'm pretty sure I can fix it by blocking it again, a little less aggressively. How can you tell if a piece is over-blocked? It's not as stretchy as it should be, loses its drape or just looks too stretched out!

And the winner is....

Today there are kind of 2 winners! One won the fall table runner.

The winner is

ALLISON

Congratulations! Please send your mailing address to waywardgirlscrafts at gmail dot com. Thank you who entered so much!


The other winner is ME! I purchased my new sewing machine on Monday. (Pfaff Ambition 1.5) It is fantastic. I made a receiving blanket and burp cloth and used some of my 195 stitches to trim them. I learned to choose wisely-- the leaf pattern, though adorable, took a long time to do and a lot of thread to do it.


Wayward Girls send out a salute to the men and women who have served in the Armed Forces to protect our country! Happy Veterans' Day.

3 Fashion Rules to Live By

I am so happy I got some fashion questions from you guys last week! It really does make us happy to not only get comments but to get comments that answer our questions if we ask them!! Now, by next week I want a few more questions so I can have a Q&A post next week. So ask me more questions and I  will answer them ALL next week.
I am no fashion expert but here are 3 rules I think are good to live by when it comes to your wardrobe:
1. White and Black: The whole white after Labor Day is not a real rule. I think it depends on the climate where you live. If it's warm year round (feel free to invite me to visit you in the winter) then white is a perfectly fine color to choose. If it's cold out, steer clear of white shoes. White pants to me just scream "Spill something on me!" so I don't even bother but if you are magical and keep your white pants white, then you go girl! Now for black. Every girl should own a little black dress and every man should own a tailored black (other dark colors would be nice too) suit. I think the black suit is pretty self explanatory but the little black dress...now ladies that's not that simple. Little black dress just means that one nice dress that makes you look great and is black. This does not mean skimpy, shows WAY too much of you or is just plain tacky. This means classy, beautiful and nice. 
2. T-Shirt Rant T-shirt,s t-shirts, t-shirts...t-shirts should not be your entire wardrobe. I love a good t-shirt but that can't be the only thing you wear. What do I mean by a t-shirt? A casual shirt that may have some 2007 family reunion picture on it. I work with children so I completely understand that moms don't want to get nice clothes ruined with what their children may throw at them (literally and figuratively.) Aim for a date night with the hubby/wife/significant other or just even yourself once a week. This could even be a stay-at-home date night. You know what makes you feel good. So take some time out and dedicate it to you! Ok, I have more advice on t-shirts. You should not own a t-shirt for more than 6 years. Odds are, it's old, has signs of wear and tear and it's probably out dated. If you bought this t-shirt at a secondhand store, it's a good idea to keep it for less than 6 years. Graduated from high school too many years ago and still own a shirt from that era...definitely part ways with it. I am a total "but that is sentimental" person and not just with my clothes. But I have to tell myself just because it reminds me of something doesn't mean I have to keep it. And I probably have a picture or 200 of whatever it may be. If you make have a sentimental connection with that shirt, take a picture of it and then retire it in the garbage. If you just can't separate yourself with this shirt, then maybe you could make a t-shirt quilt. It's ok to keep around a couple of those oversized t-shirts that have absolutely not nice shape to them for pj's or a work shirt too.
3. Give vs Throw Giving away clothes or throwing them away should be based on age and wear and tear. If the article is outdated (if you don't know what's outdated, if it's over 10 years old, it's probably outdated or just ask a teenage girl) you could save it in a box and wait for that to come back into style (good for you if you have that storage space and optimism), cut it apart and use the fabric for a project or just toss it. If there are bad stains, holes, whatever, you probably should throw it away or tear it apart and make some cleaning rags out of it. Throwing away clothes may seem wasteful but if there is no way that someone would wear it or could use it then it's ok to throw it away. I'm all for recycling as much as you can, too. When you give away clothes ask yourself why you are giving this away. If you are giving it away because you don't wear it or just doesn't fit anymore then that's perfect. However, if you're thinking "those pants have a fatty grass stain on them" then don't give that away. It's just not good to give poor quality clothes to a secondhand store.


I found this on pinterest and found it to be amazingly refreshing coming from a very famous celebrity.

Baby Girl Nursery

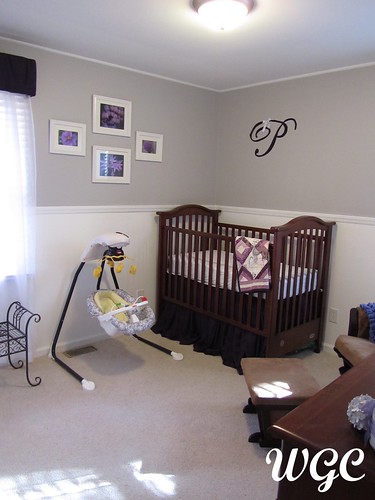
 As promised here are the pictures of the finished nursery. Last week we were working on making and putting up the cornice boards. Here are the before pictures.  The one of the left is 2009. The one on the right is terrible I know. This picture was taken I think in January. There is a bed in there. This is mostly the stuff we had accumulated for the nursery.


And After!
nursery 008
From blue and tan  to gray and purple. From beach themed to nursery
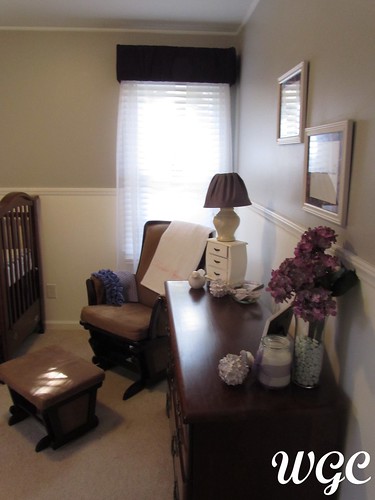
This BEAUTIFUL dresser we got at a used furniture store. It had some scratches on the top but we got a great deal (more than 50% off the price listed) and my hubby lightly sanded the scratches out and refinished the top.
I'm sad this picture turned out blurry!

I covered the mat with hydrangea paper. 
"I am a child of God"
"And He has sent me here"
nursery 015
I LOVE that glider. 
Aunt Jaime took these beautiful pictures and framed them for her.
nursery 007
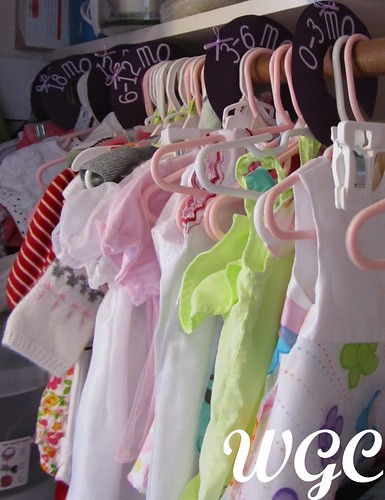
This is her closet with some things in it. I hang up her dresses and new clothes. The hand-me-downs are in bins. It drove me nuts to think there might be clothes in there I didn't know she fit into so I created these dividers.


nursery 016
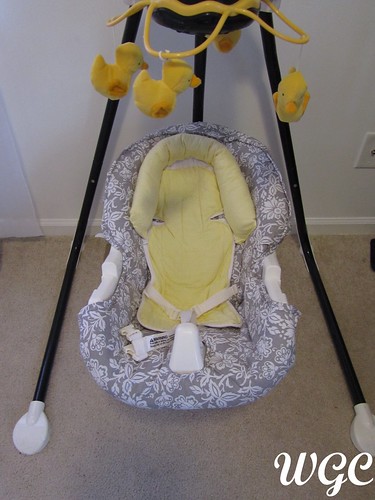
I recovered the swing my sister-in-law let us borrow.
I got this at Tuesday Morning and made the pillow out of an old pillow case and silk hydrangea petals. 
   There are still a few things that I want to do to the room but I'm so happy with how it looks. I hope it gives you some inspiration! Enjoy


Guest Post: Beaded Book Marks


Hi I’m Heather – wife to one, sibling to several, and aunt to many. I spend most of my free time making stuff for my house and sewing outfits for all my adorable nieces and diaper bags for all my friends. You can find me regularly at http://www.balladofthemckeons.blogspot.com and http://www.mypolkadotelephant.blogspot.com

With Christmas quickly approaching, I thought I’d do a tutorial of one of my favorite quick crafts that make an excellent gift – bookmarks (or book thongs if you like the sauciness). In fact I’m already planning to make one for each of the ladies in my book club for Christmas this year. (Shh don’t tell!)

And since I needed to make a few bookmarks for breast cancer and ovarian cancer awareness, I’m going to take you through the steps while I make them. First of all you need your supplies - scissors, beads, charms, and hemp twine (I like to use the dyed hemp twine, but you can also use thin ribbon or cord). And of course if you have jewelry making supplies you can use headpins to attach extra beads or charms if you like.


When choosing beads, I like to put three beads on each end, depending on the size of the beads, because I like a simpler look. But if you want more – add more! For these bookmarks I wanted to keep them very classic, so I just chose two different beads and pulled out three of each, so that my finished bookmarks will have an alternating pattern on each end. In this case I chose pink for one and teal for the other.

Next you want to pick your twine (or ribbon or cord) and cut it to about 24” this will give you plenty of room for knotting, etc.


Then choose your charm. I always choose the charm and the beads together and lay them out on the table until I get the look I want. In this case I’m using awareness ribbon charms for these. Tie your charm onto one end of the twine, leaving enough extra twine at the end to weave through the first bead. I usually just do a double knot here. (Sorry this photo is so blurry. And of course I only took one of this step. Oh well.)


Add half of your beads, in whatever order you like, over the charm. And as I said you’ll want to weave the extra end of the twine through the first bead and then snip off the excess – I think it gives it a cleaner look. Then knot the twine close over the last bead, again a double knot is all you need.


Measure about 12” up from the top knot and make another double knot.


Add the remainder of the beads. Then finish it off with a final double knot and snip the excess twine.


And that’s it. Easy peasy, right? And pretty cute too, I think.


By the way if you haven’t read Garden Spells by Sarah Addison Allen yet – I highly recommend. Anyway here are a few other bookmarks I’ve made recently to give you more ideas of things you can do.


Well thanks for letting me visit you here at Wayward Girls Crafts with my rambling instructions and blurry photos. Hope to see you soon!

Thanks so much Heather for the great tutorial! We LOVE ideas for homemade things for Christmas!
Related Posts Plugin for WordPress, Blogger...