T-Shirt to No Sew Workout Tank

So this craft is wayward, but it borders on a fail to me. I found my inspiration and pattern from Blogilates via Pinterest, her DIY Racerback Workout Shirt Tutorial found here.

I started with two shirts. Both were cast offs from my husband's college days.

Photobucket 

Then I started cutting. I did a lot of cutting. First I cut off the collar. Then the sleeves.

Photobucket 

Then I cut the neckline deeper, and the straps and the bottom, like so.

Photobucket 

And finally I finished.

Photobucket

The wonky back

Photobucket

The reason why it's kind of a fail is I feel like it doesn't fit me like it should. I should have started with a larger shirt (this one fits only a little big, when it should be at least a size bigger than you are). So the proportions seem a little off. I didn't even make a second one because both shirts fit the same way. It was my first time doing something like this so the straps aren't exactly right. BUT in the end, I still wear it to work out, so I suppose it isn't a complete fail. Next time I might use this tutorial, which has a little more detail: Trash Planet's Tutorial 

Reversible toddler sunhat

Ever seen a carnival-themed wedding? At first glance it might sound a little weird, but it's definitely a way to show your fun personality! Check out our Facebook page for pictures from the Carnival Extravaganza wedding reception we attended this weekend.

Last summer, we had a Wayward reunion at the beach—and I had big plans about all the crafts I wanted to make for our cute beach gear.

Top priority was a sunhat for my girls. I found a cute free toddler sunhat pattern with ruffles and ties online at Merriment Design, and I used a photocopier to blow it up to adjust to my 3-year-old (I think I sized it up very slightly for my 1-year-old, too).

The pattern is adorable as is, but . . . I'm wayward. I can't just sew according to a pattern! I have to do something! So I adapted Merriment Design's pattern to make the hat reversible. You can see a peek of the inside fabric in this shot:


For the most part, the changes are pretty easy, but be sure to read the notes at the end!

Materials needed:

Cut out your hat!
Using Merriment Design's pattern:
  • Cut 4 triangles from fabric 1
  • Cut 4 triangles from fabric 2
  • Cut 4 brims (2 top, 2 lining): Fold fabric 1 in half, right sides together. Cut 1 brim pattern on doubled fabric (making 2 pieces). For the second brim, fold fabric 2 in half, wrong sides together. Cut 1 brim pattern on doubled fabric (making 2 pieces).
  • Cut 1 strip 25″ x 2″ for ruffle in each fabric
  • Optional: Cut 2 strips 16″ x 1″ for the ties in each fabric (I used ribbon for my 1-year-old's hat, and omitted the ties for my 3-year-old's)

I won't copy all of Merriment Design's instructions, but following her directions, sew together the 4 crowns in each fabric, and then sew the two pieces of the brims together in each fabric (you will end up with four separate pieces at this point: a crown in each fabric and a brim in each fabric).

Make the reversible ruffle!
Match the 25" x 2" strips and pin right sides together. Sew a seam along one edge.
Press closed, then press open, then fold back and press flat:

Using two rows of long basting stitches along the raw edge, gather the ruffle to fit along the outside (larger in circumference) edge of the brim. Matching fabrics, pin right side of ruffle to right side of one brim, with raw (gathered) ruffle edge along outside brim edge (larger in circumference). Sew down.

Place the other brim right side to right side, "basically making a ruffle sandwich with the two right sides together" as Merriment Design describes it. Sew along outside edge.

Always being careful to match fabrics, sew the crowns and brims together using Merriment Design's instructions. If you're using ties, I recommend sewing those to the matching side of the brim before sewing to the crown. When the ties are on the "wrong" side, you can tie them in a bow at the back of the crown.

Notes!
Between the extra fabric from enlarging the hat and the added weight of the ruffle seam, the brim of my 3-year-old's hat was a little extra floppy. She loved it, but I would recommend lining the brim using interfacing.

There are two ways to do this:

1. Iron fusible interfacing onto the brim fabrics before cutting out brim pieces.

2. Fold interfacing in fourths and cut 1 brim (making 4 pieces), sewing the two pieces of each interfacing brim together, then adding those pieces to the outside of the ruffle sandwich and sew, being careful to match the asymmetrical shape of the brim.)

Rebecca with a friend

I made my girls' hats with a total of 3 fabrics: one fabric for both girls' hats so they could have a matching pair, and the other side in two different fabrics to match each of their towel coverups.

Unfortunately, the beach didn't agree with my one-year-old and she hates hats. But Jaime was kind enough to model for us (okay, she was making a face, but you get the picture here):

What do you wear to the beach?

17 Last-minute Father's Day Crafts Kids Can Make

Father's day is here! Of course you didn't forget--but maybe your kids did ;) . Here are some last-minute crafts kids can make as gifts for Dad's special day--on Dad's special day.


1
Daddy? Darth Vader onesie from Sisters, Sisters
(you could also scale this up for a matching shirt for Dad, captioned "Who's yo Daddy?")
(Kids may need a little help with this)

2

Best Daddy/Grandad Ever (Jelly) Beans printable from the letter 4

3

I got this frame at a Dollar Tree, but you can do this with a Silhouette or Cricut. I don't have either of those, but an Exacto knife and poster board would work, and the kids can help you pick out photos.

4

Homemade Stress Relief Balls from Craftivity Corner @ Family Education Blogs

5

Father's day tie scavenger hunt from here on Wayward Girls' Crafts
(sorry, iPhone not included)

6

Dozens of Father's Day Handprint and Footprint crafts from . . . Handprint and Footprint Art

7

Daddy Tokens Tin from Eighteen25

8

DIY Lenticular photos: use photos of your kids or family from here on Wayward Girls' Crafts

9

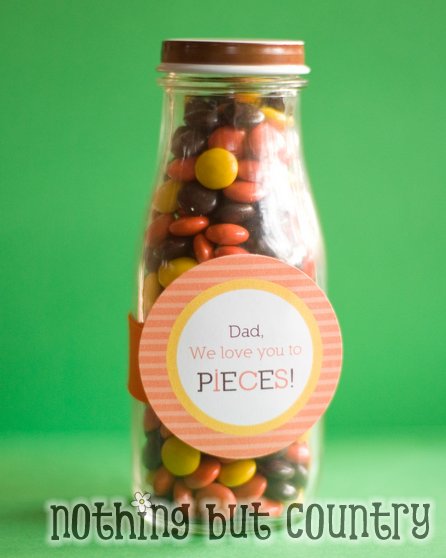
Dad, we love you to (Reese's) pieces! printable from Nothing but Country

10

Personalized note cube from Cool Mom Picks @ BabyCenter

11
Father's day coupon books from here on Wayward Girls' Crafts

12

Love notes on paint chips from Eighteen25

13

Daddy's Soda with shirts and ties from The Idea Room

14

Fabric paint or even acrylic (you don't machine wash ties, do you?) to put a footprint on a tie

15

Free printable All About Dad book from Eighteen25

16

I love you THIS much/hug card from Day in My Life

17
If all else fails, the way to a man's heart is through his stomach! Check out our desserts and other recipes here on Wayward Girls' Crafts.

Saturday Sister Spotlight 5: Babblings and More

I love coming across other sister blogs in the craft blogosphere. I always feel an instant connection with other sisters who are blogging about crafting together, and I want to share these fantastic blogs with others. So this time, I'm sharing . . .


Babblings and More


Last week, the lovely sisters behind Babblings and More were kind enough to feature us, and this week, we're spotlighting them here:
Bridget, Briana, Brooke & Brittany
Or, in age order:
Briana loves to cook, but doesn't like the cleaning part as much.  She goes through phases on what she likes to do.  Sometimes it's reading, or sewing, or jewelry making, or card making, and the list goes on.  She loves photography and loves learning how to edit pictures. 
Brittany is very talented at canning.  People come from miles around to learn from her.  She also makes beautiful quilts. And she has a box of homemade cards to send to friends and family. She NEVER forgets a birthday and will gather her whole family around the phone to sing to you!
Bridget has a Candy Shop called Do T Do, where she makes hard candy and suckers out of Essential Oils. It keeps her busy like a part time job and the best thing about it is that it makes her house smelling yummy. Other than candy making she likes to do leather work and fiddle around with her sisters.
Brooke likes to sew, cook, bake and try anything new- but Brooke's favorite thing to do is play the fiddle on the weekends at the Big Texan Steak Ranch.
And they're all very talented at crafts! Just check out some of their awesome posts:

Brooke's Crop-it-yourself jean jacket

Briana's Monster Pillows

Brittany's (and Briana's) Fondant Ghost cupcakes

Bridget's Repurposed rake jewelry holder
And no Saturday Sister Spotlight is complete without a . . .

Saturday Sister Challenge!

Babblings and More has accepted a Saturday Sister Challenge around the theme of POPSICLE!

We'll update this post as Babblings and More post their responses to the challenge, but you can see all their great crafts on their blogFacebook or Twitter!

UPDATE!

Briana created this adorable popsicle shirt!


So cute!!

Polka Dot and Ombre Cake

Brooke had a very PINK party for her baby last week and asked me to make an ombre cake for it. It was easy and turned out OK. (This is about wayward crafts, you know.) Now that I have done it once, I know I could do it better the next time.

The cake needed to feed about 40 people, so I used a 10" round pan. I used 1 cake mix to make 2 thin layers. I used gel food coloring this time, but if I did it again, I would use liquid because you can measure liquid more accurately.  So...add 4 drops of food coloring to the cake mix and mix as directed. Pour 1/2 of the mix into a prepared cake pan. (It will be about 2 1/2 cups) and bake according at 350 for about 18 minutes. Since I only have one pan, I had to wash the pan now to use for layer two. Add 2 more drops of food coloring to the remaining mix and bake. Continue increasing the amount of food coloring each time. I made 6 layers. I would have liked to have had more variation in the color, but you take what you get.


After I stacked and frosted the cake, I decided to decorate it with pink polka dots to match the birthday girl's romper. You could use fondant, but I decided to use white chocolate which I dyed. Follow the directions for melting a small bit at at time. I added just a touch of gel coloring each time. I spread the melted chocolate onto wax paper. You have to watch the chocolate carefully so that you cut it with a round cookie cutter at the right moment--right before it becomes completed solid. Once you have your polka dots, add them to the frosting immediately after you frost the cake.

Use a round tip to make a dot border and enjoy.


Creative Date Night

My roommate and I wanted to go on a fun double date that was inexpensive. On our double date we went to the local thrift store with $10 for each couple. We split up and picked out fun outfits for the other couple keeping in mind our $10 or $5 per person budget. We kept the outfits we chose a secret from the other couple. We then went to the photo lab on our campus (you can make a mock photo lab with a large white sheet or you could go to a park/gardens) and set up for a wonderful modeling session. We then exchanged the outfits. After laughing for a bit, we struck a pose and took pictures first as couples then as a group.  After that we went to Jamba Juice and ordered smoothies we hadn't ever tried from the Jamba Juice secret menu which you can find online. It was a lot of fun and rather inexpensive.


Father's Day Scavenger Hunt

We celebrated Father's Day a little early around here because my hubby is working this Sunday. He has been hinting about an iPhone for about a year now. I finally caved but made him work to find it! He said he had no clue what I had gotten him he thought it was a tie.

Father's Day Tie Scavenger Hunt

Tips:

  • Number each clue and where it should go.
  • Be creative!
  • Make sure your clue will fit in the space . Little #5 went inside the AC controls.


My Clues:
1 Follow each clue to see why (and how) we love you! Start by looking where we keep the stuff cold that we nourish our body with! Because you bring home the bacon! (Fridge)
2. Look where I store all the resources you provide so I can buy the stuff for our house. (My wallet)
3. Go to the latest splurge to help us keep clean. (Washing Machine)
4. You provide so we can stay cool when it's hot outside. (AC)
5. We can pay the bills that the mail lady brings. Find the next clue where these are delivered (Mailbox)
6. Yum! Find the next clue behind our nightly treat. (Ice cream)
7. This keeps us going and you pay for it! The next clue is where we pump. (Gas tank cap)
8. You gave her to me. Where she sleeps lies the tie. (PB's bed)
9 We rest easy because of you! Your reward lies where you rest your head! (under pillow)
10. We love you! You deserve this! Happy Father's Day! (iPhone)


And the winner of the Monster Photobooth Props is:

Lauren at Shooting Stars Mag!

Email your address to waywardgirlscrafts at gmail dot com (you know how to do it) so we can get those out to you ASAP.
Related Posts Plugin for WordPress, Blogger...