

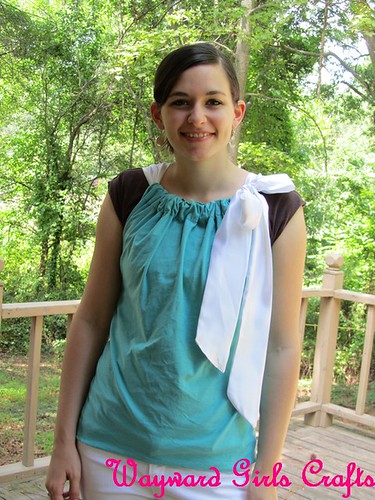
Pillow Case Top from Scratch
Needed:
1 hour and a half
3/4 yard of Jersey Knit fabric (60" wide)
1/3 yard of silky fabric (45" wide)
Coordination thread
Step One: Make the tie-
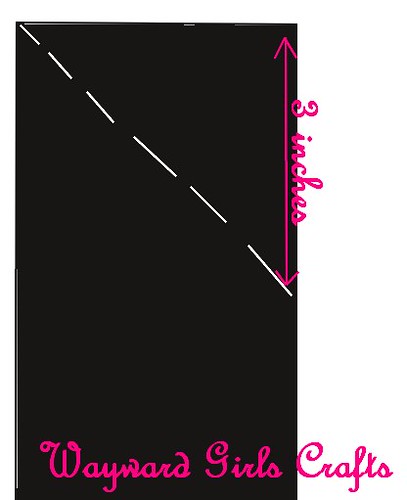
- Cut the silky fabric 5 inches wide in two 45" strips. I thought 3 inches was too wide:( If you want yours as wide as mine I originally cut 6 inch to make them 3" wide instead of 2.
Don't you love how crooked they cut the fabric at the store?"
- Sew the two strips together to make one long 90" inch strip.
- Fold in half with right sides together, pin.
- At each end three inches down mark a line to the opposite corner (see picture)and sew.
- Leaving a 6 inch gap in the middle, sew along edge.
- Turn right side out through gap in middle, fold under and sew gap.
- Press
Step Two: Make the shirt-
- Cut the fabric 23" (W) by 26"(L). In the tutorial I mentioned I found the dimensions to be way too large. I have a long slender torso so you may need to adjust your fabric somewhat. You might want to start bigger (her dimensions were 30" x 30") if you feel it will be too small. I made the other shirt first so I had some numbers to go off of.
- Press a two inch from top and baste stitch. This step it to prevent the jersey knit from rolling when you fold it over.
- Fold over to make casing a sew zig zag stitch along bottom of edge of casing.
- Thread the tie through the casing and put on. Pin where the arm holes should stop below your under arms.
- With right sides together sew up sides.
- Zig Zag stitch on arm holes and around bottom (see video). Try on
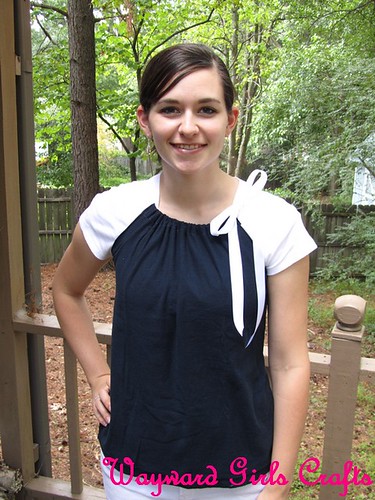
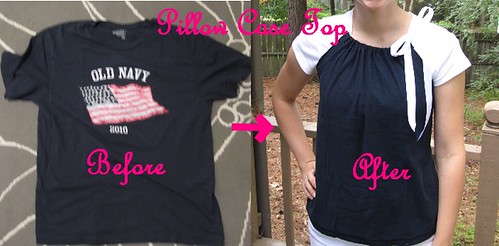
Very East Pillow Case Top from Men's Shirt
Needed:
20-30 minutes
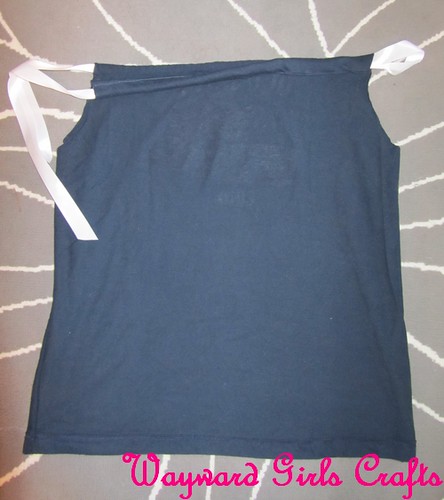
Men's Shirt- I used my husband's old 4th of July Old Navy shirt that had shrunk a little. It was size large. The shirt after step one was 21" (W) by 23.5" (L)
1/2" wide ribbon
Coordinating Thread
Sewing Ruler
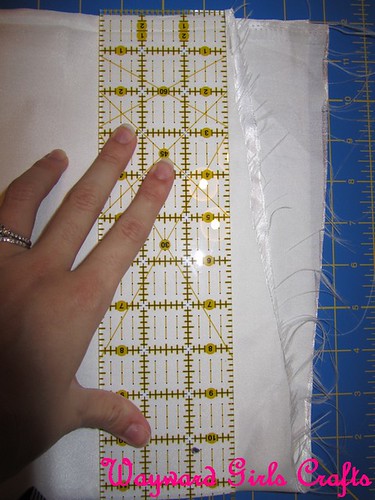
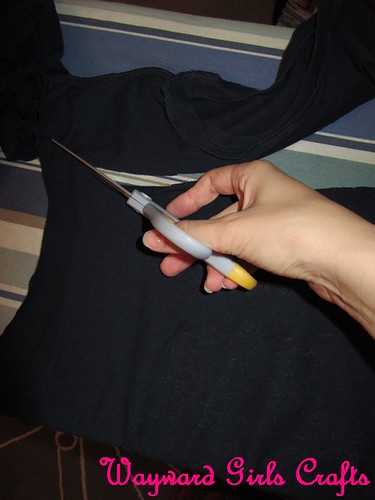
- Turn shirt inside out and cut off arms. Align the ruler at the base of the collar and cut in straight line across.
- Make 1" wide casing and straight stitch along bottom. **Make sure here that your new right sides is actually the inside of the shirt since. You don't have to do this but mine had a flag I didn't want on it so I just used it inside out. I will now refer to it as the (old outside and new inside) flag side.
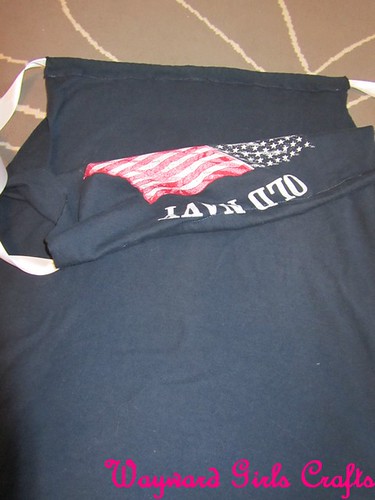
- With flag sides out sew along each side with a small seam allowance. I did this so that the old inside seam wouldn't show.
- Thread ribbon through casings and try on!
Have any shirts you want to revamp?

24 comments :
Love this! Awesome job!
So cute! I was going to get a new top today, but I might just make one instead!
I love this! What a fun idea! I made pillow case dresses for my girls! This is so creative!
I have a link party going on now, called Show & Share. I'd love to have you link this up!
http://southernlovely.blogspot.com/2011/08/show-share-2.html
Ok, now THAT was cool! I'm going to have to try that!
way clever--great idea
They both look amazing!!! I love the sleeves you added to the second one too. Very girly! I'd have never known it was a men's t-shirt.
Super cute! I love that you used an old t-shirt! I'll be hunting through my DI pile before it gets shipped off! Thanks for linking up with us at Show & Share!
Marie
mylilpinkpocket.blogspot.com
ADORABLE!! Would LOVE it if you would share this at my new turquoise lovin' party going on right now!! ;) http://www.sweetlittlegals.com/2011/08/turquoise-lovin-1.html
I, too, made a shirt from that tutorial a few weeks ago. But I had a minor wardrobe malfunction thanks to my 2-yr old and haven't worn it since. I LOVE your idea of wearing a t-shirt underneath! Brilliant!
These are too, too cute! I almost bought a top exactly like this at JCPenney, but they were out when I went back today. I was SOO sad! I want to make one so bad. Gotta learn to sew! Oh and total brilliance using the flag shirt inside out! Thanks for linking up with DIY under $5!
Oh very good! I've made a pillowcase top before too. I also do a weekly link up if you're interested in taking part!
WOW! Super cute! I cannot believe the 2nd one is an old tshirt turned inside out!!! Amazing transformation.
Id love for you to come on over to my place and link up to my new diy fashion party called DIY Diva Thursdays!
Kara
www.mineforthemaking.com
So cute! Hope I can try this soon.
What a great idea!!! How cute!
Fabulous. I love them
I am new follower from the Craft Junkie Too Linking party would love for you to come by my blog
www.touchedbyabutterfly.blogspot.com
Wow! These look fantastic! I love the second one :) And yes, the cutting at the store can be terrible! If only they gave a little extra to allow for that!
This looks very similar to a tutorial on my blog. Lol. You can't go wrong with a pillowcase top, though! I love your fresh spin by adding the sleeves, too. And lately I'm into anything refashioned so I especially like the one made from a men's shirt. I might even have that exact same shirt because my boyfriend used to work at Old Navy and on patriotic holidays they made him wear that shirt. I'll have to try it out! Thanks for sharing (and sorry about rambling! Whoopsie!)
--Madison
www.craftycritique.com
so cute and modest. Definitely need to try this.
Fabulous shirt re-vamp idea! I turned a boxy men's shirt into a ladies shirt. (I appreciate the modest length, and neckline...) Check it out: http://wp.me/pYcKQ-b9
I just hopped over from Hope Studios Tutorial Tuesday. Please hop over if you get a few minutes. :)
So fun! Congrats -- you've made the Top 3 over at Craft Junkie Too's T.G.I.F. Linky party from last week. woot! woot! Stop by and grab the Top 3 button for your blog. :) and can't wait to see what you link up this week girls!
Tracy
http://www.craftjunkietoo.com/2011/09/tgif-linky-party-23.html
What a cute way to reuse old tees! Thanks so much for linking it up to the Tuesday To Do Party! Can't wait to see what you've been up to this week!
Smiles!
Jami
www.blackberryvine.blogspot.com
They both look great! Now if only I had a sewing machine!
Ah! these turned out great!!
Coming from Ma Nouvelle's Pinterest linky party!! :)
Thank you so much for this post...so awesome to see how you reused that old Tshirt! Do you have any idea how many T-shirts I have thrown out or given away that could have been fabulous. I'll need to try this one! I'm a follower!
Post a Comment