


Chocolate Covered Bears
I decided to be adventurous and try out hand dipping/decorating Cinnamon bears. I attempted to make them look like a bride and groom using milk chocolate and white chocolate. First I covered them in either milk or white chocolate. I put them in the freezer for a couple minutes to cool down. For the groom, I added a white triangle to look like a shirt with a toothpick. I added cuffs, and mixed a touch of milk chocolate in some white chocolate to make a tie. For the bride, I added little dots on the top of her dress with a toothpick. I covered the bottom in more chocolate, let it set a little bit then took a toothpick and made grooves in the bottom of the dress to make it look like a skirt. For the veil, I just layered 2 layers of chocolate (the first was done when the bear was coated in chocolate.) I dipped pretzels in the left over chocolate. Needless to say, I don't think I need to try to pursue a career as a chocolatier :)




Book Club Bookmark
A couple years ago I was in a great book club. We had a ton of members and really fun meetings every month. I made bookmarks one month with the next book plus the next three books written on them so each member would know. In our library (which I'm sure is available in most libraries) we could check out book club kits which included a set of books. I handed out the books with the bookmarks in them. This would also be a great way to start a book club.
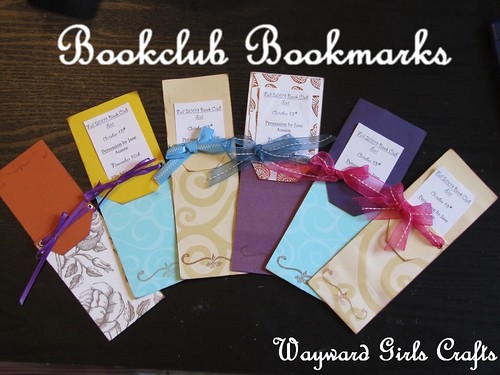
What you need (per bookmark):
- Two-sided paper or 2 coordinating papers- you can get 5 book marks from a 12x12 sheet of paper
- 2 eyelets (and setter)
- book list
- embellishments (I used ribbon and a stamp & stamp pad)
Instructions for two different papers
Step 1: Cut main paper 2.25" x 11.5" and coordinating paper 2.25" x 3.5" (A) and 2.25" x 1" (B).
Step 2: Glue coordinating paper to the back of the main paper. (A) or top and (B) on bottom


Step 3: Fold paper across bookmark 6.5" from top

Step 4: Fold out paper 1 inch from bottom (at edge of (B)) and glue down
Step 5: Put eyelets at top of (B) to create the pocket.

Step 6: Embellish! I used ribbon in the eyelets and a stamp at the bottom of the page. I also rounded the corners.

Instructions for two sided paper
Step 1: Cut paper 2.25" x 11.5"
Step 2: Fold paper 6.5" from the top and fold out 1" inch from bottom and glue down.
Step 3: Use eyelets at top of small fold to hold bookmark together.
Step 4: Embellish! (see above)
Here is another example:

I know I got this idea somewhere but I can't find the link!

Freeing Yourself of Your Crafting Stash
A while back, I read a blog entry about someone who said they needed a truck to move all of their scrapbooking supplies. I laughingly told that to my husband. He said, “Well you do have a lot of scrapbooking supplies,” That’s the first time I started actually thinking about the amount of stuff I was accumulating. How did I start collecting supplies rather than using them? How were my buying habits affecting what I was actually using?
Here are some tips for making the most out of your craft stash:
Here are some tips for making the most out of your craft stash:
- Buy what you need. Makes sense doesn’t it? But really examine your needs. How many brown ink pads do you really need? I say 1. Your number may be 4, but stick to it! Think very carefully about what you NEED and what you can reasonably do---aka don’t make it overly Wayward.
- Use what you have. Again, this seems obvious, but think about that beautiful paper or paint you bought for the perfect project. Has that project ever happened? For me, that’s a no. Use your supplies, that’s what you bought them for!
- Purge what you don’t need and donate/sell it. Remember when you bought that huge cork board from Goodwill because it was only $2 with great plans to make an amazing craft? Then you got home and got distracted and then wondered how you could actually cut cork board since you don’t have a rotary cutter. Your cork board got put on the back burner and that was 8 months ago. Where you are now, is it likely you will ever get around this craft? Or should you let that cork board go? This goes for all craft supplies. If you’re not going to use it, give it to someone who will. Schools, Girl Scout Troops, and other crafters would love to use your supplies if you are generous enough to give them up. Think about it! If you have items like Cricut cartridges you never use, you could sell those on ebay.
Having just moved, I have done a LOT of number 3. I asked myself “Is this worth the storage space? Am I really going to use this? What purpose would this finished craft serve?” And so, I got rid of a lot of stuff that just worth storing to me.
What supplies could you free yourself of?
**I should mention, I kept that cork board. I want to make a jewelry holder.


Iron Craft 1 part B: Dry Snowglobe
I had some finishing touches to do on this one (like figuring out the Shrinkadink with Mom & Jasmine) before it was ready. But now it's done and ready to share!
With three kids five and under, I have to be really careful about what kind of breakable things I make or use. Partially inspired by our Christmas in July series, I made a Christmas-themed "dry snowglobe" that won't make a big mess if my kids get into it.
Materials (Iron Craft secret ingredients in bold):
Cut the feathers into small pieces and put them in the baby food jar. (Alternatively, you could use a good amount of glitter. I used both, but the glitter didn't work very well with the feathers.)
Sand the Shrinkadink and use the colored pencils to draw your shapes to go inside the jar. I did a reindeer, Santa, and a North Pole sign. My larger figures were about 4-5 inches tall and shrank down to between a third and half their original size. (We shrank the shrinkadink in a 350 degree oven for 3-5 minutes—but follow the directions on your materials!)
I covered the baby food jar lid with aluminum foil tape on the outside. Inside the lid, I used a muse token (covered with aluminum foil tape) as a backstop for my figures.

The muse token and the figures are stuck in there with hot glue:

The North Pole sign was too short to see over the neck of the baby food jar, so I used other pieces of shrunken Shrinkadink (that I was going to use to make a necklace with my other muse token but I didn't like how it looked) to build a platform. I glued about four of them on top of one another.
To finish your snowglobe, just screw on the lid:

You may want to adjust how much "snow" you want in your jar. My jar was a little over half full of feather fluff and the best way to see my figures was to lay it on its side like this. Right now, it's kind of a cross between a snow globe and one of those "I spy" in a bag games. But that might make it even more fun for my kids, right?
What would you put in a dry snowglobe?
With three kids five and under, I have to be really careful about what kind of breakable things I make or use. Partially inspired by our Christmas in July series, I made a Christmas-themed "dry snowglobe" that won't make a big mess if my kids get into it.
Materials (Iron Craft secret ingredients in bold):
- Scissors
- White feathers
- Hot glue gun
- Baby food jar
- Shrinkadink
- Sandpaper
- colored pencils (or no sandpaper and colored sharpies)
- Muse token
- Aluminum foil tape
Cut the feathers into small pieces and put them in the baby food jar. (Alternatively, you could use a good amount of glitter. I used both, but the glitter didn't work very well with the feathers.)
Sand the Shrinkadink and use the colored pencils to draw your shapes to go inside the jar. I did a reindeer, Santa, and a North Pole sign. My larger figures were about 4-5 inches tall and shrank down to between a third and half their original size. (We shrank the shrinkadink in a 350 degree oven for 3-5 minutes—but follow the directions on your materials!)
I covered the baby food jar lid with aluminum foil tape on the outside. Inside the lid, I used a muse token (covered with aluminum foil tape) as a backstop for my figures.
The muse token and the figures are stuck in there with hot glue:
The North Pole sign was too short to see over the neck of the baby food jar, so I used other pieces of shrunken Shrinkadink (that I was going to use to make a necklace with my other muse token but I didn't like how it looked) to build a platform. I glued about four of them on top of one another.
To finish your snowglobe, just screw on the lid:

You may want to adjust how much "snow" you want in your jar. My jar was a little over half full of feather fluff and the best way to see my figures was to lay it on its side like this. Right now, it's kind of a cross between a snow globe and one of those "I spy" in a bag games. But that might make it even more fun for my kids, right?
What would you put in a dry snowglobe?


Iron Craft
I was definitely uninspired with the iron craft challenge. In the end, I made 3 items that are so-so at best. (Guess that's why we're called wayward.)

 The first one is an inspiration jar. I covered the lid with aluminum tape (which I LOVE!) then antiqued it by holding it over a candle flame. I used tiny strips of the tape with power words written on them. They looked engraved. I used a black wire to loop around and hold the medallions.
 My second craft used the feathers, the flowers, and a bit of T-shirt to cushion the back of the clip on the baby's head.



Iron Craft 4: Headband and Courageous Moments Jar
So if you missed it we are doing a IRON CRAFT this week. To get the full scoop go here. To see Jordan, Jaime, or Brooke's amazing crafts did click on their names.
Well, I'm not really sure where my headband is at the moment and since my 3 year old niece is asleep in my room, I can't search for it. But as soon as I find it, I will add a picture up here! I used the t-shirt, feathers and flowers.
I also made a jar for courageous moments from the baby food jar, aluminum tape (decoration on the lid), 2 tags (Courageous and Moments), and a shrinkadink (with a quote on it.)

Well, I'm not really sure where my headband is at the moment and since my 3 year old niece is asleep in my room, I can't search for it. But as soon as I find it, I will add a picture up here! I used the t-shirt, feathers and flowers.
I also made a jar for courageous moments from the baby food jar, aluminum tape (decoration on the lid), 2 tags (Courageous and Moments), and a shrinkadink (with a quote on it.)
"People are made up of flesh, blood and a miracle fibre called courage."- Mignon McLaughlin
Iron Craft 3: Magnet Picture Frame, Headband, Candle holder, and Card
So if you missed it we are doing a IRON CRAFT this week. To get the full scoop go here. To see Jordan and Jaime's amazing crafts did click on their names.
After much crafty thought I came up with four different crafts that used all the secret ingredients. The items are:
A magnetic picture frame
 |
| Shrinkadinks and tags |
 |
| Close up and a picture of my SIL's cute fam. The tag says "Forever more" |
a headband (idea came from here)
 |
| Tshirt and flowers |
a candle holder
 |
| Tag and baby food jar. The tag says "wonderful" |
and a thank you card
 |
| Aluminum tape and feathers |
Enjoy!

Subscribe to:
Posts
(
Atom
)
