
Stockings in October

I am not usually one to jump the seasons, but this year I have to get an early start. With Jasmine's wedding a few days after Christmas, I need to get things done early. One added benefit of having a Christmas wedding is that everyone will be home for the holiday. This makes me very happy, but a little stressed! This is why.
Long ago, I made patchwork stockings for the girls. They were personalized to represent things they liked at that time.

 Each one is sewn with trims, satin stitching and embellishments. They are lined with a white fabric.

Eventually, our family expanded when Jordan married. I made one for our new son-in-law. Amazingly, they had a wonderful little baby who needed a stocking. Not long after, we added another son-in-law when Jaime married.

 Husband #1 has ties to Scotland, so he got lots of plaids, including a small patch of his own tartan plaid. Husband #2 is a huge Yankees fan, so that featured prominently in his stocking. Baby got baby things.

Of course, Brooke couldn't be left behind, and it wasn't long before we needed one more stocking.

 As I had a little more time when I made these individual ones, I added special embellishments such as a handmade tassel, specially printed fabric, and nice thread.
Yep, I made the tassel. The clan tartan is the blue, green, and white one on the left. I used a fancy stitch on the right side.
Hubby #3 loves dogs -- both police dogs and golden retrievers. I printed this on fabric with my ink jet. 
Hubby #2 is in economics, so I chose a money fabric trimmed in gold.

 These later versions have fun, personalized linings, too. For example,

 
The backs are also patchwork, but without the embellishment.

Now, however, I need to get 3 stockings made kind of fast. I felt like I didn't have time to sew patchwork.
I decided to use iron on adhesive.
So I cut the backing fabric and the iron on adhesive in the shape of the stocking. Follow manufacturers instructions. (or don't. It's up to you!)
I placed the backing wrong side up and laid the adhesive on it. Next, I cut out fabric into squares. I still had fabric from the first stockings, so some fabric appears in all 11 stockings.
Then I started laying out the blocks on the adhesive/backing sandwich. I had to trim some and move them around to make things fit. I allowed the blocks to hang over the edges. When I was satisfied with the design, I made sure no adhesive was showing. I carefully ironed the blocks in place.

I haven't finished yet, but I will make the back with two layers of fabric. I could use the adhesive between these fabrics, but there is no need to. I will sew a 1/2" seam all around the stocking, and then around the opening. I will add a ribbon hanger and trim the edges with my pinking blade of my rotary cutter.
Then I will be done, and that will be one thing off my to do list!

Blogger Absence Apology

Dear Wayward Girls' Crafts Readers,
 I am so sorry I have been absent for the past couple of weeks. Here's my excuse for totally forgetting to blog two weeks ago: It was a busy week of work and helping my dear sister, Brooke, move into a new home and helping her pack and move and unpack and having to pack for my own vacation and please imagine me saying this all in one breath. So, it's ALL Brooke's fault for that week's post. Ok, not really, I could've prepared something but I really had no time to craft so I guess I'll take SOME of the blame...but most of it can go on Brooke.
Now as for last week, I was out of town visiting a special someone. This turned out to be quite a good trip. A special shout out to Jordan for providing many miles of traveling entertainment! I greatly appreciate it. I'm sure Becca liked spending time with her best fwiend evay as well. I got to see my cousins, old roommates, lots of Bison (quick trip to Yellowstone...well it wasn't quick but you know what I mean), and then on Wednesday of last week, I found this weird thing...and then that special someone was on one knee...and then I said YES!! And now...

I'M ENGAGED! which means, get prepared for a WHOLE lot of wedding related posts. I will be getting married December 28th of this year!

Oh and did I mention it's my BIRTHDAY! Yay! What a happy day it is to announce my engagement to you all on my birthday!

Pumpkin Carving Ideas

The Wayward girls have a strong tradition of carving pumpkins. After lining the dining room table with newspaper, we'd all get to work gutting and carving! We've shared some of our pumpkin designs and thought we'd give you a few ideas since it's that time again!

Jasmine, Brooke and her husband carved these bad boys as an homage to Harry Potter.

 
A dementor and patronus, the three brothers, and a witch.  

Jaime and her husband are also HP fans. Here's what her husband carved. 
Photobucket
Voldy!

Jordan's son (5 at the time) designed and husband cut this cutie!


Brooke's little girl could be found playing around:


Have fun carving!

3 Ingredient Pumpkin Cookies

Fall baking means one thing to me: PUMPKIN! I've been meaning to make some pumpkin cookies and friends coming over for lunch in between General Conference Sessions was a great excuse. I found the idea of making pumpkin cookies with only 3 ingredients all over and I knew I had to make them myself.

Photobucket

3 Ingredient Pumpkin Cookies

Photobucket

Ingredients:
1 15 oz can of pumpkin puree (not pumpkin pie filling)
1 cake mix (I'd recommend Spice Cake)
1 bag (2 cups) of chocolate chips (I'd recommend dark chocolate chips)

Optional: Pumpkin pie spice. Really you only need this if you use a regular cake mix, rather than spice cake.

Directions:

1. Preheat oven to 350. Mix together pumpkin and cake mix using a mixer.

Photobucket 

2. Stir in chocolate chips

Photobucket

3. Glob 2 tablespoon sized cookies on a greased cookie sheet.

Photobucket

4. Cook at 350 for 12-15 minutes, or until a toothpick comes out clean.

Photobucket


5. ENJOY!

Photobucket


What excuse can you find to make these babies?

30-minute breadsticks (from scratch!)

I don't shy away from making my own bread, but the time commitment of rising the dough does often mean we don't have it in time for dinner. But last year, I came across Fast, Easy Bread via I'm Topsy TurvyFast, Easy Bread offers recipes for homemade bread, rolls, and pizza dough in less than an hour (including baking time!).

Last night, I realized I had no bread in the house to go with my baked ziti (adapted from this baked ziti recipe, but with cottage cheese instead of ricotta and homemade tomato sauce—this is why I'm a slow cook!). If I'd had two hours, I would've made French bread. But I had <30 minutes, so I turned to Fast, Easy Bread and put the fastest of their free recipes to the test: breadsticks.


Ingredients:

  • 2 1/2 cups unbleached bread flour
  • 2 Tbsp sugar
  • 1/2 tsp salt
  • 1 Tbsp SAF-instant premium yeast - (available in FEB's Homemade Pizza Bundle; I use regular yeast)
  • 1 tsp Liquid Soy Lecithin - (available in FEB's Homemade Pizza Bundle; I got mine at the grocery store)
  • 1 cups hot/warm water

Instructions:
1. Mix dry ingredients, including yeast.
2. Make 1 dimple in dry ingredients with tsp. Squeeze lecithin to fill the dimple. Add water slowly, add 3/4 cup and then the remaining 1/4 cup [I'm bad and just dump the whole thing in, aiming for the lecithin to try to break it up]. Mix for 1 minute and check consistency. The dough mixer should be sticky and pull itself off bowl.
3. Mix/knead in mixer on medium setting for 5 minutes or knead for 5 minutes by hand.
4. Spray counter and hands with cooking spray and knead for a few seconds to form smooth ball.
5. Roll dough out into a circle if using pizza stone or into a rectangle if using a cookie sheet
6. Spray cookie sheet and place rolled dough on sheet or pizza stone. [The recipe says it should rise for 10 minutes but doesn't say when to do that. I recommend doing it here, but I skipped the rising and they turned out fine.]
7. Cut dough down the center and into inch strips
8. Bake at 350 for 15 minutes.

I'm generally a very slow cook, so I'm the ultimate test for this recipe. But within fifteen minutes I had this:


I skipped rising because their pizza dough recipe doesn't require rising, and I didn't need them much fluffier than that. I left them in the oven for about 20 minutes (getting other things ready for dinner).

Yum!

Potholder Purse Packet

At our church's Women's Day, which I wrote about last week, a sweet little elderly lady wanted to show me something she had made. I was kind of busy making sure that everyone was transitioning to the next activity, but since I love this little lady, I stopped to look.
Her idea was really quite cute. She insisted that I keep it, and the extra buttons to make more. I let one of the people I was working with take it home, so I had to make one to share with you today.

It is so fast to make! Just start with an ordinary potholder.


Next layer 8 - 10 ziplock type sandwich bags on the backside of the potholder. Alternate which side the zipper is on. (You could use snack size, but I was afraid they wouldn't be roomy enough.)

Notice how the zippers alternate, one on the left the next on the right.

I clamped my bags with clothespins, then drew a line in the center. Just make sure your bags are straight and that they are not hanging off any edge.

Now you are ready to sew. Be sure to back tack both ends.
Trim off the part of the bag that cannot be opened. (If you use snack sized bags you can skip this step.)
Sew on a button that opposite of the hanging loop already on the potholder.

That's it!
You can fill the baggies with whatever you will need: medicine, bandaids, pencil and paper, sewing kit, wet wipes, change.


This could be a great little quiet activity for kids-- fill the baggies with kid-friendly things like crayons, gum, tiny books, etc.

Homemade Costume Ideas

It's about time to decide on a Halloween costume. We love great costumes. Here are some ideas we've shared:
Brooke, her husband, Jasmine and PB were X-Men:  
Storm, Cyclops, Rogue and Professor Xavier 


Brooke made that little suit! Cute huh? 


Jordan's clan also did family costumes, and she made her daughter's princess dress:


Jaime and her husband were characters from Harry Potter: Professor Trelawny and Snape


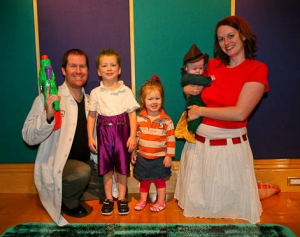
On Jordan's personal blog, she also has an AWESOME list of family costume ideas. Plus more great costume ideas if you are expecting. Look, they're Phineas and Ferb!


Hope you've gotten a little inspiration!

What are you going to be?

Related Posts Plugin for WordPress, Blogger...



